How to create a website using WordPress/How to use plugins/No-code construction blog

How to register students for online courses with Lifter LMS
At HanamiWEB Online School,
●Ask questions in real-time in the virtual study room!
●Ask as many questions as you want via chat!
●E-learning materials that you can learn as much as you want, 24 hours a day!
All included for just 2,500 yen/month!
I am a WordPress instructor, and I often have the opportunity to teach the same content, such as how to get started with WordPress and how to use WordPress. I came to know about the Learning Management System (LMS) because I thought it would be nice if my customers could learn through e-learning.
I also learned that you can get started for free by using a WordPress plugin, and this time I'll explain how to install a plugin called Lifter LMS. This is a recommended plugin for those who want to provide a higher level of education by taking lessons and courses online.
Today we will be introducing how to register as a student!
This time, I will introduce how to create an LMS using Amelia, a plugin that allows you to build a reservation management system using WordPress.
About the types of courses
The course plan includes
- Free Plan
- Paid Plans
There are two types.
- One-time offer
- Subscription-type plans
There are two patterns:
You can set expiration dates and offer discounted rates to certain people.
Lifter LMS allows you to create up to six different plans.
Setting the Japanese Yen Display
Click [LitderLMS] > [Setting].

Set the currency option in Japanese yen under [Currency Options] in the [Checkout] section.

Setting up a payment method
The LifterLMS free plan allows you to make offline payments that are not automatic.
Offline payment is a method in which you make a bank transfer after applying, or you make the payment manually by sending a payment link such as Stripe after applying.
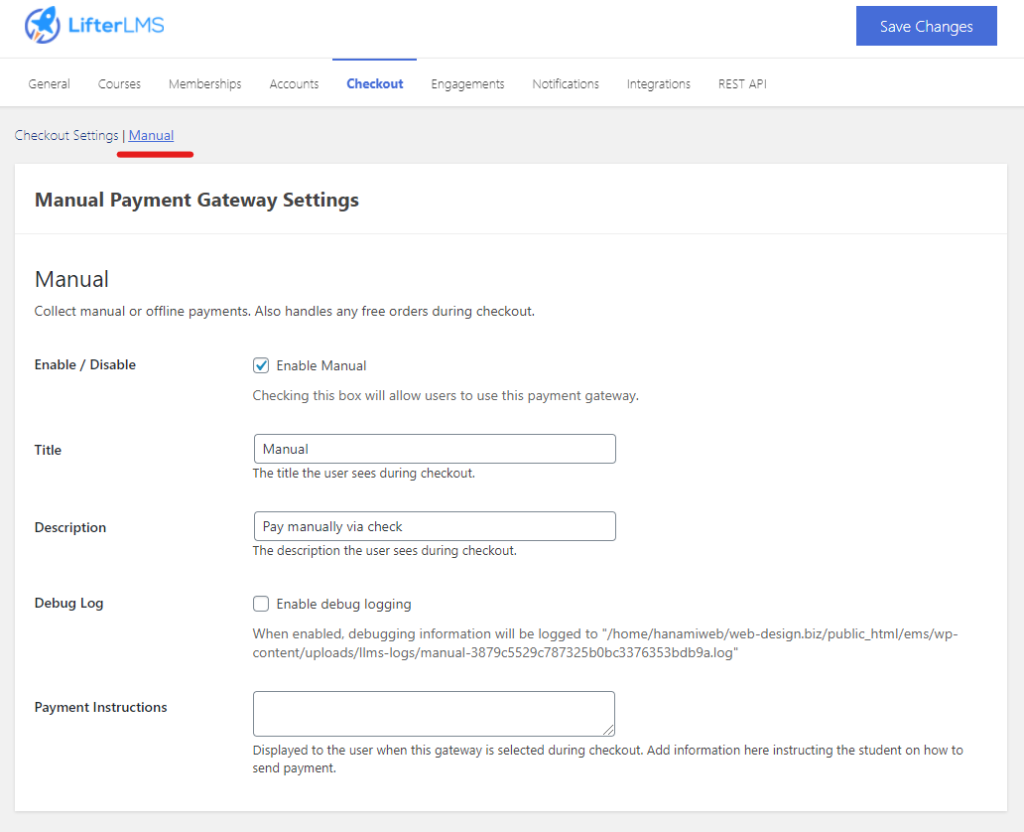
Go to [LifterLMS] > [Setting] and click [Checkout] tab [Manual].

- Enable/Disable - Check to enable offline payment.
- Title - Enter the title that will be displayed on the user's payment screen
- Description – Enter the description that will be displayed to users on the payment screen.
- Debug Log - If checked, the debug log will be saved to the specified file on the server.
- Payment Instructions – Enter the details regarding your payment method.
Once you have entered the required information, click [Save Changes].
Display the course application screen
Title: Bank transfer
Description: Please pay by bank transfer
is reflected.

The information you entered in the Payment Instructions will be displayed as shown below once you click [Buy Now] on the screen above to complete your application.

How to register for a course plan
Click [Courses] > [Courses] to display a list of courses you have created.
Click [Edit] for the course for which you want to create a course plan.

Register your course plan
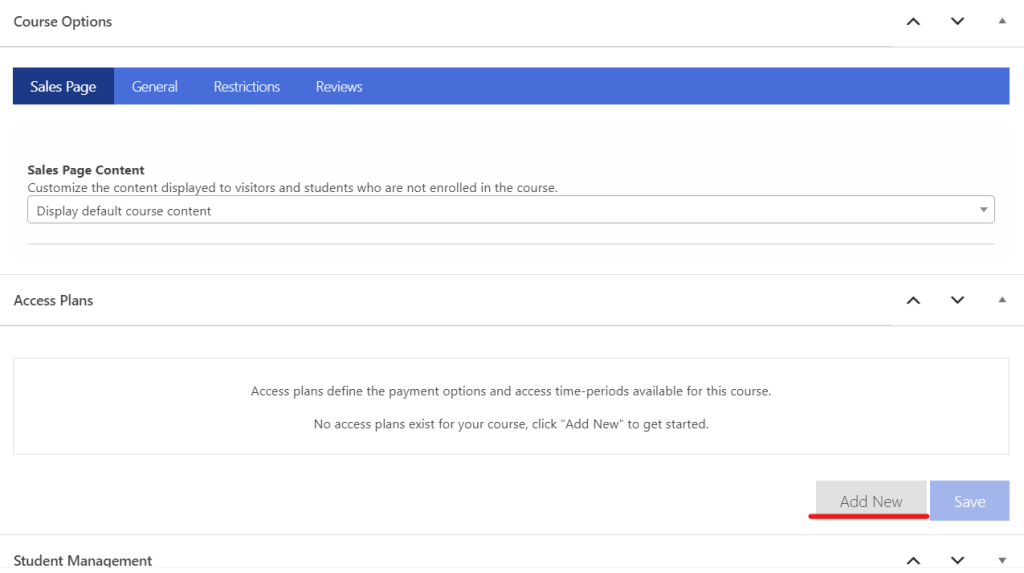
Under [Access Plan], click [Add New].
This item is located at the bottom of the editor where you enter text.

How to register for the free plan
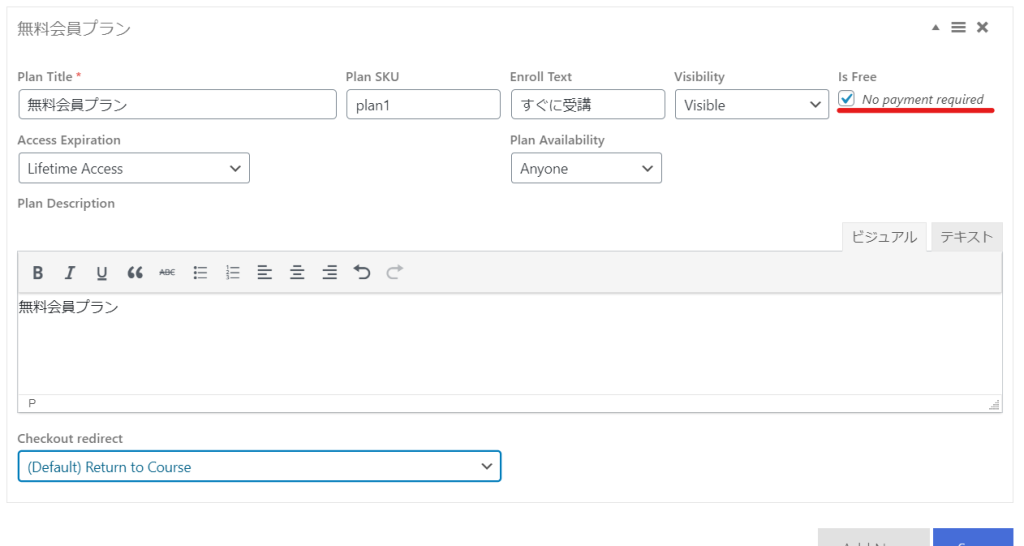
Check [Is Free].

Plan Title
Enter a title for your plan
Plan SKU
Enter the string to manage your course plan.
Enroll Text
Enter the text to be displayed on the button. In this example, I entered the text [Enroll Now].
Visibility
Set the display settings for the price list
- Visibility – Display on price list
- Hidden - Not shown in the price list. Anyone who knows the URL can sign up for a membership plan.
- Futures – Highlight your plans in the price list
Access Exporation
Decide the membership period for your course plan
- Lifetime Access - No time limit
- Expires After - Set the expiration date in days, weeks, months, or years
- Expires on - Set a deadline by specifying a date
Plan Availability
Decide who can enroll
- Anyone – Anyone can register
- Member Only - Registration is available only to members. You can also select the type of membership.
By setting it to Member Only, you can offer a special price course plan only to members.
Free Text
You can freely write an introduction for your course plan.
Finally, click [Save] to save.
Free plan displayed on course page
The free membership plan is now displayed on the course overview page.

Register a paid plan
In the [Access Plans] section, click [Add New].

Register your paid plan information
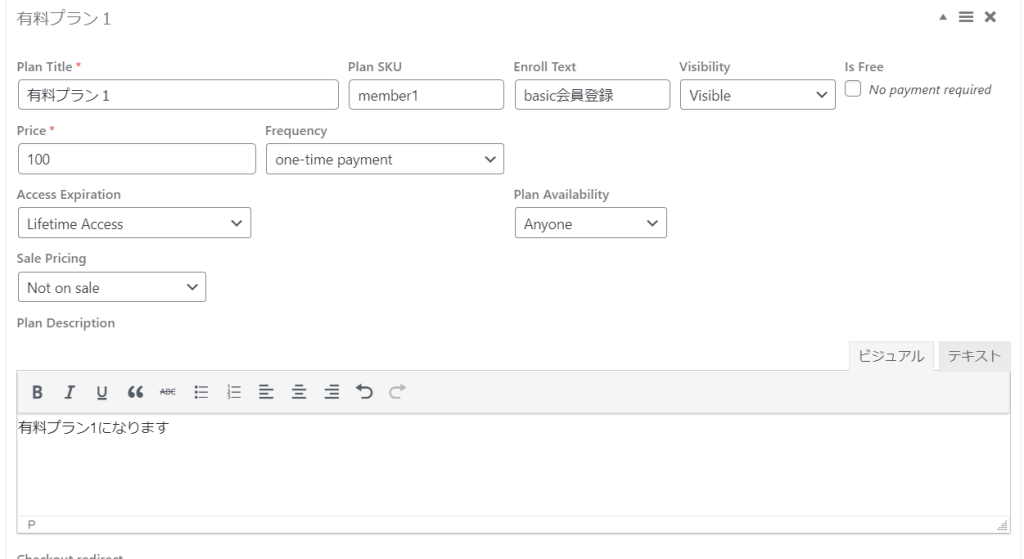
This is a paid plan registration, so please do not check [In Free].

Plan Title
Enter a title for the course plan.
Plan SKU
Enter the identification string for the course plan.
Enroll Text
Enter the text to be displayed on the course plan registration button.
Visibility
Set the display settings for the price list.
- Visibility – Display in price list
- Hidden - Display in the price list. Anyone who knows the URL can register.
- Features – Make your price list stand out
Price
Set the price for the course plan.
Frequency
Set the timing of your payment
- One time payment
- every
- every 2nd
- every 3rd
- every 4th
- every 5th
- every 6th
Access Expiration
Decide the expiration date of your course plan
- Lifetime Access - No time limit
- Expires After - You can set the expiration date in days, weeks, months, or years.
- Expires on - You can set the expiration date.
Plan Availability
Set who can register the course plan
- Anyone – Anyone can register
- Memberships Only - By making it exclusive to members, you can offer it at a special price only to members.
Sale Pricing
We can offer discounted services for a limited time.
- No Sales
- On Sales – Set the sale price, start date, and end date
Plan description
Finally, enter a description for this course plan.
Click [Save].
Paid plans now displayed in the price list
A paid plan has been added to the price list along with the free plan you initially signed up for.

How to register
Take the course now

Released as soon as the next morning! Weekends and holidays are also available!
Super rush website creation plan
We offer a rush website creation plan for those who need a website in a hurry!
We can publish your content as soon as the next morning, even on weekends and holidays! If you have any questions, please check the details below!
Latest Articles


