How to create a website using WordPress/How to use plugins/No-code construction blog
A free Japanese WordPress plugin that allows you to make calendar reservations for accommodation and events [Booking Package SAASPROJECT]
At HanamiWEB Online School,
●Ask questions in real-time in the virtual study room!
●Ask as many questions as you want via chat!
●E-learning materials that you can learn as much as you want, 24 hours a day!
All included for just 2,500 yen/month!
Available in Japanese! "Booking Package SAASPROJECT" is a free reservation system plugin for WordPress blogs that is ideal for booking accommodations such as hotels and campsites.We will explain the functions and settings in an easy-to-understand manner, even for beginners!
At hanami-web, we are conducting research into reservation plugins, which have been installed over 5,000 times.
"Booking Package SAASPROJECT" also offers paid plans, but many of its features can be used for free.
Today I would like to introduce how to use the free plan!
Are there any other plug-ins I can use, even if they are paid?
I get a lot of questions like this. What we've been doing recently on our client's site isHbook is a one-time purchase paid pluginis.
・Seasonal rates
・Price per room
・Online payment
・Email customization
You can do a lot of things like that. Best of all, the license is a one-time purchase, so I recommend it!
Benefits of the free Japanese reservation system plugin "Booking Package SAASPROJECT" that can be used on WordPress blogs
The biggest advantage is that you can make reservations with overnight stays free of charge. You can also set prices for children. Not only overnight stays, but you can also make reservations smoothly from the event calendar.
You can also set a Google Analytics tracking ID to perform analysis.
What payment method do you care about?
Since this is not supported in the free plan, another option is to send Stripe payment instructions via PayPal when you send the reservation completion email.
First, let us show you the process (movie) for making an actual reservation!
The free WordPress reservation system plugin "Booking Package SAASPROJECT"
● "Event" type where you select the date and time from the calendar to make a reservation
- "Hotel" type for bookings involving overnight stays
There are two ways to make a reservation.
"Event" type (movie) where you select a date and time from the calendar to make a reservation

- Select the desired date from the calendar
- Choose the time you want
- Enter your name, email address, and phone number
- Once the reservation is complete, an automatic reply email and a reservation notification email will be sent to the administrator.
Customers can choose a date and time within the set business hours, so it's also great for making reservations at salons and beauty parlors!
"Hotel" type (movie) for making reservations including overnight stays
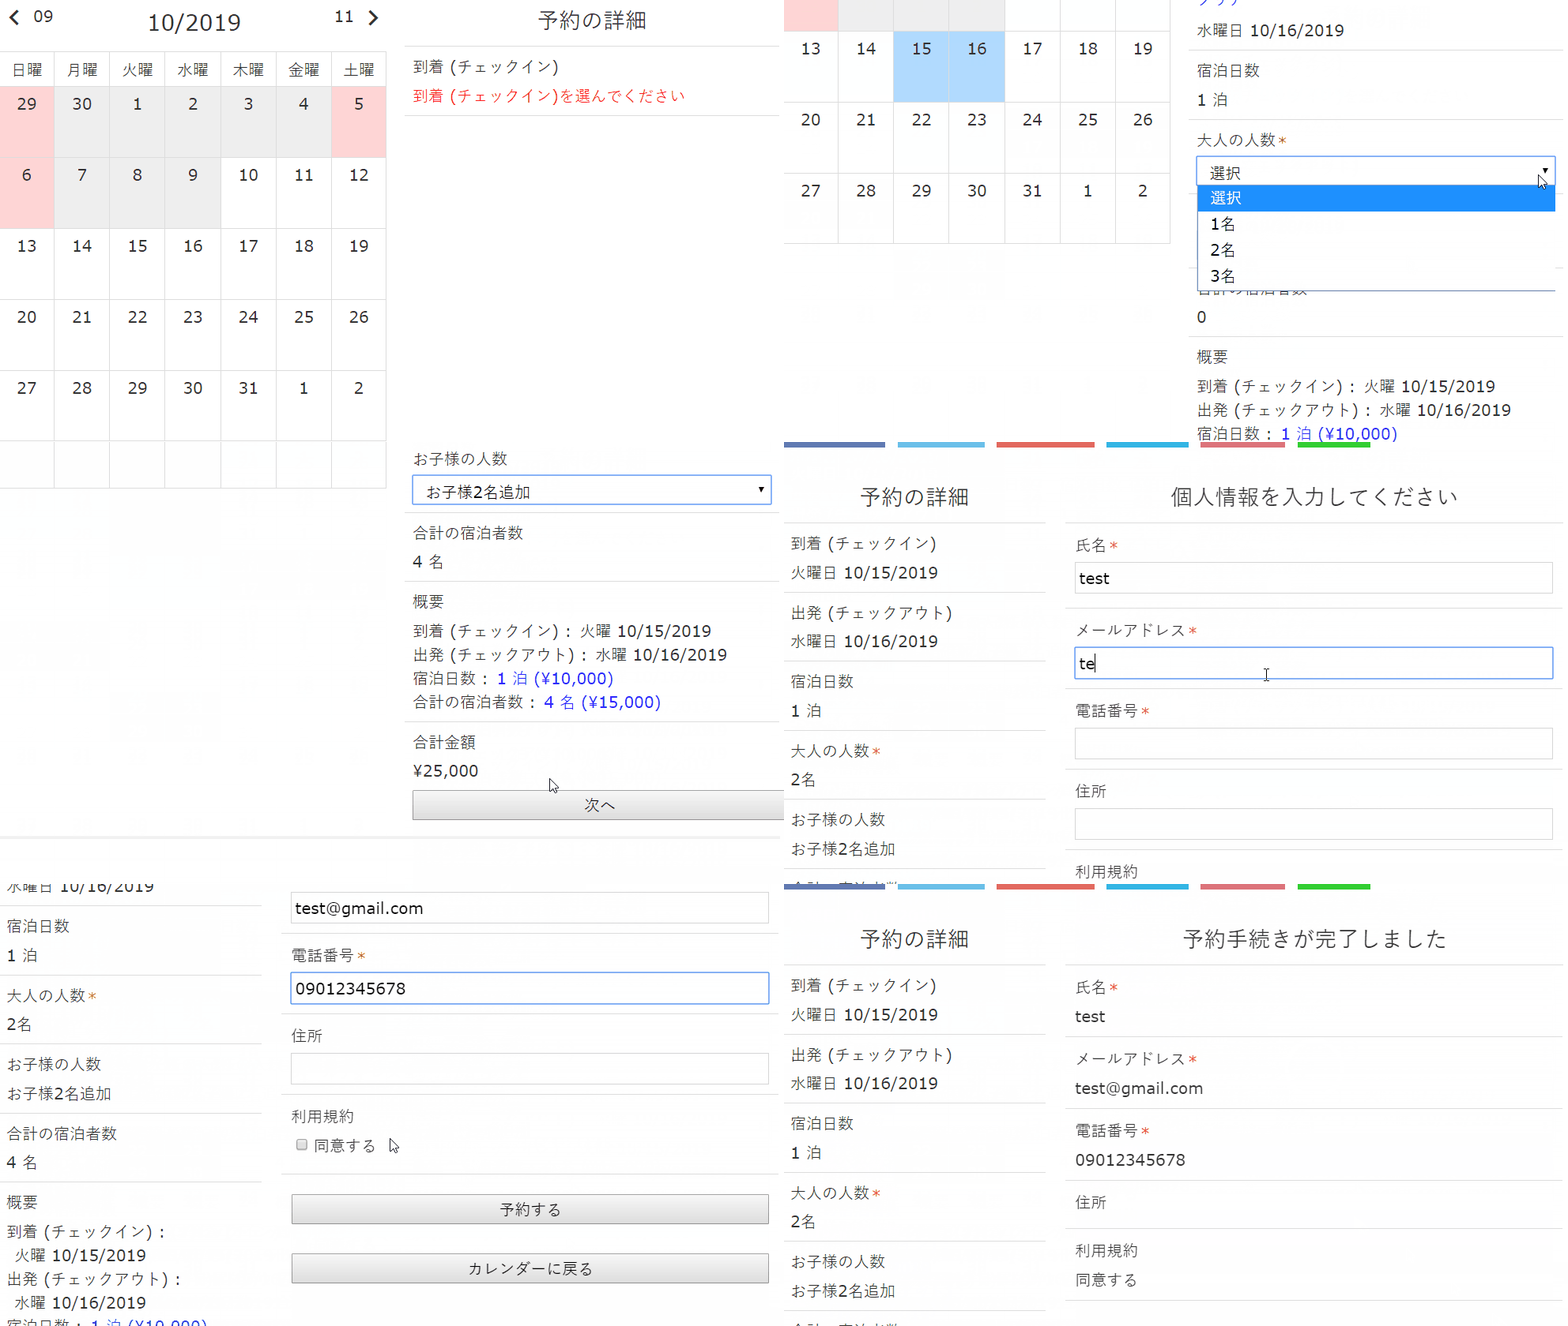
- Select the date you want to check in
- Select the check-out date
- Select the number of adults and children
- Enter your name, email address, and phone number
- Once the reservation is complete, an automatic reply email and a reservation notification email will be sent to the administrator.
You can set the amount by day. Perfect for hotels, campsites, etc.!
What type of industry is a free booking system plugin suitable for WordPress blogs?
The free reservation system plugin "Booking Package SAASPROJECT" that can be used with WordPress blogs has an "event" type that allows you to set business hours and let customers make reservations at any time within those hours, so reservations can be completed within 24 hours.Salons and beauty salonsI think this is a great reservation system plugin for things like this!
There is also a "hotel" type for hotels and campsites that require overnight stays!
In both cases, you can easily display a calendar using a shortcode.
How to set up the free reservation system plugin "Booking Package SAASPROJECT" that can be used with WordPress
From here, we will use screen captures to explain how to set up the free Booking Package SAASPROJECT.
How to install
Go to “Plugins” > “Add New” > Search for “Booking Package SAASPROJECT”. Click “Install”.
Then click Enable.
Once enabled, an item called [Booking Package] will be added to the left sidebar of the dashboard.
setting
First, we will explain "Booking Package" > "General Settings" in the newly added dashboard.
・Mailgun
・Stripe
・Paypal
You can implement payment.
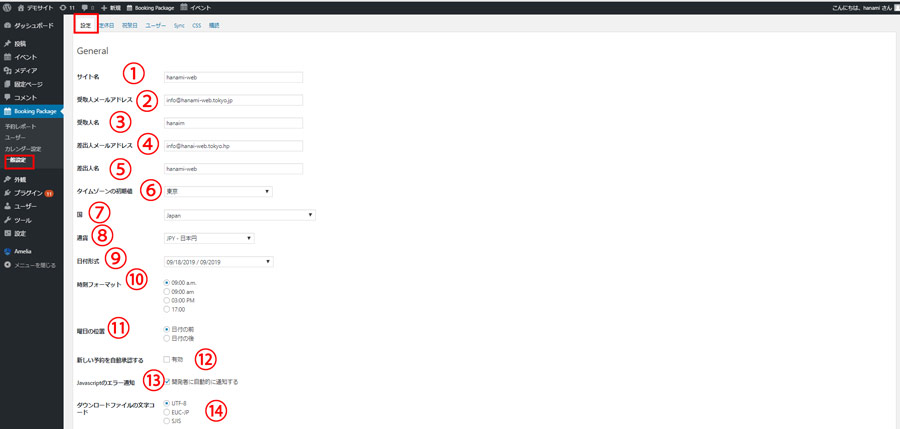
- Site name
- Recipient email address - Set the email address that will receive the reservation email.
- Recipient Name – Set the name of the recipient who will receive the reservation email.
- Sender email address - Set the sender email address for emails sent to customers when they make a reservation.
- Sender name - Set the sender name for emails sent to customers when they make a reservation.
- Set the initial time zone to Tokyo.
- Country – Set Japan.
- Currency - Set JUY - Japanese Yen.
- Date Format – Select your preferred format.
- Time Format – Select your preferred format.
- Day Position – Choose your preferred position.
- Automatically confirm new bookings – Check this box if you want reservations to be automatically confirmed.
- Javascript Error Notifications - Check this box if you want to receive error notifications.
- Download file character code – Select UTF-8.
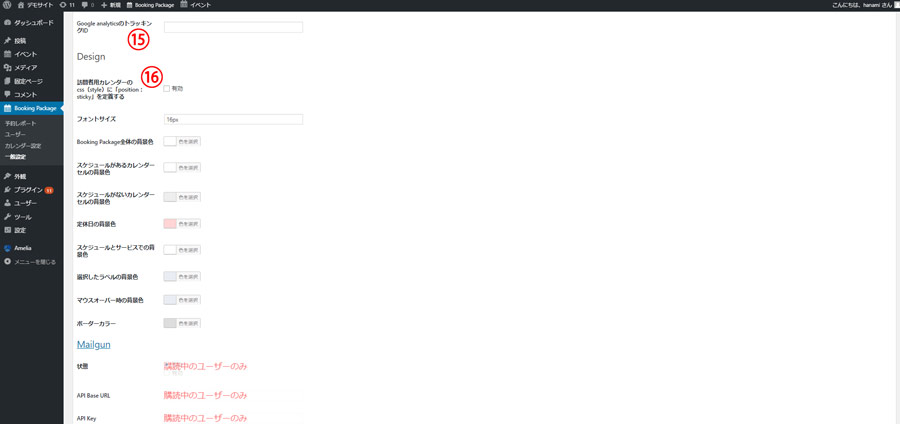
- Google Analytics Tracking ID - Enter the ID if you want to track.
- Design – You can customize each design.
Click Save Settings.
Setting regular holidays
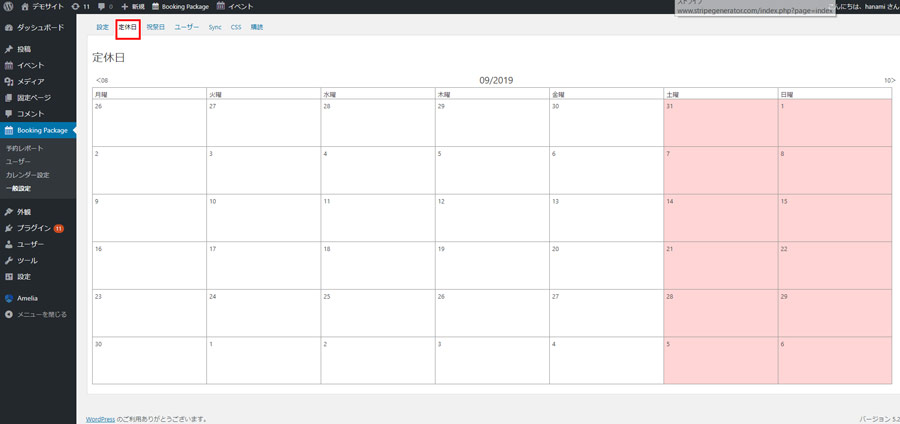
[General Settings] > [Closed Days]
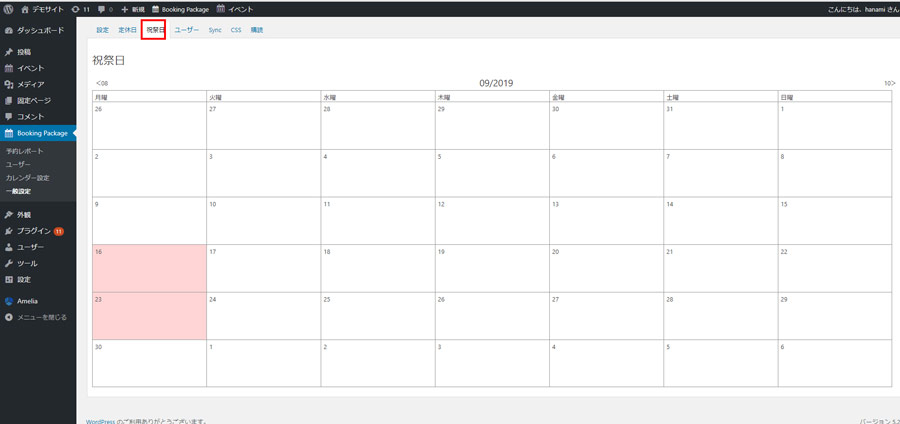
Select the day you want to make a holiday.
Setting Holidays
Select the holiday.
User Setting
[General Settings] > [User]
You can set up a user account.
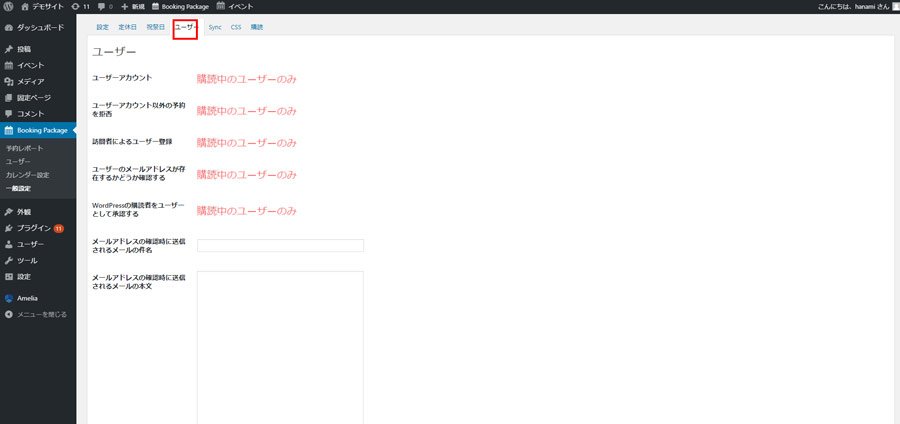
- The subject of the email sent when you confirm your email address
- The text of the email sent when confirming your email address
This seems to be a feature only available in the paid version, as I was unable to register.
iCal Settings
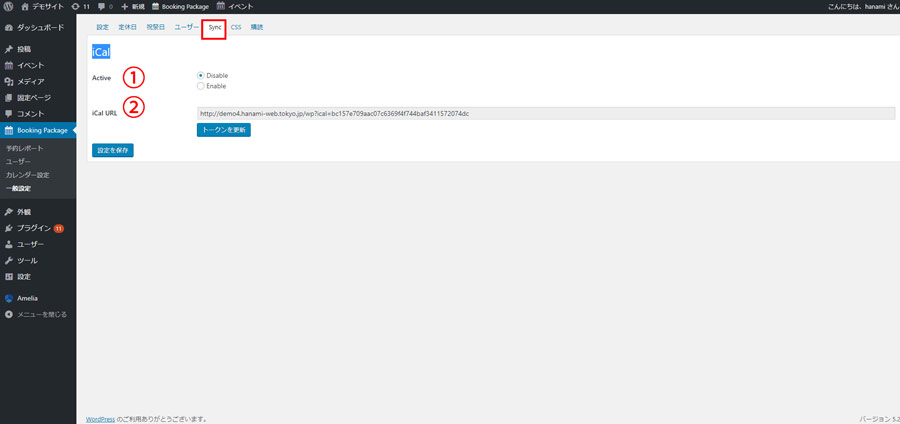
[General Settings] > [Sync]
If you want to use iCal format data integration to automatically share calendars and schedules, you need to set it up.
- Active - Select Enable if you want to use it.
- iCal URL - If you want to use it, enter the URL.
Click Save Settings.
Advanced Design Customization
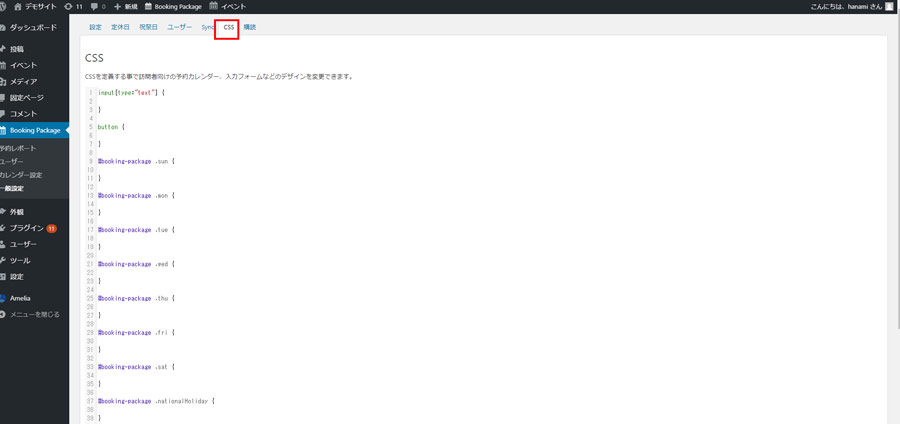
[General Settings] > [CSS]
You can customize the design freely by adding CSS.
Click Save.
Paid version
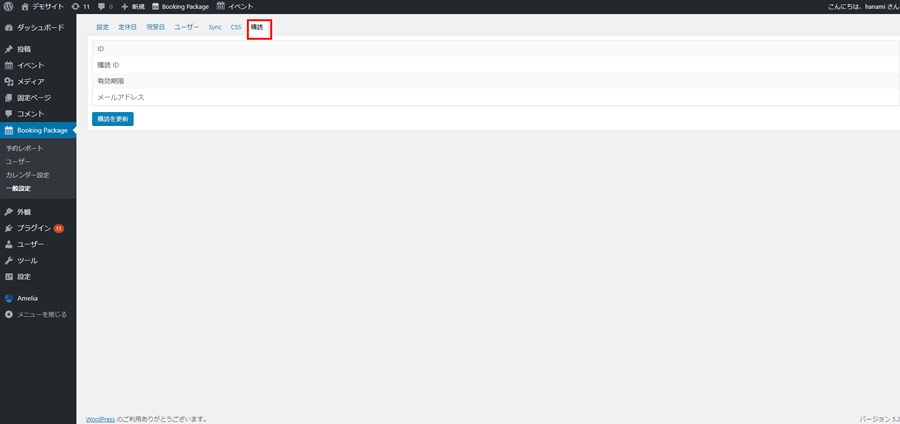
[General Settings] > [Subscriptions]
If you have purchased the paid version, you can check here.
Calendar settings
[Calendar settings] > [Add new calendar]
There are so many items to set.
● A type for salons and schools that completes reservations within 24 hours
● Accommodation types for hotels and camping
You can create two types of calendars.
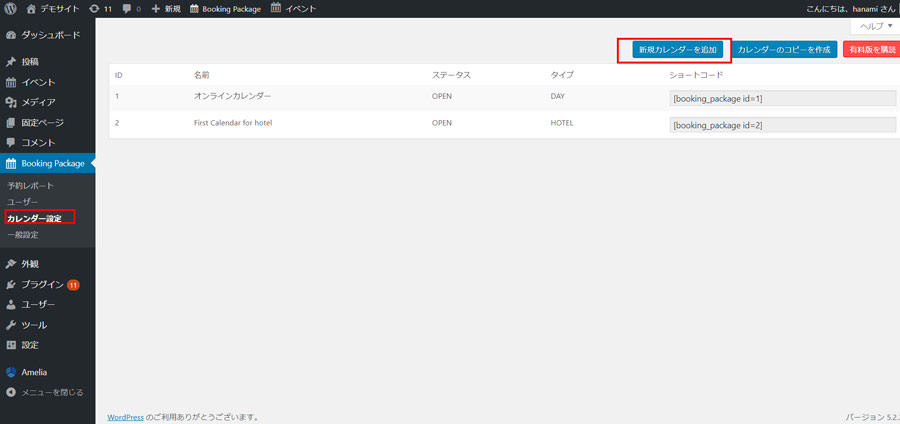
- Name - Give your calendar a name
- Reservation Type - Choose a reservation that will be completed within 24 hours (air salon, school, tour, etc.) or accommodation (for hotels and campsites). The items that can be set will change depending on the type you choose.
- Recipient email address – This is the email address that will be sent when a reservation is made.
- Sender name - Set the sender name for emails sent to customers when they make a reservation.
- Sender email address - Set the email address that will be sent to customers when they make a reservation.
- Calendar Status – Choose Public/Private.
- Time Zone – Set to Tokyo.
- Start of week – Set your preferred day of the week.
- Select payment method - You can check this option, but you cannot make payments with Stripe or PayPal unless you have the paid version.
- Accommodation fee - You can enter this when you select the accommodation type.
- Number of available rooms – You can enter this when you select the accommodation type.
- Maximum number of people that can stay in one room - You can enter this when you select the accommodation type.
- Include children in the room capacity - You can enter this when you select accommodation as the reservation type.
- Arrival and Departure Notation - You can enter this information when you select Accommodation as your booking type.
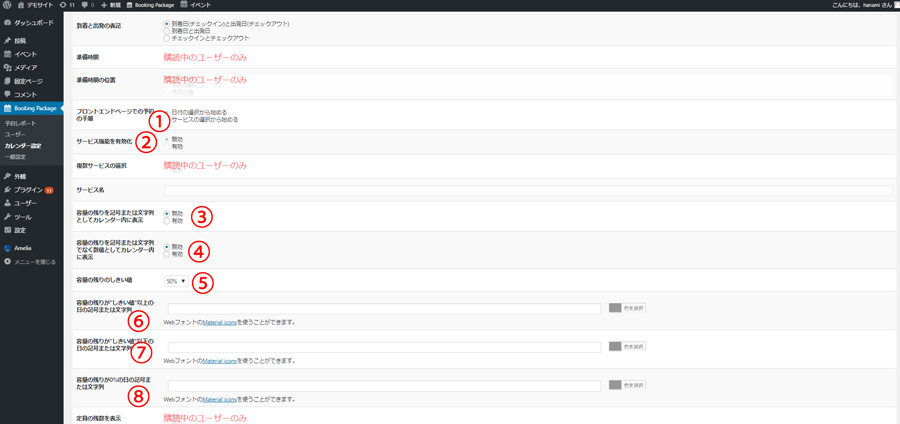
- Booking steps on front-end page - you can choose to start with choosing a date or choosing a service.
- Enable Service Features – Choose Disable/Enable.
- Service Name – Enter the service name.
- Display remaining space as a symbol or text in the calendar – Choose Disable/Enable.
- Display remaining space in the calendar as a number instead of a symbol or string – Choose Disable/Enable.
- Capacity remaining threshold - Set the percentage to display △ etc.
- Set the symbol or string (such as - or O) for the day when the remaining capacity is greater than or equal to the "threshold value."
- Set the symbol or string (such as - or △) for the day when the remaining capacity is below the "threshold value."
- Set the symbol or string "- less" or "×" for the day when the remaining capacity is 0%.
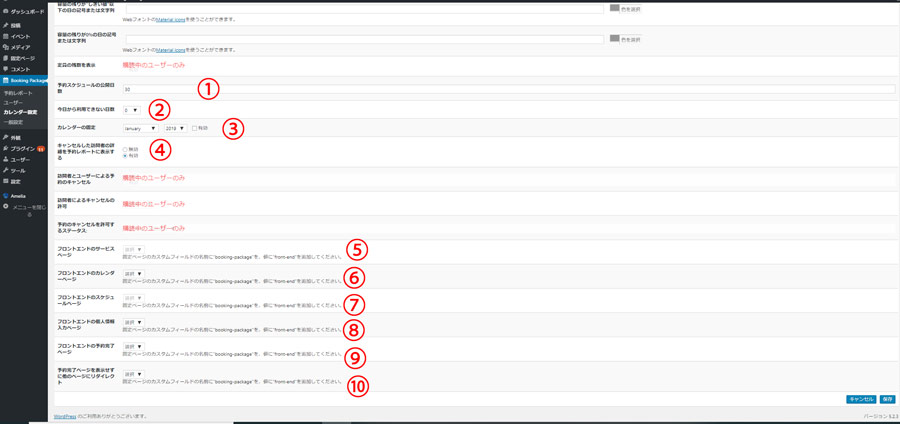
- Number of days to publish the reservation schedule – Enter 30 or 31 for one month. Enter 365 for one year.
- Number of days unavailable from today
- Pinning the calendar
- Show cancelled visitor details in booking report – Choose Disable/Enable.
- Frontend service page
- Frontend Calendar Page
- Front-end schedule page
- Front-end personal information entry page
- Front-end booking confirmation page
- Redirect to another page without displaying the reservation completion page
Finally, click Save.
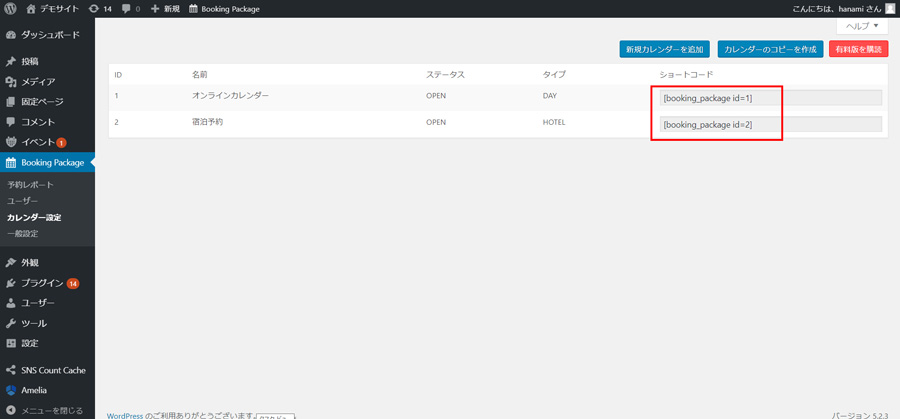
Once the calendar is created
It will be listed in [booking package] < [Calendar settings]. The initial settings include a sample calendar for each of the event type, which can be booked within 24 hours, and the hotel type, which can be booked with overnight stays, so you can also modify those. Paste the shortcode into the area where you want the calendar to appear.
user
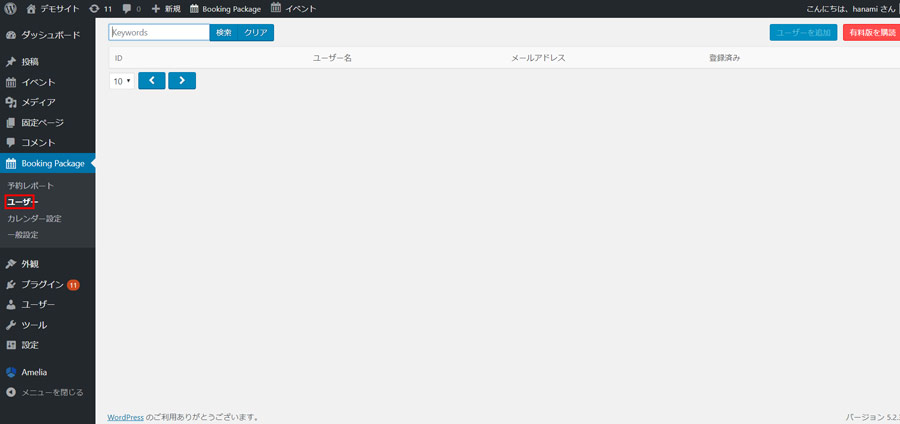
The reserved users are displayed.
Reservation Report
You can see a list of your reservations on the calendar.
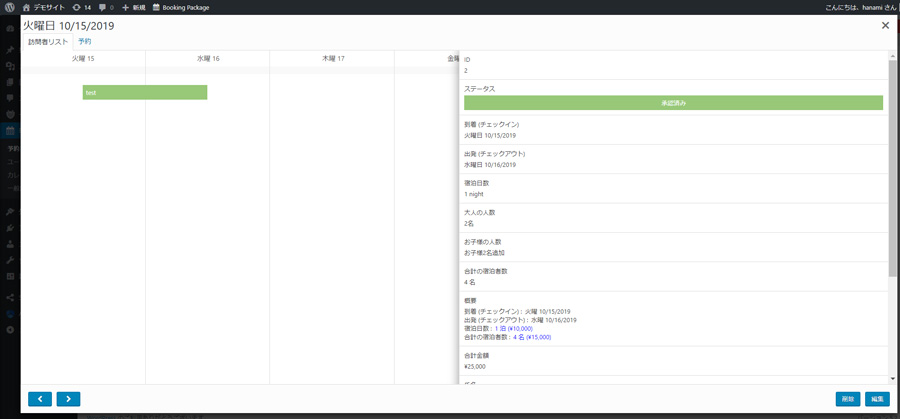
Green: Approved reservations
Yellow: Reservations waiting for approval
Red: Cancel
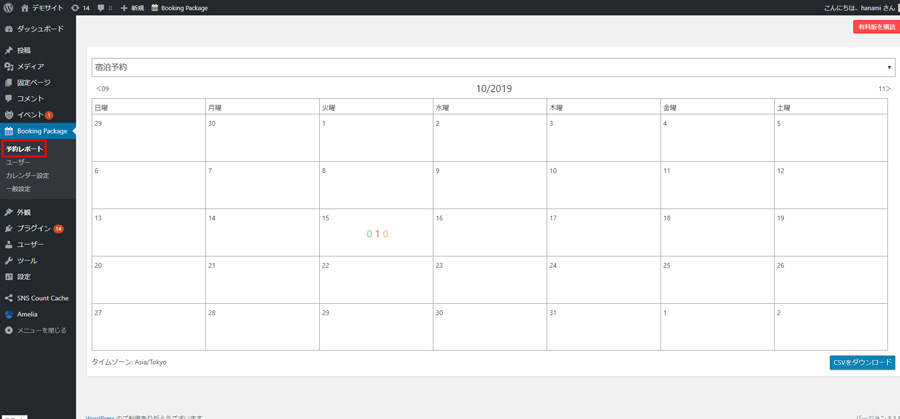
Click on the day that you have an appointment.
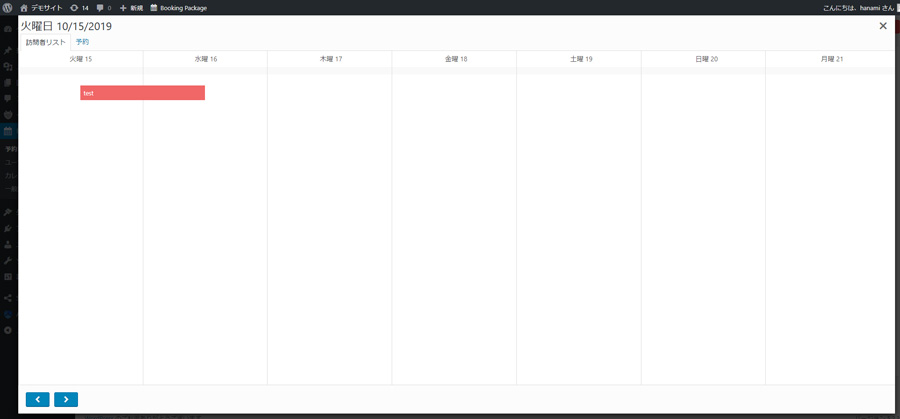
Then click on the reservation section.
The reservation details will be displayed.
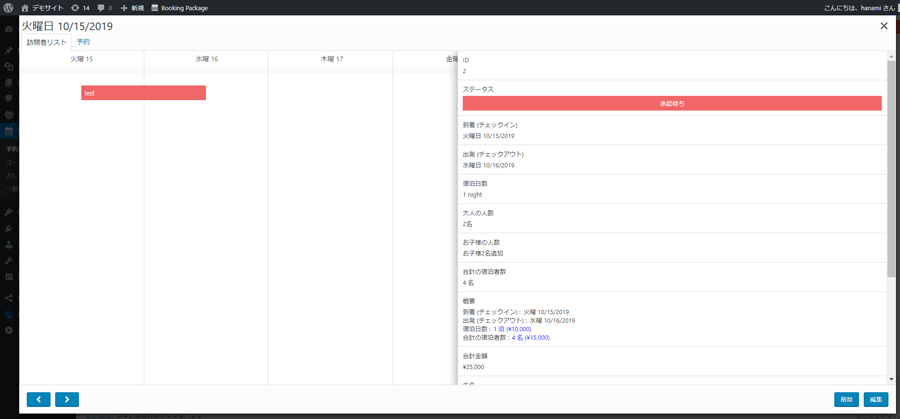
On this screen, click on "Pending Approval".
·approved
- Cancelled
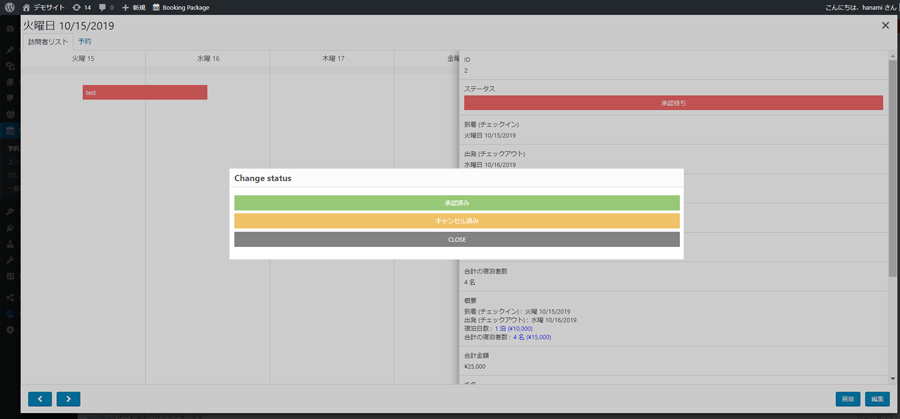
Choose one.
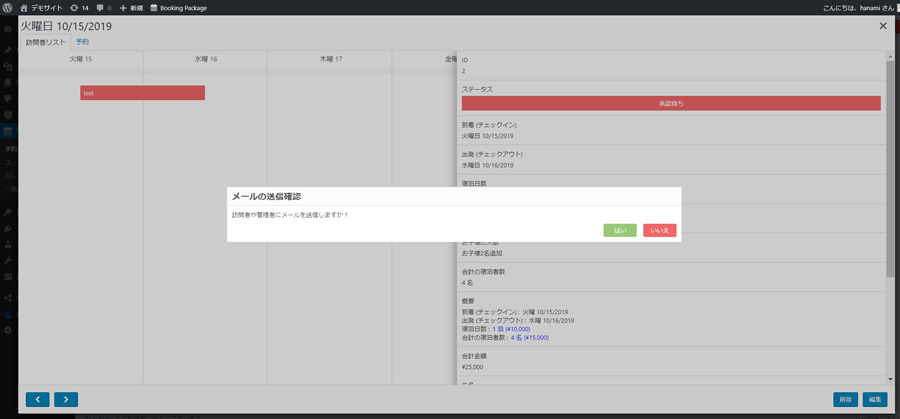
A confirmation screen for sending the approval email will appear. If you want to send the email, click [Yes].
Once approved, the color will change to green, indicating approval.
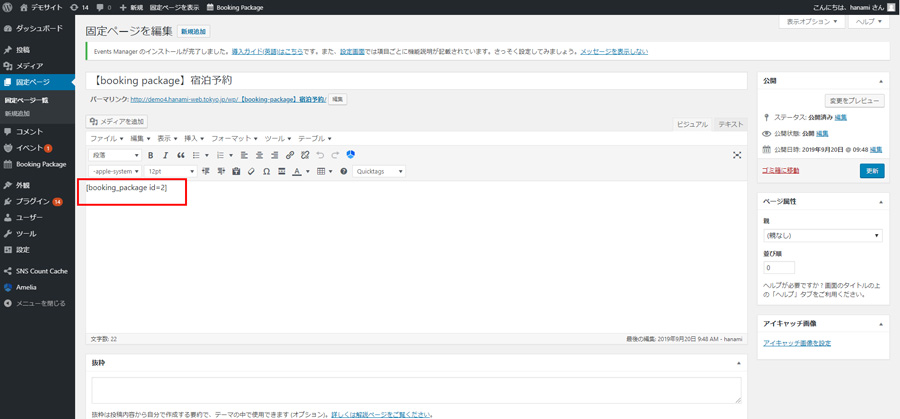
How to insert the booking system plugin "Booking Package SAASPROJECT" on the posting screen
Click booking package > [Calendar settings].
Copy the shortcode you want to use to display the calendar.

Display the page you want to paste.
● "Event" type where you select the date and time from the calendar to make a reservation
You can have a reservation screen like this.

Other Japanese event reservation system plugins
>>Amelia
>>MTS booking system
- "Hotel" type for bookings involving overnight stays

You can have a reservation screen like this.
Other Japanese reservation system plugins that allow you to make hotel reservations
>>MTS booking system
>> Hbook
summary
I think it's great that you can book the number of adults and children when making a reservation. However, since children are all grouped together, you cannot separate the prices for children such as infants and elementary school students. There are many settings that can be configured.
This is a recommended plugin for those who want to automatically complete hotel reservations on their homepage!
This article introduces the specifications as of September 2019.
WordPress individual lessons available
Leave your WordPress private lessons to HanamiWEB! Our WordPress private online lessons have been very well received.
Released as soon as the next morning! Weekends and holidays are also available!
Super rush website creation plan
We offer a rush website creation plan for those who need a website in a hurry!
We can publish your content as soon as the next morning, even on weekends and holidays! If you have any questions, please check the details below!
Latest Articles
