How to create a website using WordPress/How to use plugins/No-code construction blog


[Illustrated & video explanation] Simple Memberships membership registration plugin - How to change the message -
At HanamiWEB Online School,
●Ask questions in real-time in the virtual study room!
●Ask as many questions as you want via chat!
●E-learning materials that you can learn as much as you want, 24 hours a day!
All included for just 2,500 yen/month!
A WordPress teacher will carefully explain how to set up Simple Memberships, which allows you to easily create a membership site with WordPress and create content exclusive to members!
This time, we will explain how to change the message.
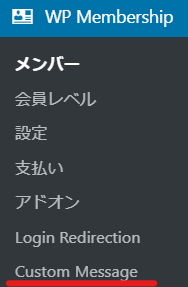
Add new add-on
Download the add-on from the following site and add and activate the new plugin.
https://simple-membership-plugin.com/
Add Custom Message
When you activate the add-on (plugin), [Custom Message] will be added to [WP Membership], and you can set it here.
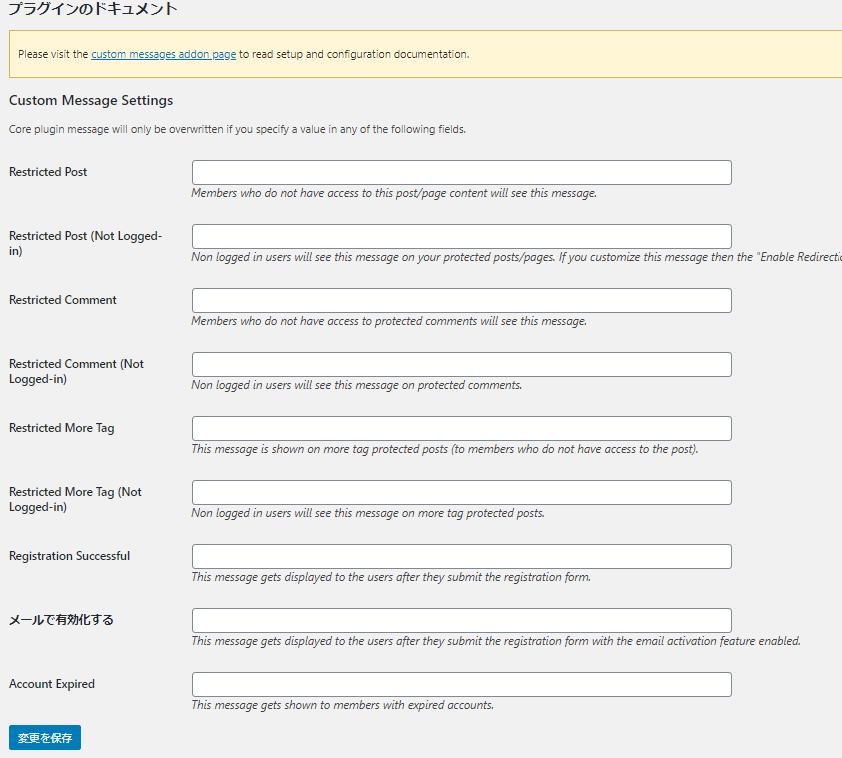
Customizable message list
You can change the message. You can also add HTML syntax at that time, so you can add CSS or add links.
- Restricted Post - A message for users who cannot access a protected page
- Restricted Post (Not Logged-in) – Message for non-logged-in users
- Restricted Comment – A message for users who cannot access protected comments
- Restricted Comment (Not Logged-in)
- Restricted More Tag
- Restricted More Tags (Not Logged-in)
- Registration Successful
- Activate by email
- Account Expired
1. Restricted Post
Message for users without permission to access protected pages

For example, here is the default message:

If you enter the following, it will change to the following:
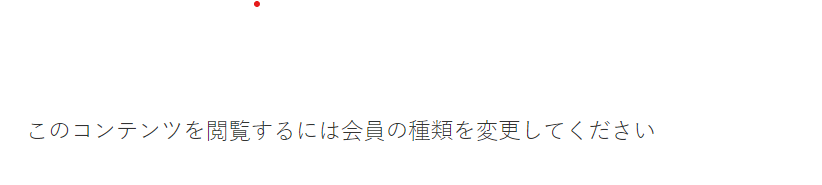
You can also use html syntax here,
<p class="restricted-post">Please change your membership type to view this content</p>You can also enter, etc.
2. Restricted Post (Not Logged-in)
Message for users who are not logged in

Please login is inappropriate in Japanese, so I will edit it as well.
For example,

Enter it like this. At this time, you will probably need links to a login page or a new member registration page (in this case, the paid member registration page). An example is shown below.
You must be logged in to view this content.<a href="/blog/en/membership-login/"> Log in here</a>. <a href="/blog/en/membership-join/">Register Now</a>If you make customizations, the redirect setting after login will no longer work.
3. Restricted Comment
Message for users who cannot access protected comments
4. Restricted Comment (Not Logged-in)
Message displayed to non-logged-in users in protected comments
5. Restricted More Tag
Message for users who cannot access a page with the More tag
1. I think the same settings as Restricted Post are fine.
Below are some example sentences.
<p class="restricted-post">Please change your membership type to view this content</p>6. Restricted More Tags (Not Logged-in)
Message for non-logged-in users on pages with the More tag
2. I think the same settings as Restricted Post (Not Logged-in) will be fine.
Below is an example sentence
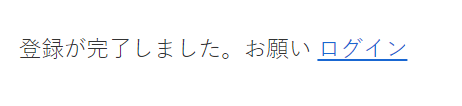
You must be logged in to view this content.<a href="/blog/en/membership-login/"> Log in here</a>. <a href="/blog/en/membership-join/">Register Now</a>7. Registration Successful
The message that is displayed to the user after they complete the registration form
Here are some example sentences.
Registration has been completed.<a href="/blog/en/membership-login/"> Log in here</a>. 8. Activate via email
If you enable the function that allows users to register by clicking the link URL in the auto-response email after registering, this message will be displayed after the user fills out the registration form.

Here are some example sentences.
A confirmation email for your registration has been sent to the email address you registered. Please click on the URL in the email body to complete your registration. If you do not receive the email, please check your spam folder, and if you still have not received it, please contact the administrator.9. Account Expired
Message for expired accounts
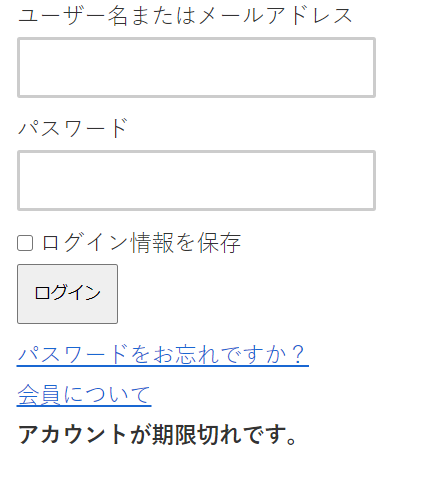
Here is an example sentence.Create an update page for expired usersIt is a good idea to specify the page you created as the link destination.
Your account has expired.<a href="/blog/en/updata/">Update your account</a>Please do.Released as soon as the next morning! Weekends and holidays are also available!
Super rush website creation plan
We offer a rush website creation plan for those who need a website in a hurry!
We can publish your content as soon as the next morning, even on weekends and holidays! If you have any questions, please check the details below!
Latest Articles

Error message: Allowed memory size of 268435456 bytes exhausted (tried to allocate 14684160 bytes) Error: On Lollipop
Explaining the Meta Pixel feature of the paid version of the WordPress booking system plugin Amelia (9.x and later)