How to create a website using WordPress/How to use plugins/No-code construction blog


[2026 Latest Version] How to Set Up Google Workspace × Post SMTP
At HanamiWEB Online School,
●Ask questions in real-time in the virtual study room!
●Ask as many questions as you want via chat!
●E-learning materials that you can learn as much as you want, 24 hours a day!
All included for just 2,500 yen/month!
When using the Post SMTP WordPress plugin with Google Workspace, you can send emails securely and reliably by setting up OAuth authentication.
Currently, Google has disabled password authentication (basic authentication) due to enhanced security measures.
Therefore, OAuth settings are required to send emails from WordPress.
This article explains everything from the PostSMTP setup procedure to troubleshooting errors.
The Post SMTP plugin is highly recommended as it allows you to obtain email logs for free!
This article is written by HanamiWEB Co., Ltd., a company with extensive experience in WordPress development and operation, and provides a practical explanation that is easy for beginners to understand.
What you will learn from this article
- How to integrate Post SMTP with Google Workspace
- OAuth authentication setup procedure
- Troubleshooting steps for when you cannot send an email
What is the PostSMTP plugin?
Post SMTP is a WordPress plugin that allows you to securely send emails via an external SMTP server.
WordPress's standard email sending method has a low delivery rate and is often treated as spam, so SMTP settings are essential.
Why is OAuth authentication necessary?
Google has made the use of OAuth mandatory from 2025 onwards due to enhanced security measures.
Furthermore, Google officially recommends using OAuth-compatible apps.
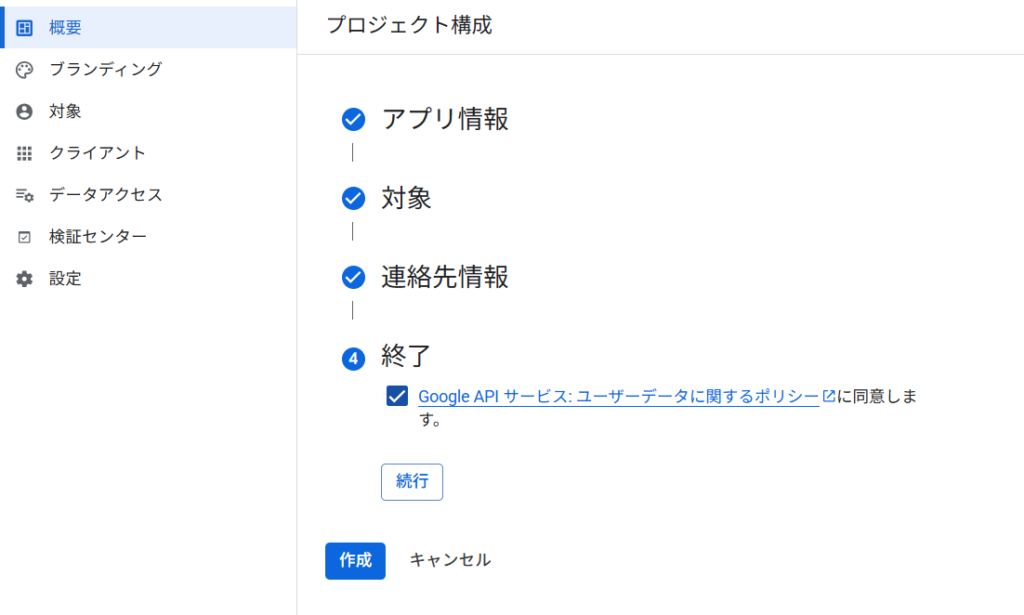
Post SMTP setup procedure (Google Workspace compatible)
- Install Post SMTP
- Create a project in Google Cloud
- Enable the Gmail API
- Obtain the OAuth client ID
- WordPress settings
PostSMTP Plugin Installation Instructions
This guide explains how to configure the PostSMTP plugin for users of Google Workspace.
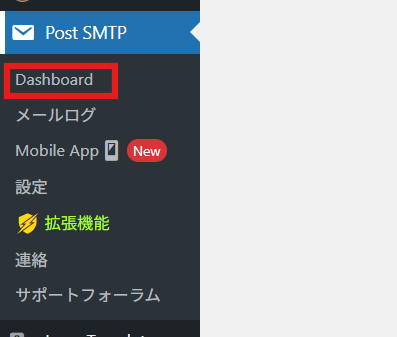
Once you have installed and activated the PostSMTP plugin, a PostSMTP item will appear in the black sidebar on the left.
Click on Dashboard and go to Settings.
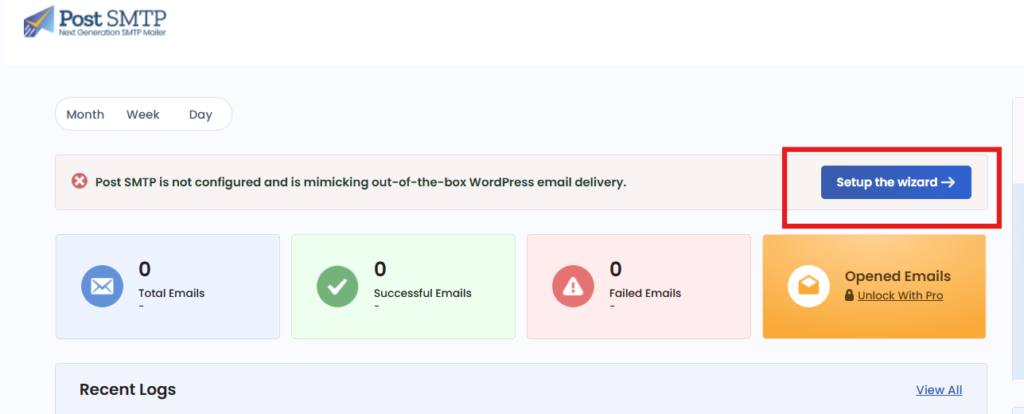
Click Setup the wizard to open the setup screen.
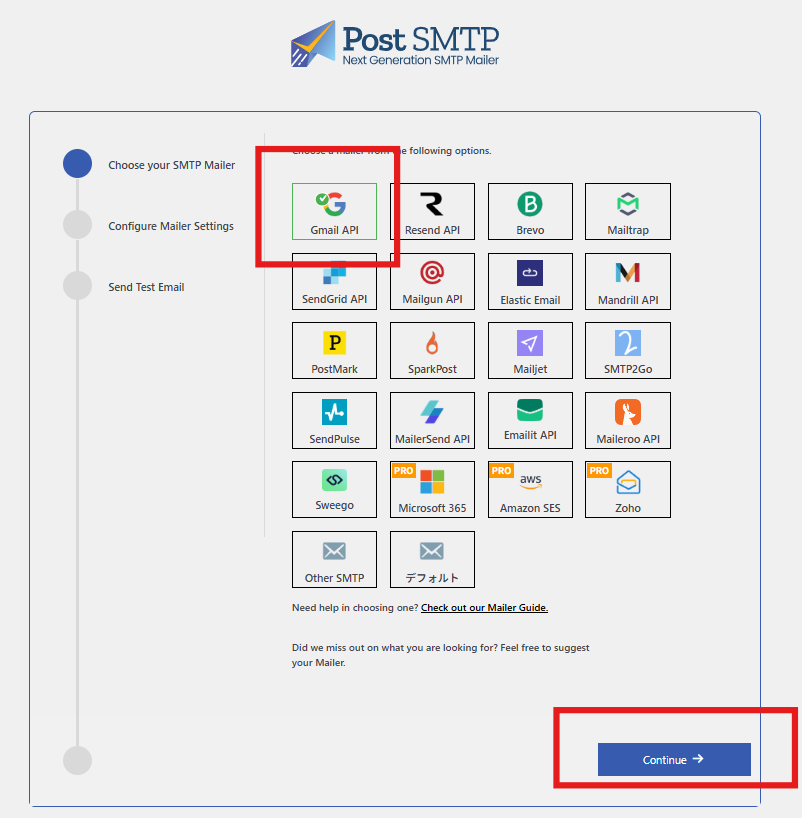
Select Gmail API
Select Gmail API and click the Continue button.
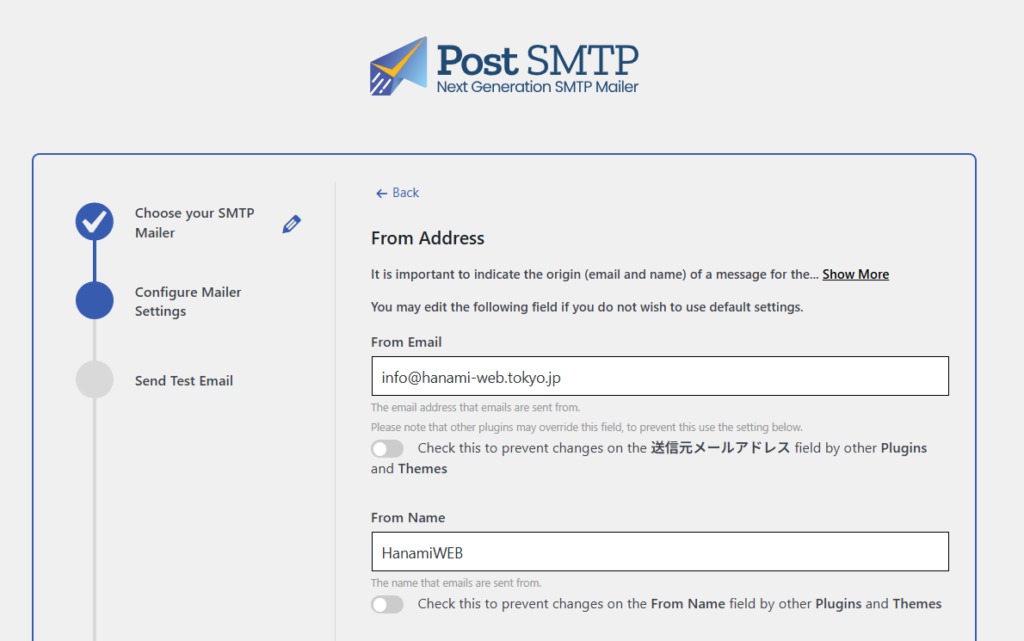
Sender Settings
In From Email, enter the email address of the sender.
From Name: Enter the sender's name.
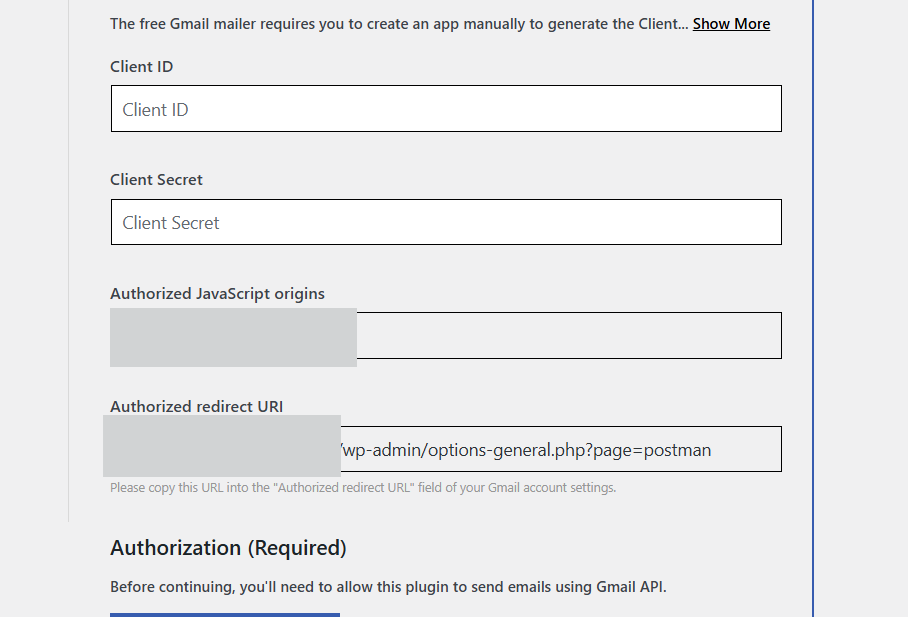
Google API settings
Proceed to set the Client ID and Client Secret at the bottom.
We will use Authorized JavaScript prims and Authorized redirect URLs later.
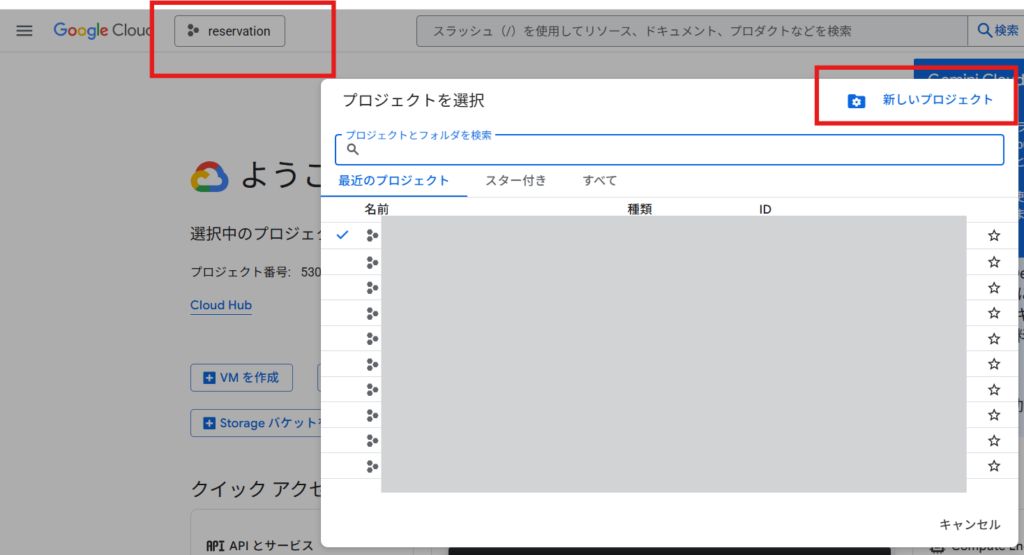
Access the Google Cloud Console and configure it.
Click the project selection box in the upper left and click [New Project] to create a new project.
Added Gmail API
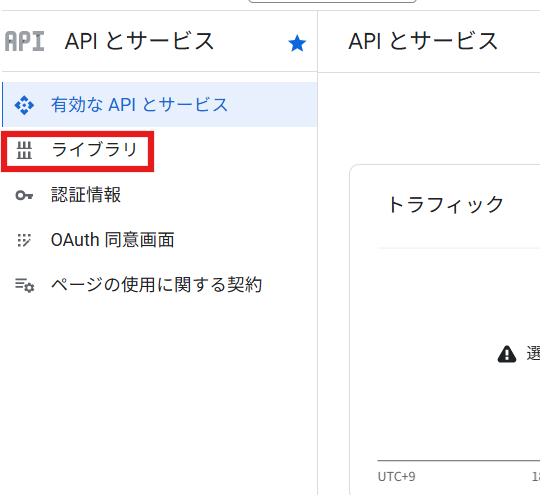
In the left sidebar, under APIs & Services, click Enabled APIs & Services.
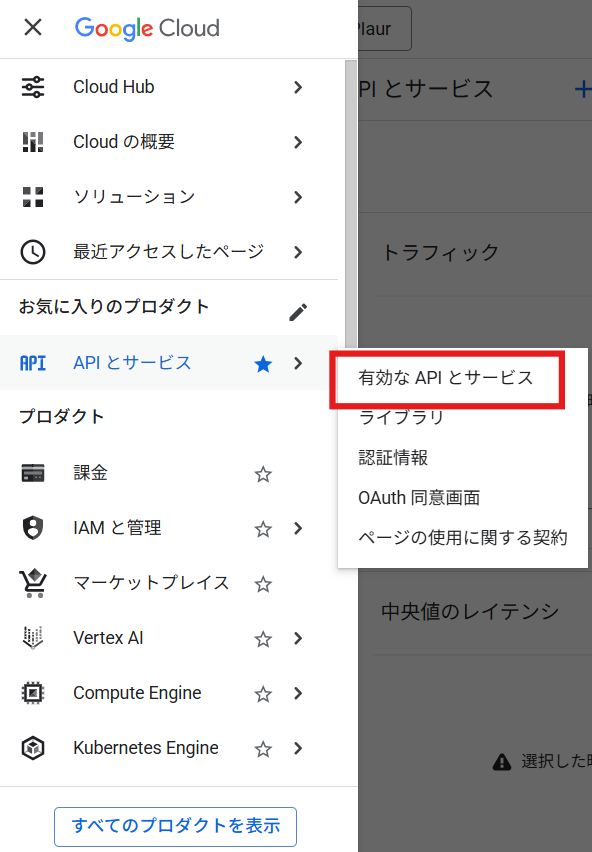
Select the library and enable the Gmail API.
Search using the Gmail API.
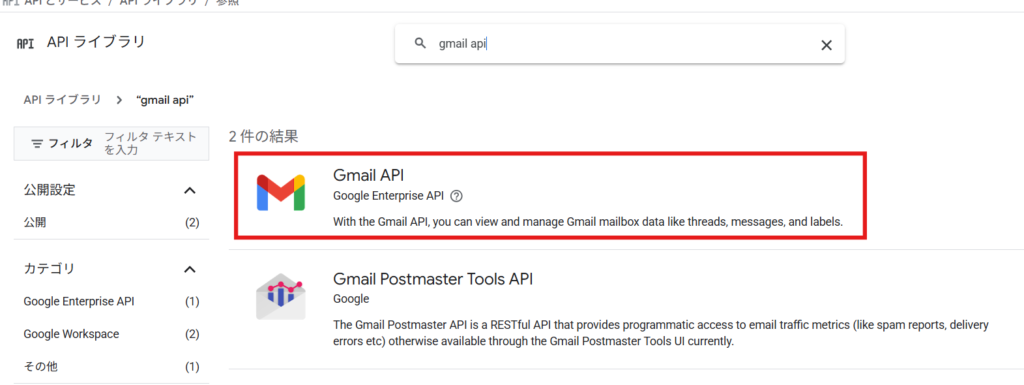
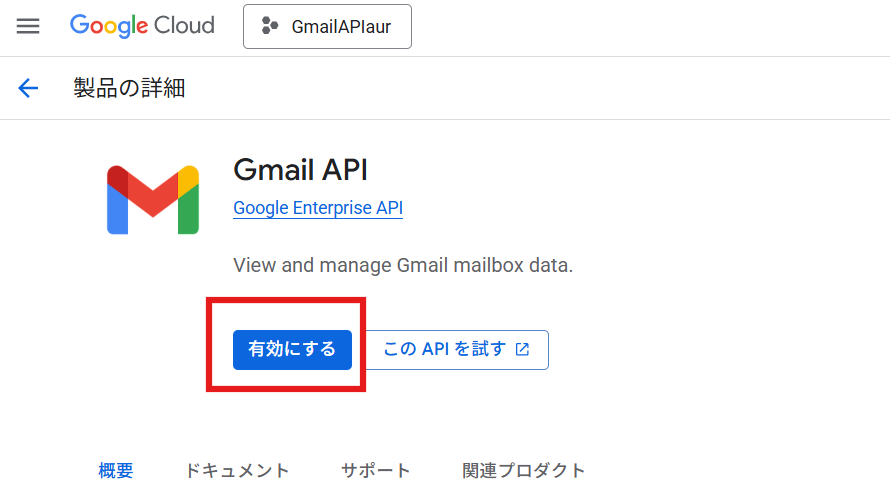
Enable it.
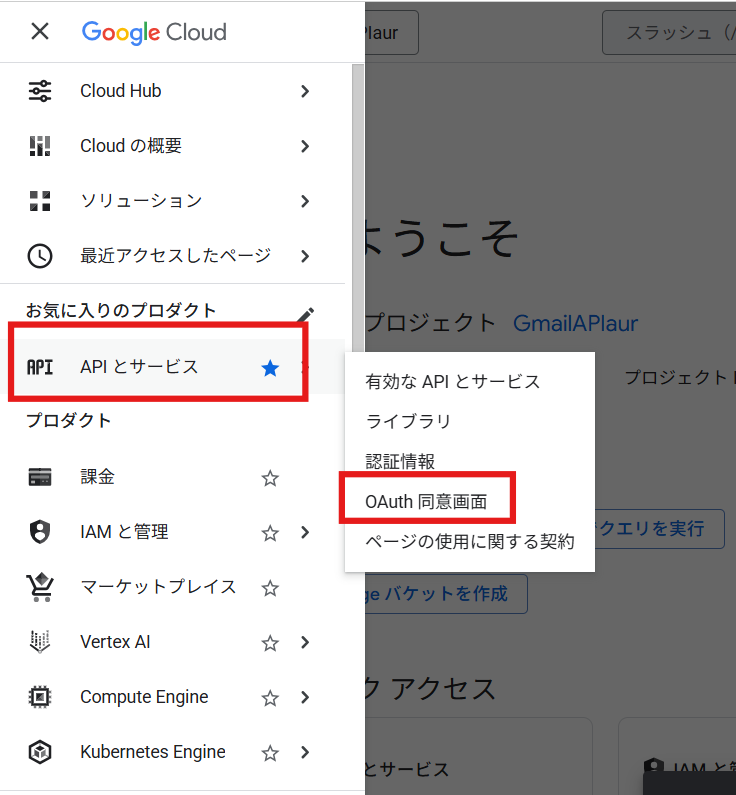
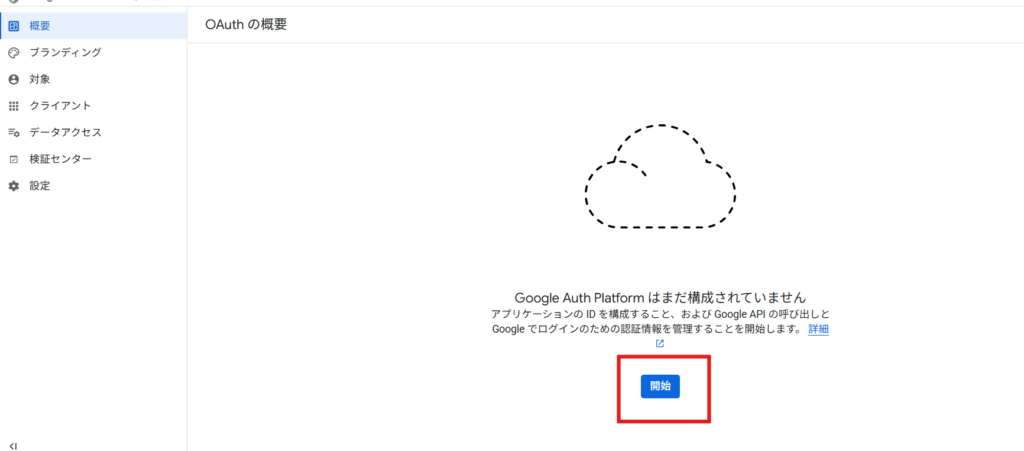
Open the OAuth consent screen
Once you have created a new project, expand the left sidebar and click
・APIs and services
・OAuth consent screen
Select to go to the settings screen.
Click the Start button.
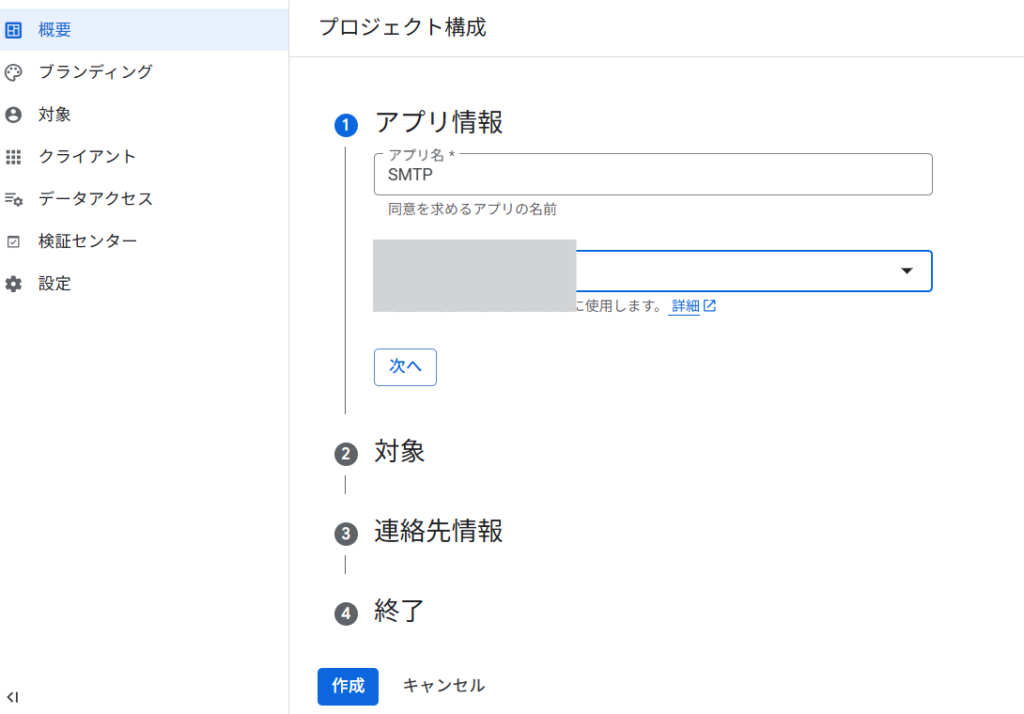
Add any string of characters to the app name, set your email address, and then click the [Next] button.
Select Outside
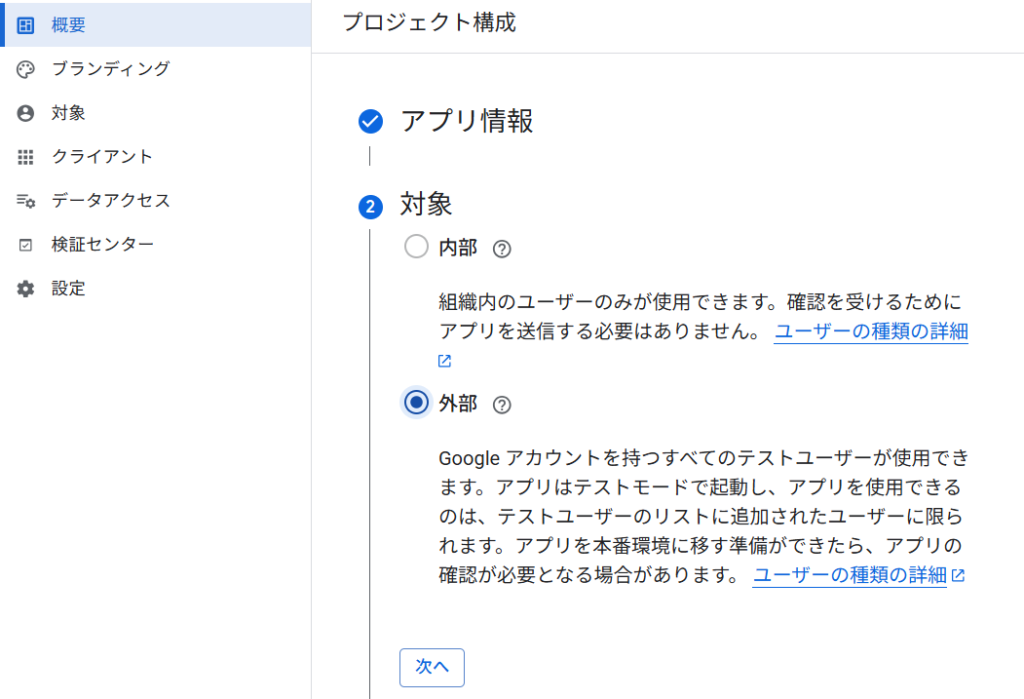
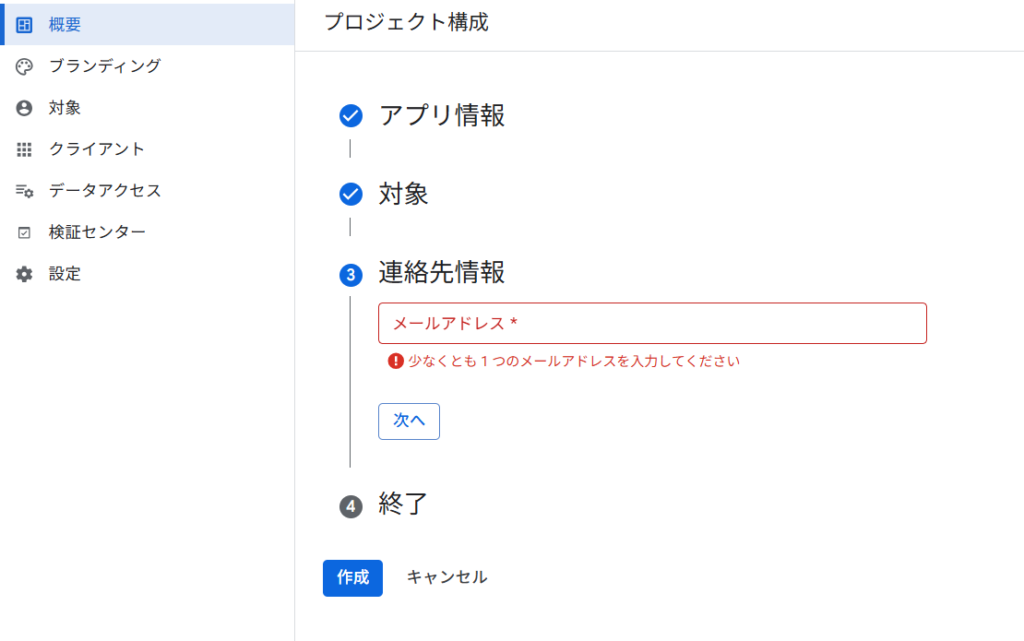
Enter your email address again and you're done.
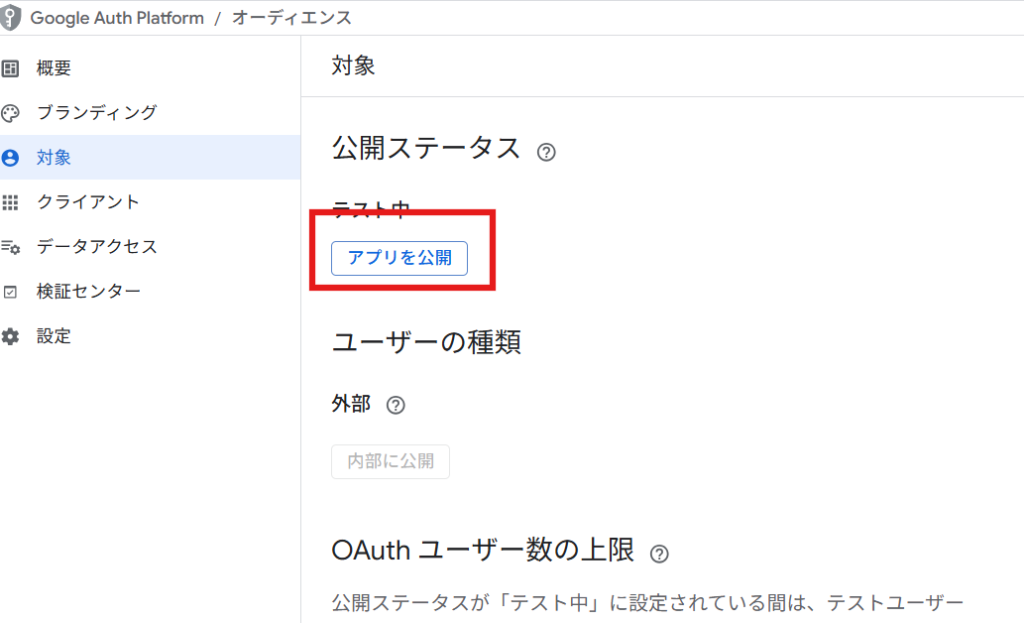
Publish your app
Once you have completed the creation, the app will be in test mode, so go to the target tab and click the [Publish app] button repeatedly to publish the app.

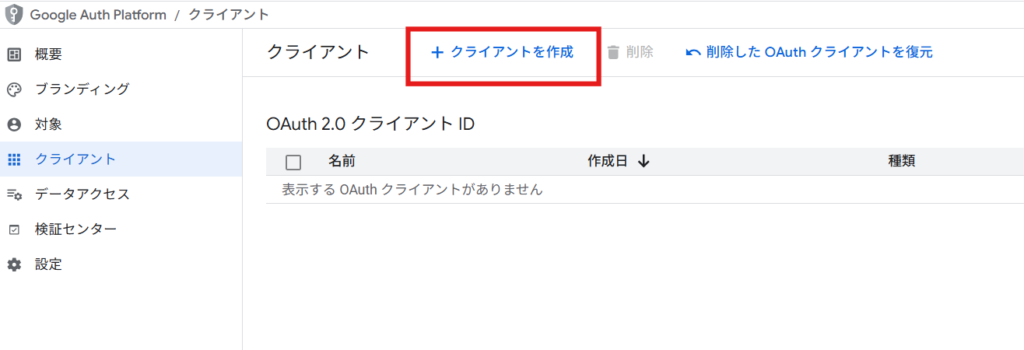
Issue a client ID and secret key
Next, go to the Clients tab and issue a Client ID and Secret Key.
Click the Create Client button.
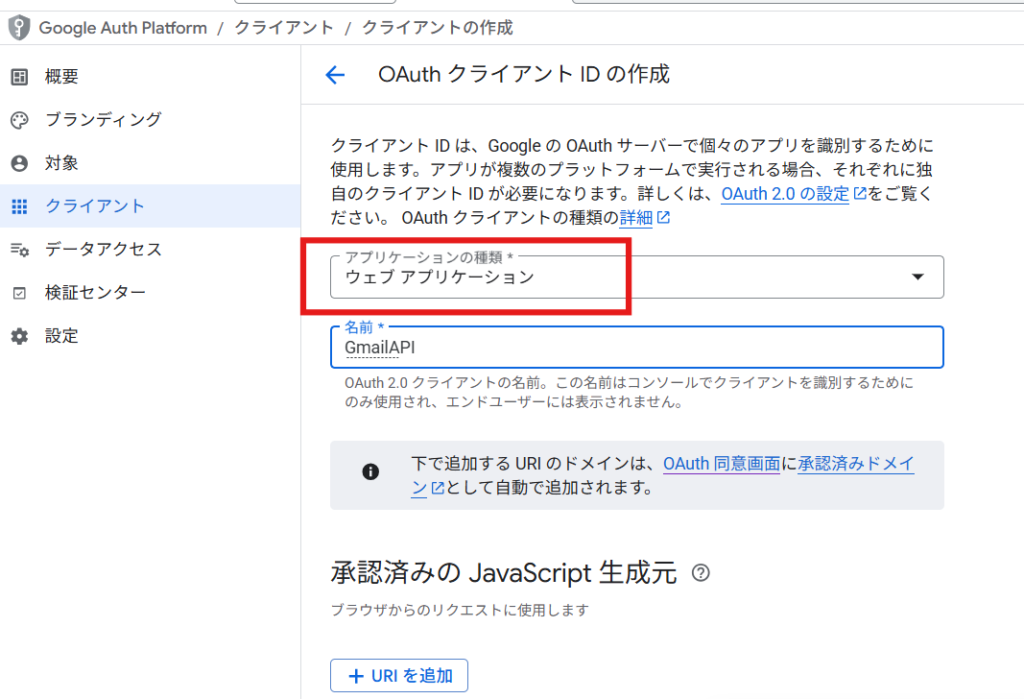
Select [Web Application] as the application type and give it a name.
Add Authorized JavaScript Prigins
Add "Authorized JavaScript origins" in the PostSMTP section to the approved JavaScript origins.
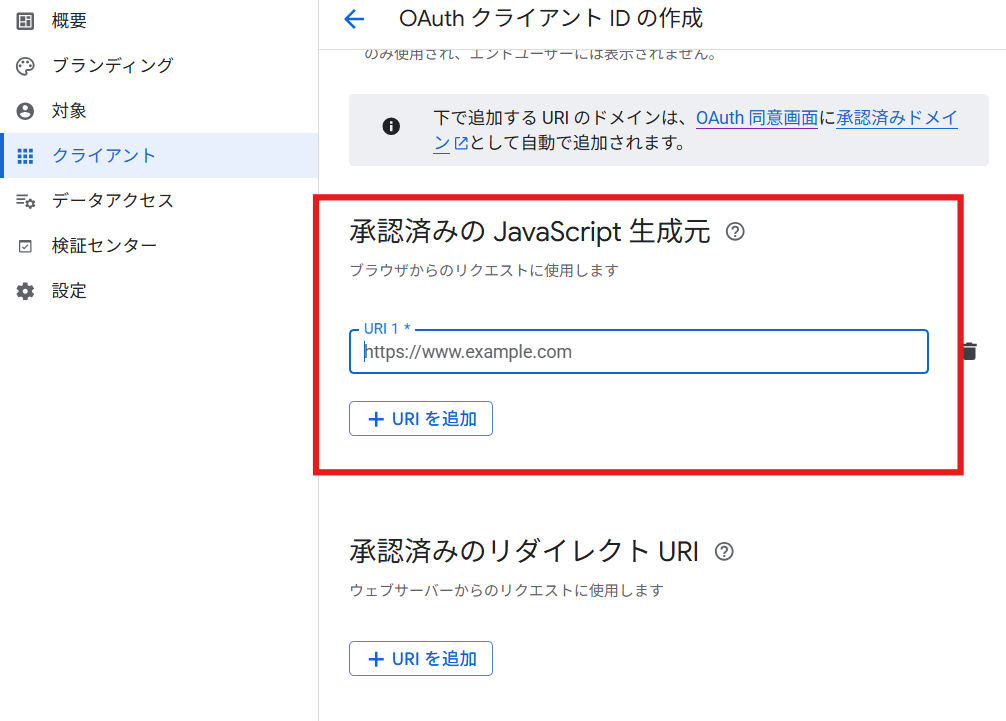
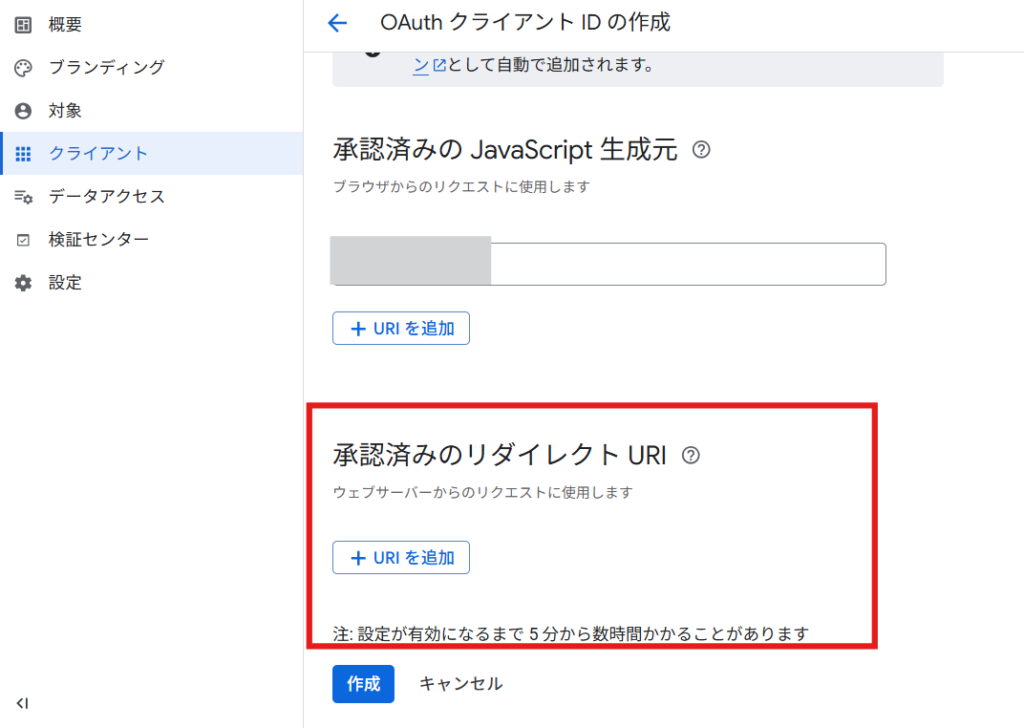
Add an Authorized redirect URL
Add the Authorized redirect URL to the list of authorized redirect URLs.
Issuing a client ID and client secret
Click the Create button and an ID and secret will be issued.
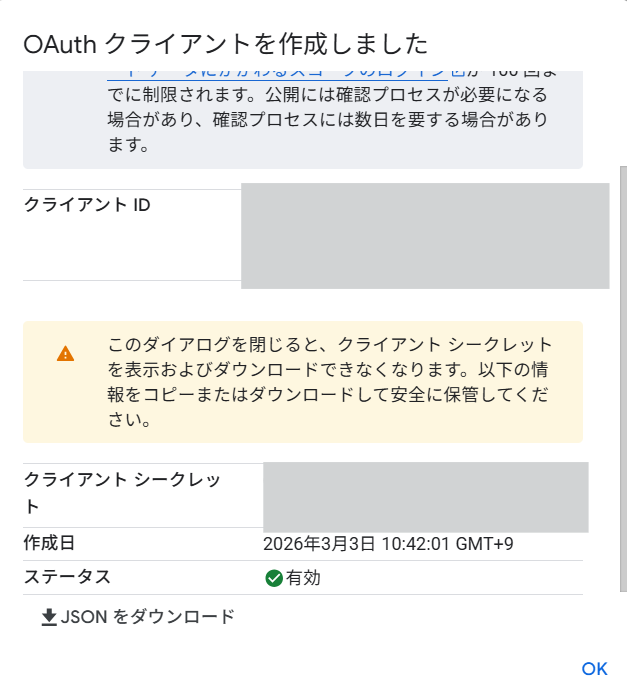
Paste in the PostSMTP Client ID and Client Secret.

Finally, connect
Click the Connect to Gmail API button.

You will be taken to a screen like this, click on Details.
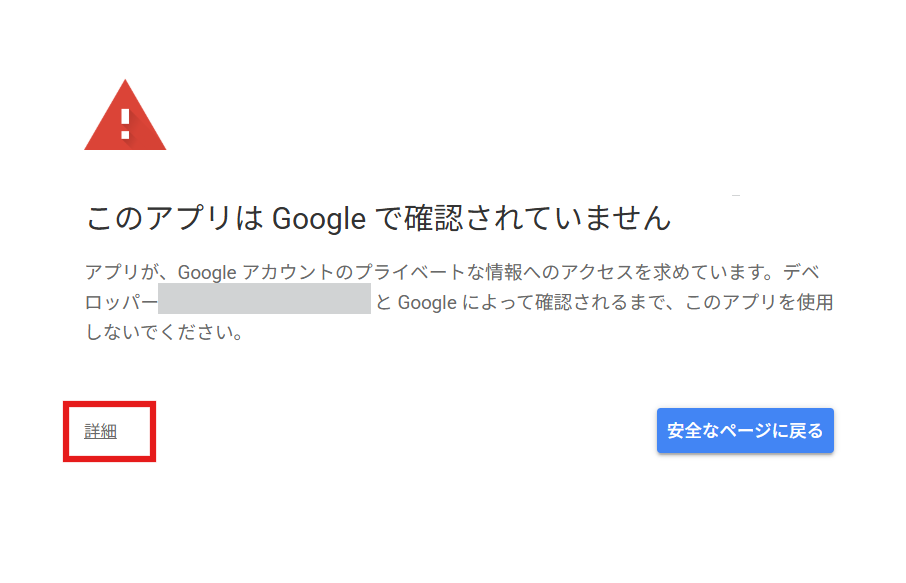
You will be redirected to a screen like this, but click on the part that says [Hide details] and then click on the text link that says Go to unsecure page.
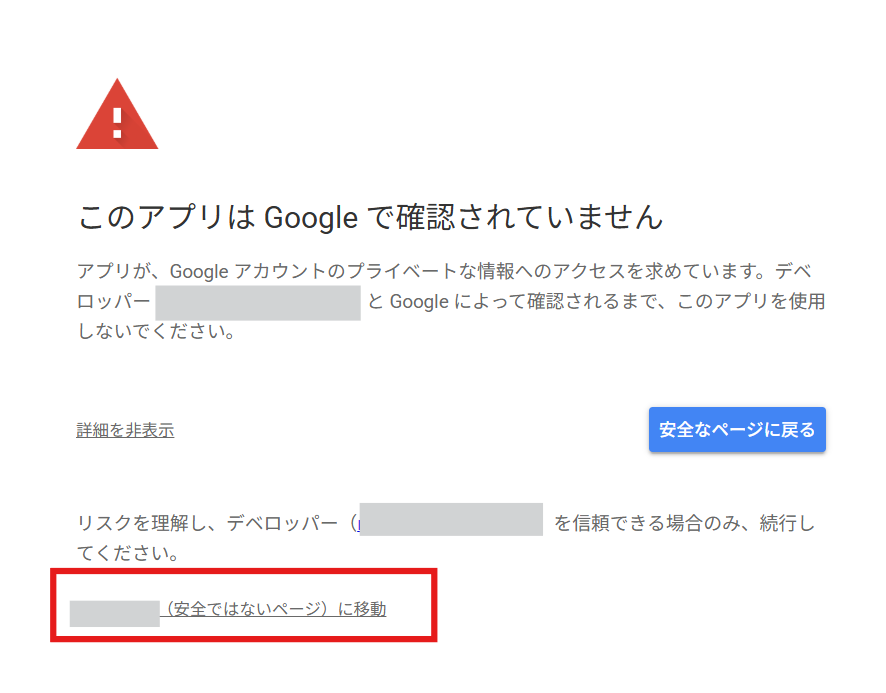
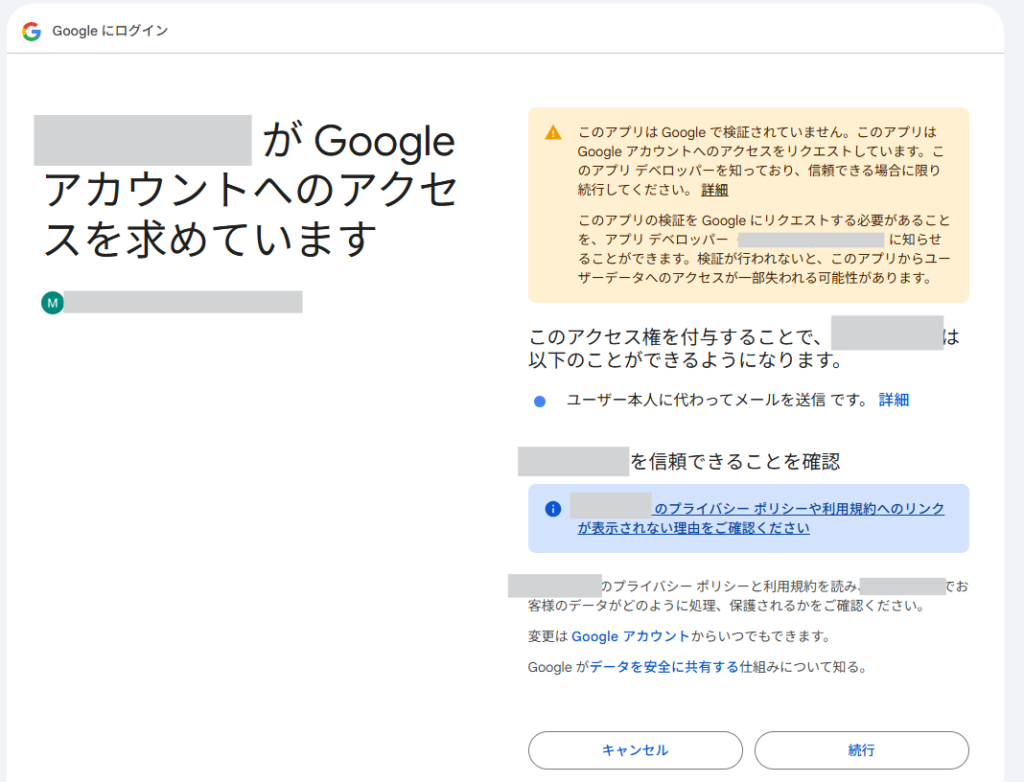
You will be taken to a screen like this, so click the Continue button to complete the connection.
*If the security plugin is enabled, communication may be blocked, so it is recommended to temporarily turn off the security plugin before configuring it.
Reasons why emails cannot be sent and how to fix them
Common causes
- Lack of authority
- Gmail API is not enabled.
- OAuth authentication incomplete
- Redirect URL error
How to deal with it
- Check the settings URL
- Enable the API
- Re-authenticate
Summary of PostSMTP settings
If you want to use POST SMTP with Google Workspace, you must configure OAuth authentication.
The setup is a bit complicated, but once configured, it will allow you to send emails reliably.
If you have any questions, please feel free to contact us.
Q&A regarding PostSMTP
Q. Can I use Google Workspace with POST?
A. Yes, it is available if you set up OAuth authentication.
Q. Why is SMTP configuration necessary?
A. Because emails sent via WordPress's standard email service may not be delivered.
Q. Why is OAuth authentication required?
A. Because Google recommends OAuth 2.0 for security reasons.
Q. Is SMTP authentication alone not sufficient?
A. This is not recommended at present for security reasons.
Q. What is the Gmail API?
A. This is a mechanism for using Gmail's features from external applications.
Q. What could be the reason why I can't send emails?
A. The main causes are authentication settings issues, API not being enabled, and insufficient permissions.
Released as soon as the next morning! Weekends and holidays are also available!
Super rush website creation plan
We offer a rush website creation plan for those who need a website in a hurry!
We can publish your content as soon as the next morning, even on weekends and holidays! If you have any questions, please check the details below!

Latest Articles


Error message: Allowed memory size of 268435456 bytes exhausted (tried to allocate 14684160 bytes) Error: On Lollipop

Explaining the Meta Pixel feature of the paid version of the WordPress booking system plugin Amelia (9.x and later)