How to create a website using WordPress/How to use plugins/No-code construction blog


Migrate your WordPress site in 3 easy steps! How to use All in one WP Migration
At HanamiWEB Online School,
●Ask questions in real-time in the virtual study room!
●Ask as many questions as you want via chat!
●E-learning materials that you can learn as much as you want, 24 hours a day!
All included for just 2,500 yen/month!
I want to migrate a WordPress site to a test environment, migrate a WordPress site to another server, migrate a WordPress site to another domain, etc. I will explain about the plugin [All in one WP Migration] that can copy, migrate, and move a WordPress site in its entirety. I really recommend it!
Why All in one WP Migration?
This is because anyone who can install a WordPress plugin can easily migrate a WordPress site in a short amount of time, even if they don't have any knowledge of FFTP or server migration!
Also recommended for backing up WordPress data in local files!
What is All in one WP Migration?
The operation is so simple that anyone who has wasted days trying to migrate their site without knowing about All in one WP Migration would laugh at how easy it is.
FFTP does not touch databases, etc.You can export and import data using only the WordPress admin screen.
Normally, you would migrate all the file data using FFFP software etc. Migrate MySQL files... Rewrite
This is necessary, but after activating the plugin,
[Export] > [Select file] > [Import] > [Select file]
That's all it takes to complete the WordPress move!
However, while you can export data from a WordPress site, there are capacity limitations when importing WordPress site data to the destination.
You can export up to 512MB for free, but anything more than that requires a fee.To.
However, the general migration procedure for WordPress sites is
Transfer files with FFTP
Migrate your database
Rewrite domain name and database name
Considering the amount of work required and the fear of failure, I think the paid plan is very cheap.
I also purchased the multisite plugin!
Now let’s take a look at how to use All in one WP Migration!
First, a video explanation of how to use All in One WP Migration
[All in one WP Migration illustration] Installing to WordPress
First, install All in one WP Migration on your WordPress site!
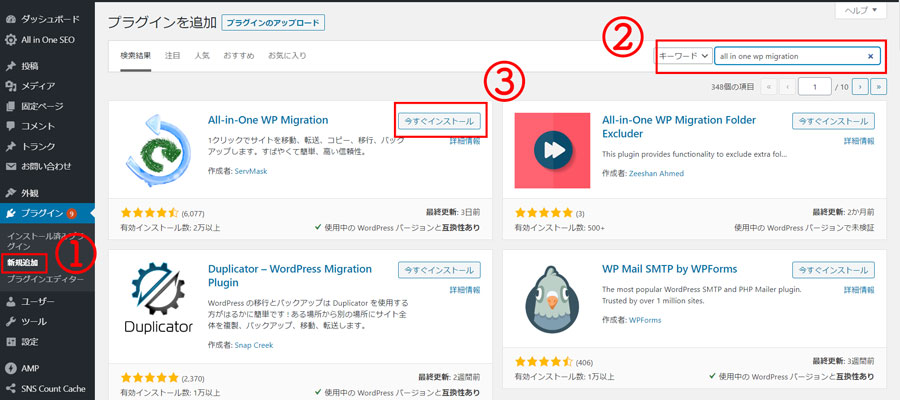
On the dashboard (management screen)
- [Plugins] > [Add New]
- Enter [All in One WP Migration] in the keyword field.
- Install now
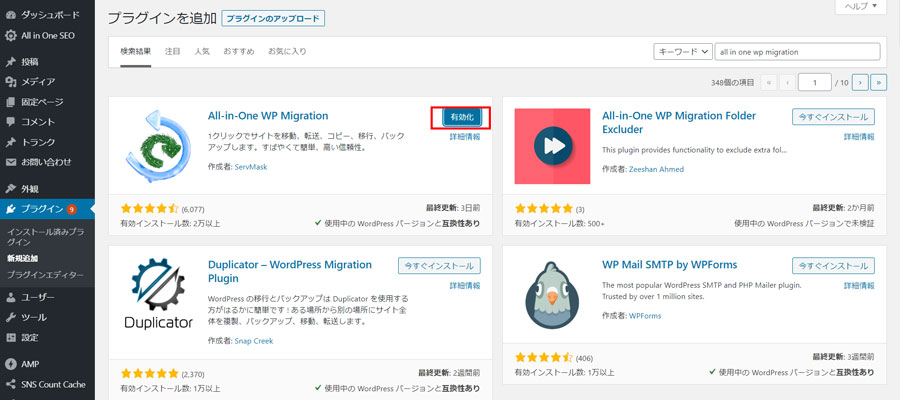
Click [Enable]
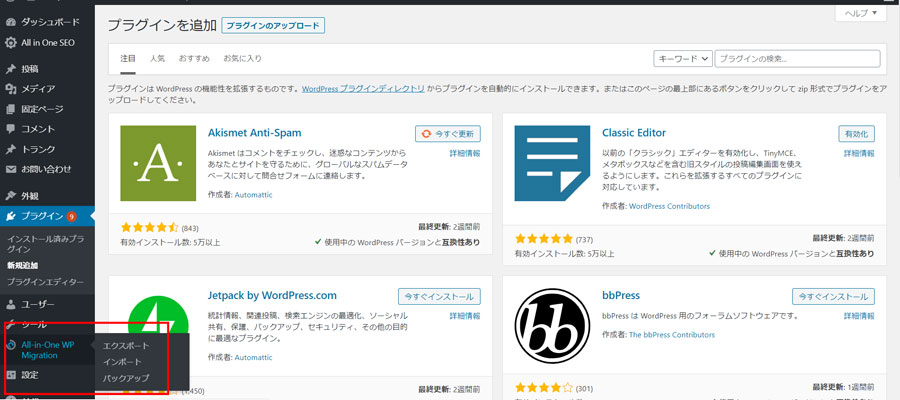
An item called All in one WP Migration will be added to the dashboard (administration screen).
- export
- import
- backup
The number of items like this will increase.
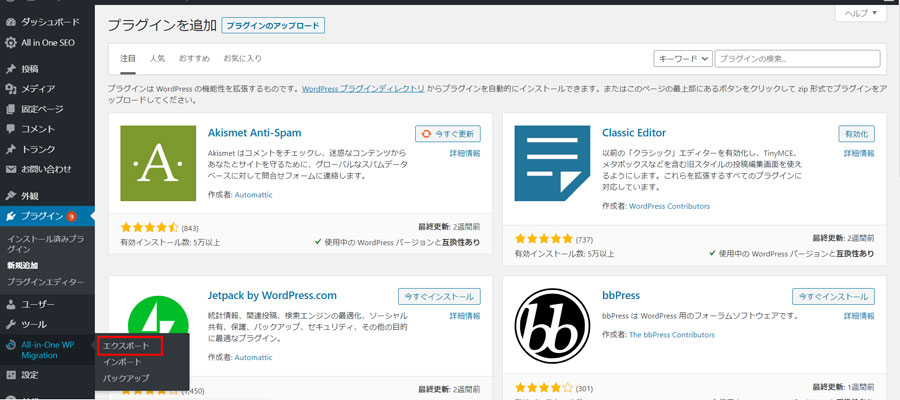
If you want to export site information to an external device, click [Export] to output the data to an external device.
Export all information of your WordPress site to an external source
From now on, the procedure will be to copy the entire WordPress site to another server, domain, or test environment.
On the dashboard
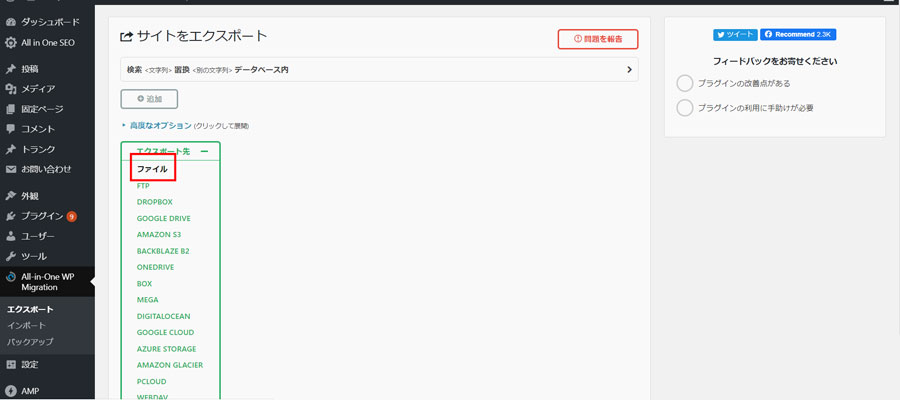
Click [All in one WP Migration] > [Export].
Click [File].
This will pack the data into a compressed file.
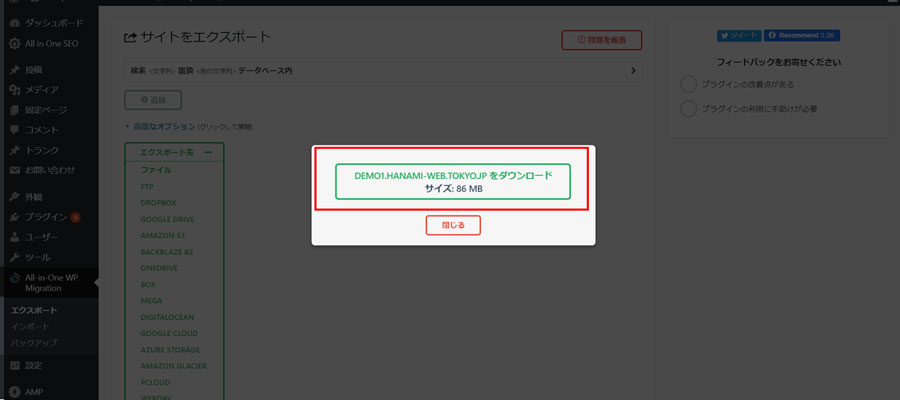
Download now.
At this time,Be careful not to unzip the zip file.
Import the zip file to migrate the data.
Now you can export the data of your WordPress site.
Import WordPress site information
Import the export data you just downloaded into the new WordPress site.
In that case, importBe careful because all the information on your WordPress site will be rewritten.is.
- User Information
- Login Information
- fixed page
- Post page
etc. will all be rewritten.
Activate the All in one WP Migration plugin on your new WordPress site
You will also need to install and activate the All in one WP Migration plugin on the WordPress site you want to migrate.
Please refer here for how to install and activate the All in one WP Migration plugin.
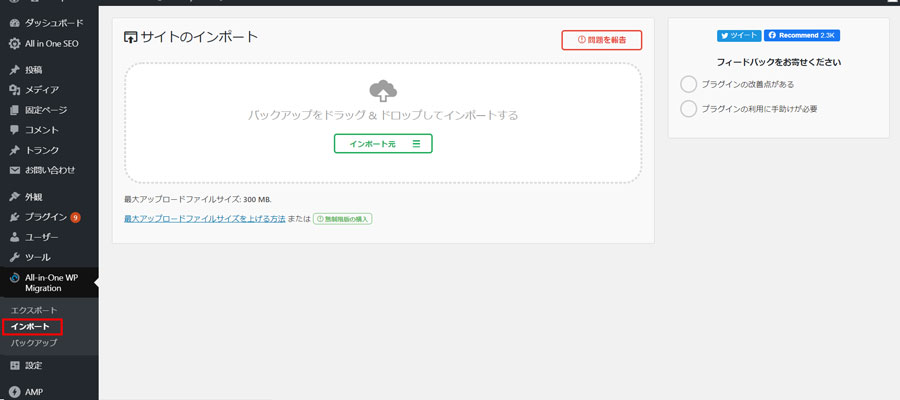
Click [All in one WP Migration] > [Import].
Click on [File] in the import source.
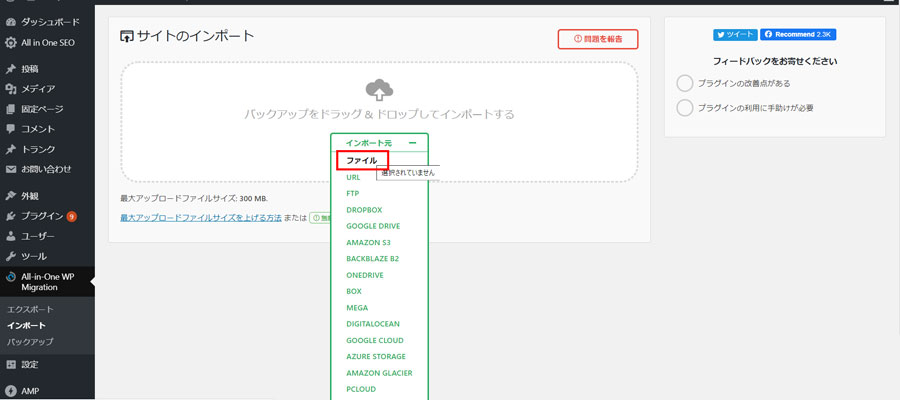
Select the zip file you exported earlier.
Please note that if you unzip the zip file, you will not be able to upload it.Please do so.
Common errors here
Maximum upload size exceeded
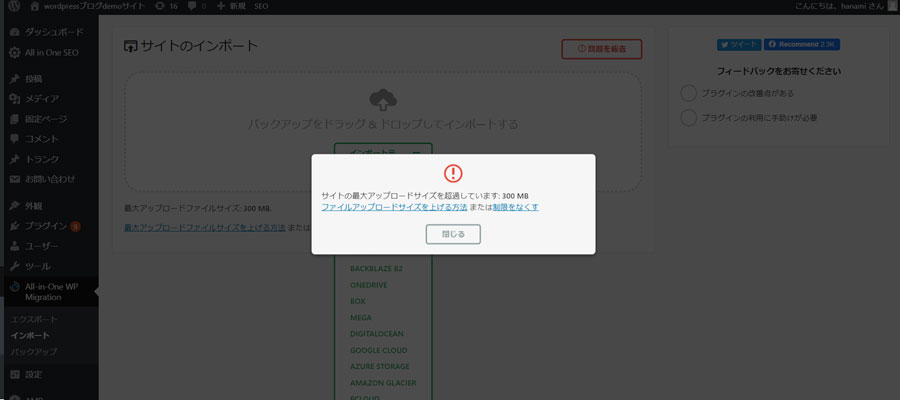
When I try to upload, I get an error.
"Site's maximum upload size exceeded"
How to increase file upload size or remove the limit
The following message will appear.
If the upload sizeEliminate limitationsClicking this will take you to a prompt to install the plugin.
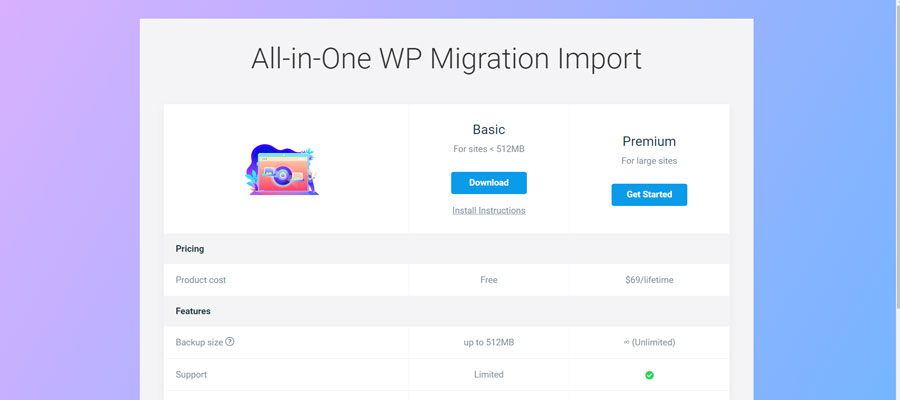
How to increase your upload size to 512MB for free
Click Download under Basic to download the extension plugin.
Upload the download file from Add New Plugin.
How to make upload file size unlimited
Purchase the Premium version.
This is a one-time purchase type, $69.
It only costs around 7,000 yen, so it's much more cost-effective than outsourcing.
Also, if you are trying to transfer your data yourself and would spend several days trying to do so, you can quickly skip that tedious process with $69.
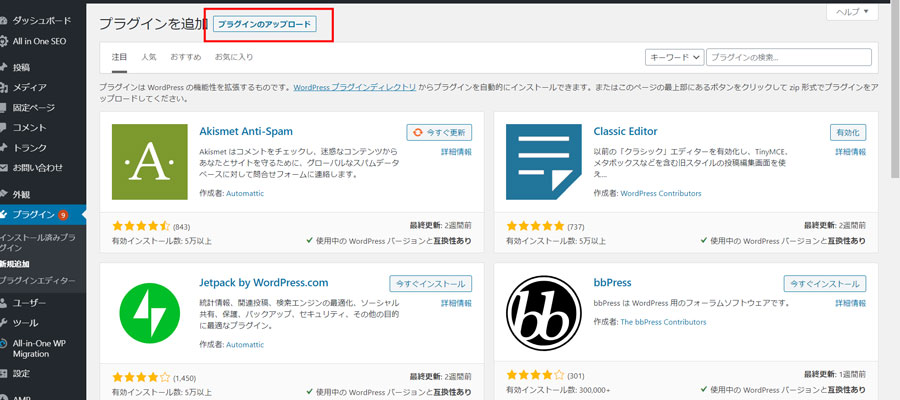
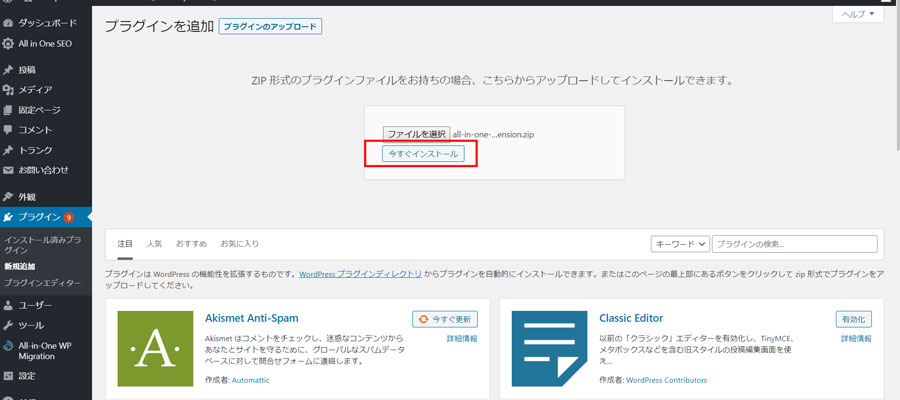
How to add a plugin to increase upload file size
Extension plugin files downloaded with the free plan/paid plan
Dashboard (management screen)
[Plugins] > [Add New] > [Upload Plugin]
Upload from.
Select the file.
At this time,Please note that the file will be uploaded as a zip file.Please do so. I cannot upload files that have been unzipped.
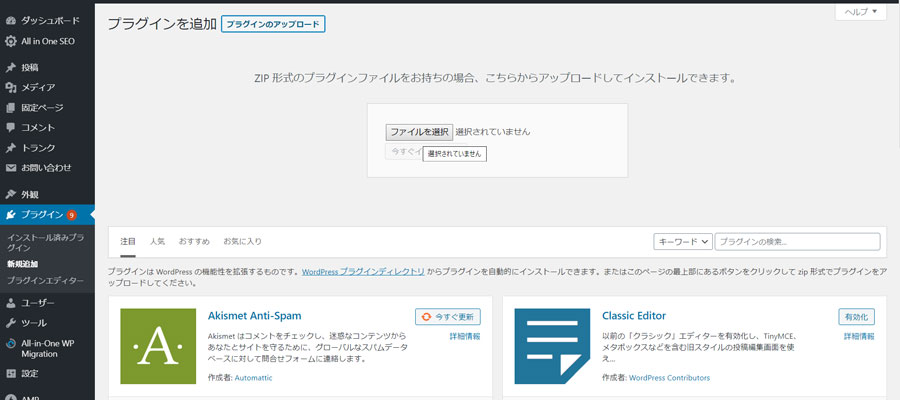
Click [Install now]
Click on [Enable plugin]
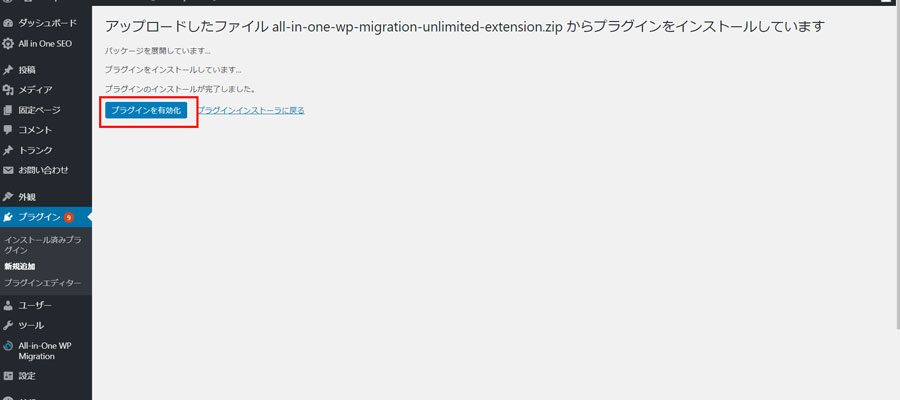
You are now ready to upload your files.
Go back to the import steps again.
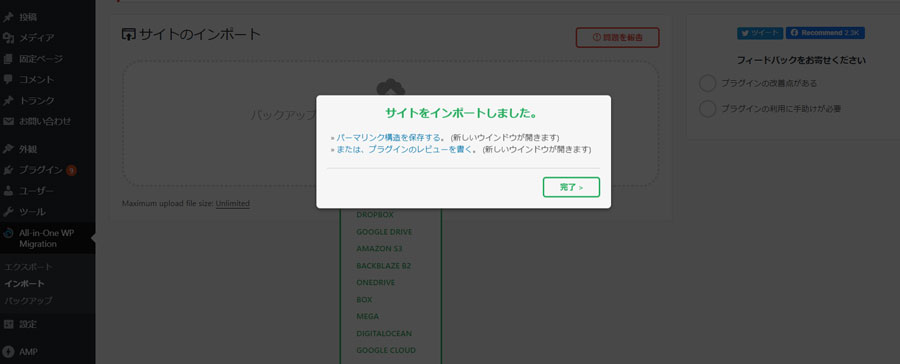
Import Data
Now that we have the All in one WP Migration extension plugin ready to handle the file upload size, let’s try importing again!
[All in one WP Migration] > [Import]

Select [Import destination] > [File].

Select the file and execute the import.
Your site copy is now complete.
Click [Finish].
Important work to reflect the transition
You need to update the permalink settings and update the URL address, etc.
On the management screen (dashboard)
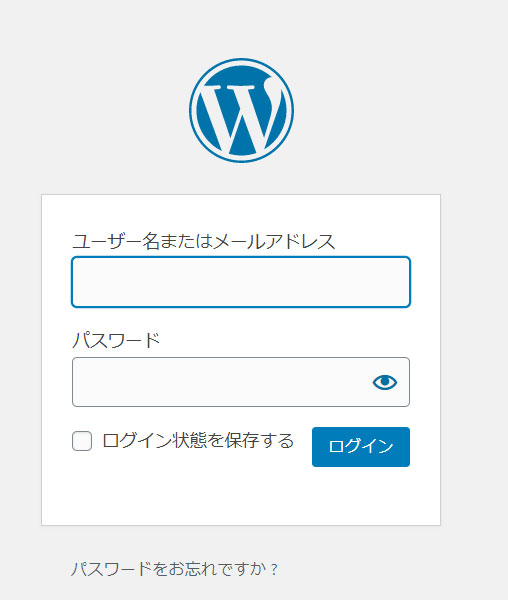
Click [Settings] > [Permalink].

You will then be redirected to the WordPress login screen, where you can log in using the copied login information.
At this time,Please note that the login information for the WordPress site you are migrating will be replaced with the login information from the original site since the site has been copied.
This completes the WordPress site migration process.
All in one WP Migration plugin that can also be used for backups
I think many people use plugins to back up their WordPress sites regularly. In most cases, the backups are stored on the server, right?
Using the export function of All in one WP Migration, you can back up your important WordPress data to your own computer, a USB file, a DVD, etc.
The restoration method is also just one click import, soWe recommend that you regularly save your WordPress data locally.
Summary of tweets about All in one WP Migration
Released as soon as the next morning! Weekends and holidays are also available!
Super rush website creation plan
We offer a rush website creation plan for those who need a website in a hurry!
We can publish your content as soon as the next morning, even on weekends and holidays! If you have any questions, please check the details below!

Latest Articles


Error message: Allowed memory size of 268435456 bytes exhausted (tried to allocate 14684160 bytes) Error: On Lollipop


Explaining the Meta Pixel feature of the paid version of the WordPress booking system plugin Amelia (9.x and later)