How to create a website using WordPress/How to use plugins/No-code construction blog


If you want to create an inquiry form with a confirmation page, use “WP MP Form”
At HanamiWEB Online School,
●Ask questions in real-time in the virtual study room!
●Ask as many questions as you want via chat!
●E-learning materials that you can learn as much as you want, 24 hours a day!
All included for just 2,500 yen/month!
The classic WordPress contact form plugin "Contact Form7"
I'm sure most of you are using the Contact Form 7 plugin.
Contact Form7 is a major and very easy to use tool.
For those who are concerned about such issues, we recommend the plugin "MW WP Form" that we will introduce here.
It has an advantage over Contact Form 7 in that you can customize the confirmation page and submission completion page.
WordPress has many plugins made overseas,The flow of confirmation screen ⇒ submission is unique to JapanIt may be that, but it's a rare specification.
I'd like to quickly explain how to use MW WP Form.
MW WP Form video explanation
An explanatory video about the MW WP Form contact plugin that lets you create thank you pages!
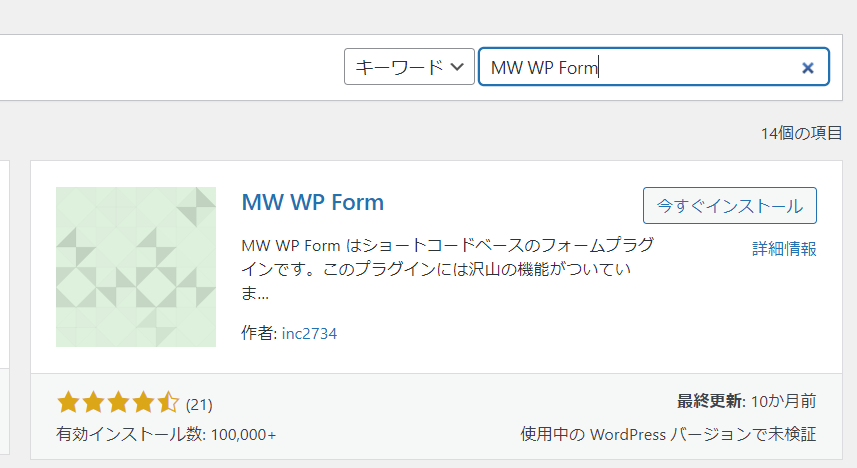
MW WP Form Installation
Go to [Plugins] > [Add New] and search for [MW WP Form].
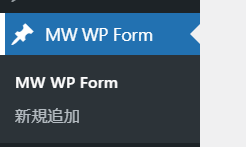
Once activated, it will be added to the left sidebar of your WP dashboard.
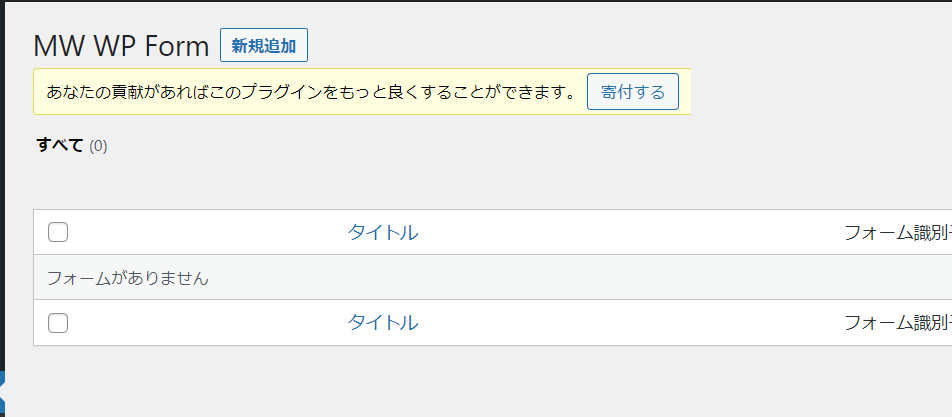
Creating a contact form
Unlike Contact Form7, there are no sample forms, so we will create one from scratch. Click [Add New].
Add a title and create the form below.
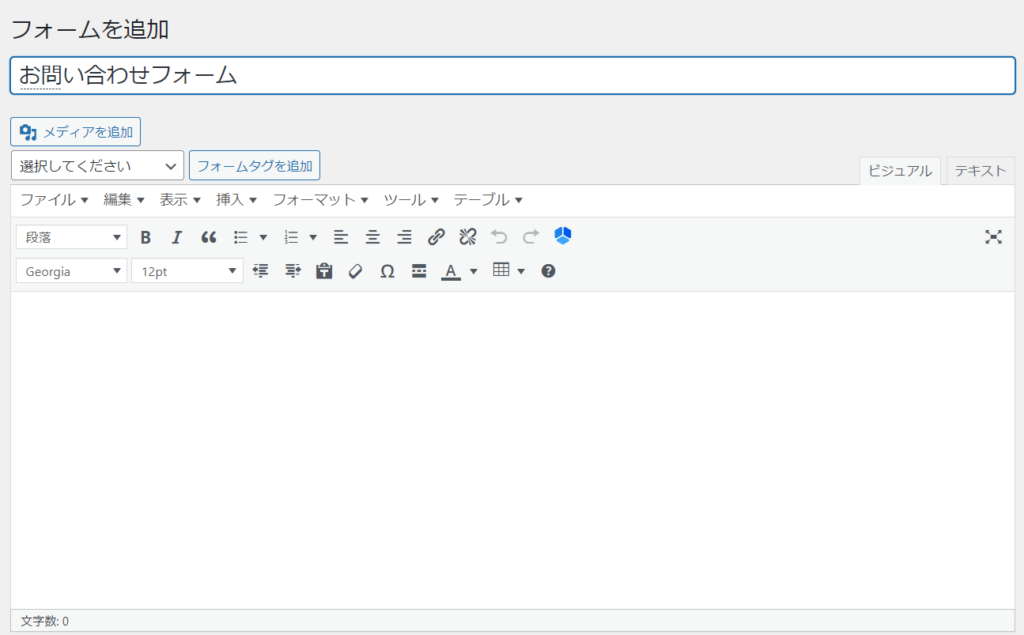
Create the form content
Now, let's set up the form content, such as the name input field and email address input field.
Select the form you want and click the [Add form tag] button to create the form.
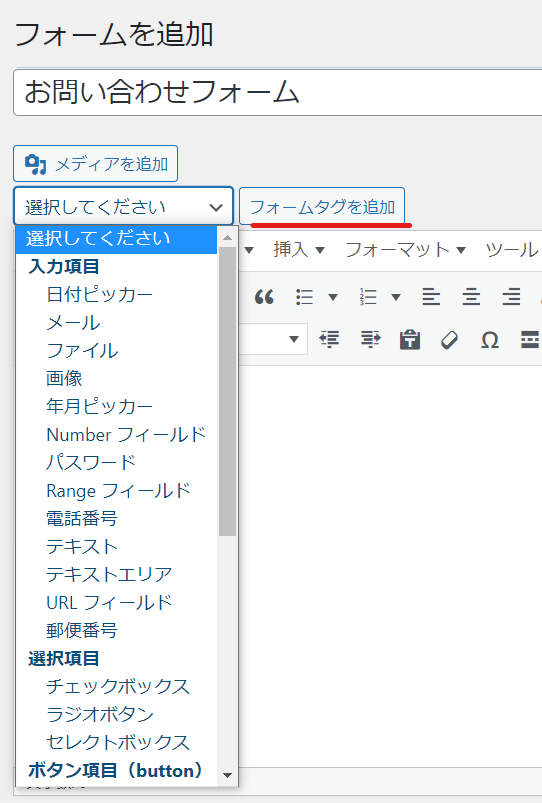
Create a single line text input field
Name etc.One-line input formIf you want to use, select [Text].
The name field is required, and this value is used for automatic reply.Used in email placeholdersTo do.
You only need to fill in the other required fields, so there is no need to fill in anything.
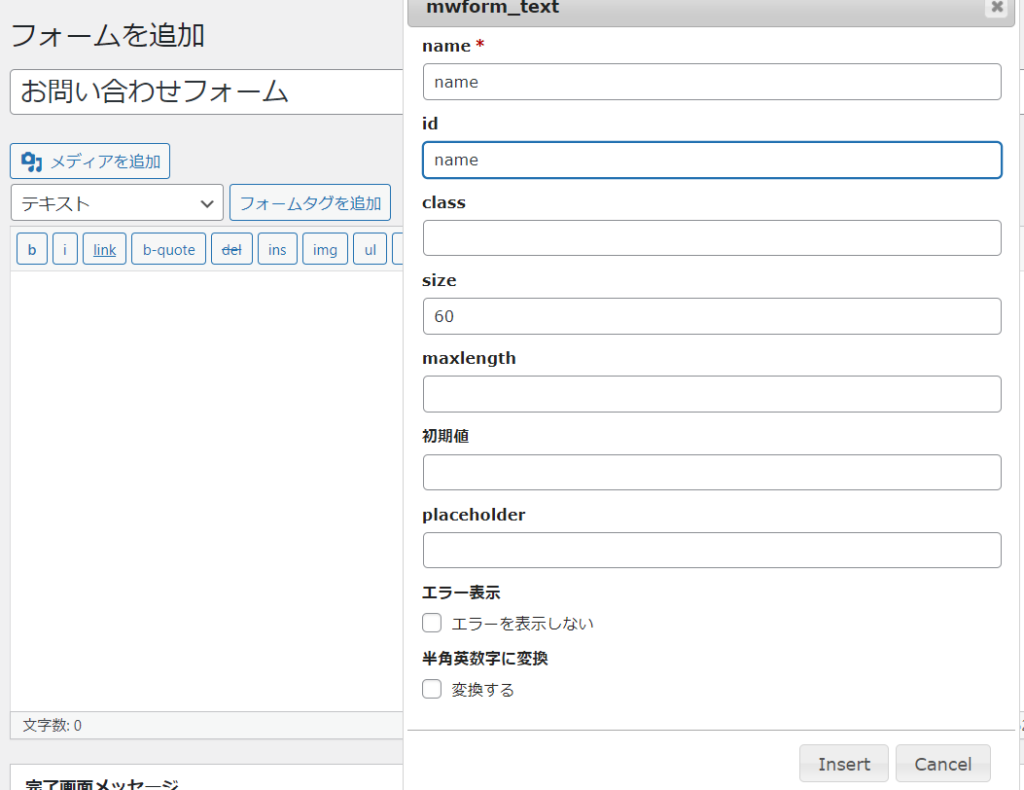
This is how the text is generated.
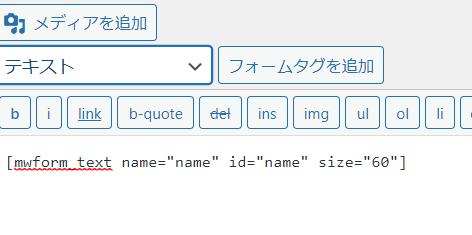
To actually set up the contact form:
<table>
<tr><td>name</td><td>[mwform_text name="name" id="name" size="60"]</td></tr>
</table>Set it up like this. If you set it to table, the table design from the theme will be automatically reflected.
Email address input field
Email address has an input field for your email address.
First, copy and duplicate the name line.
- Change your name to your email address
- [mwform_text name="name" id="name" size="60"] ⇒ Delete
<td></td>With the cursor between the boxes, create an email input field.
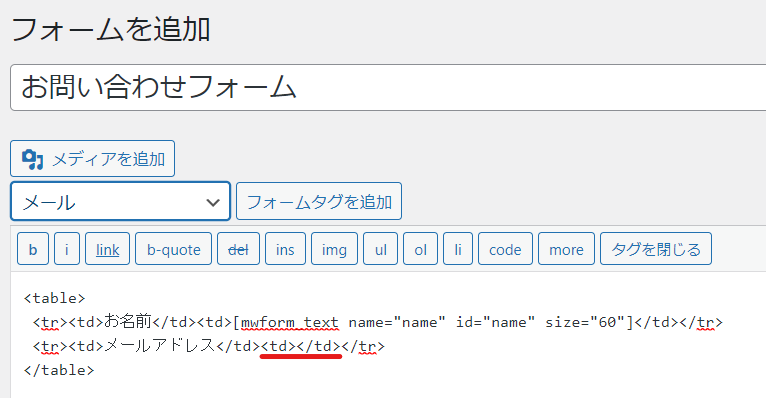
The field to use is [Email]. Enter name and click [insert].
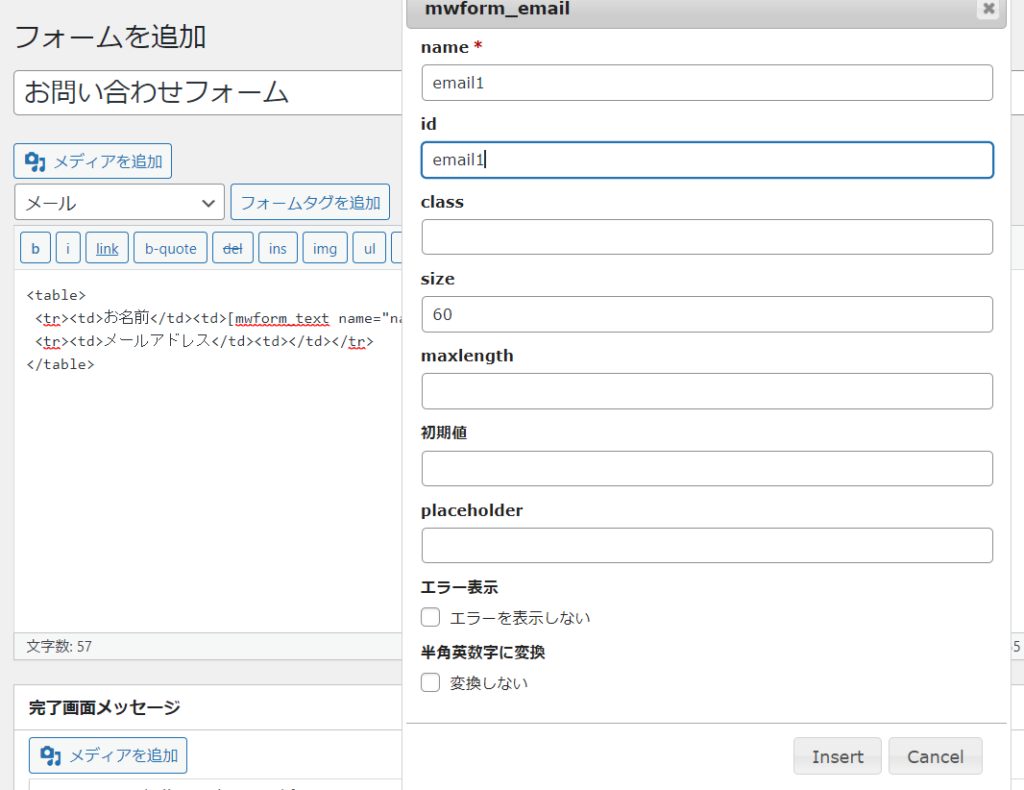
It was entered in this format.

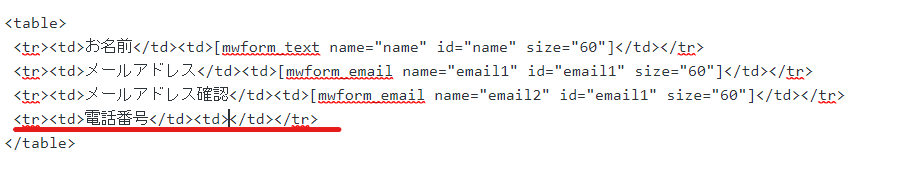
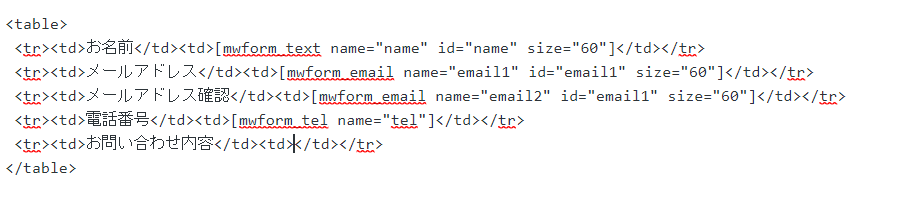
I also want to create a field for email address confirmation, so I'll copy the email address line andname="email2"Change it to:

Phone number input field
If the email address registered is incorrect, we will not be able to contact you, so we often set up a field for entering a phone number.
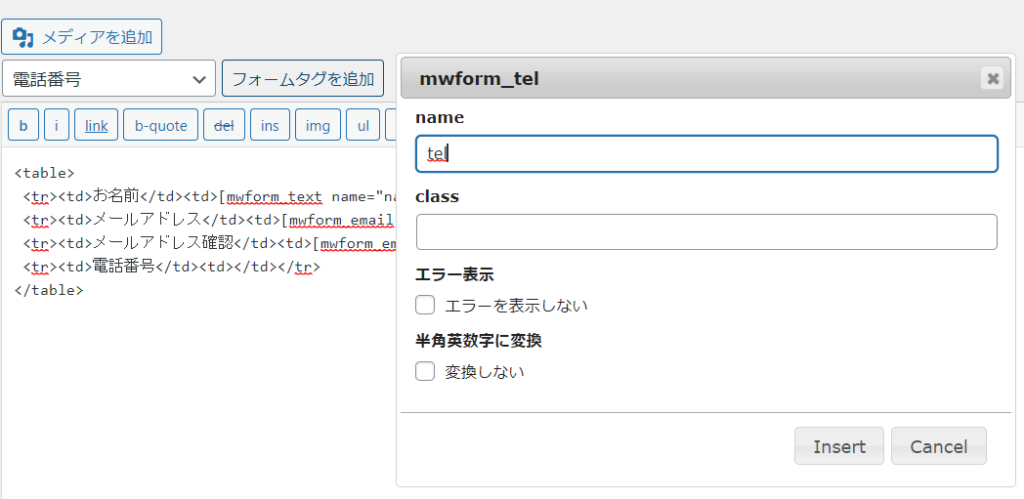
Just like with the email address, copy the line and edit the necessary parts.
Use the phone number input field. Enter the name and click [Insert].
Selection Box Field
You will probably be asked to check the details of your inquiry in advance.
- Radio buttons - choose only one
- Checkboxes - Multiple selection possible
- Select Box - Drop-down selection
Select from and add a field.
As before, copy any line and change it as necessary.
This time we will use check boxes. Enter a name, enter each item on a separate line in the options, and then click [Insert].
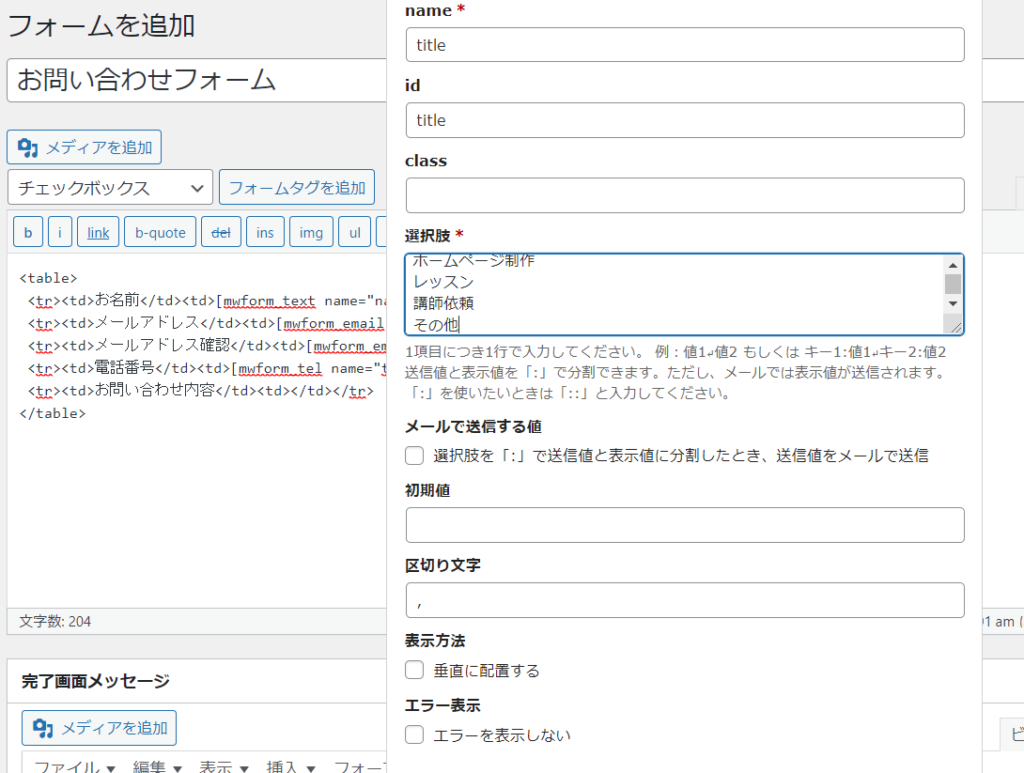
It was entered in this format.

Multiline input fields
Set up a multi-line input field for entering your inquiry details.
As with the previous steps, copy any line and rewrite the necessary parts.

Use the text area field. Enter name and click [Insert].
*By entering text into the Placeholder, you can create a state where temporary text is already entered in gray.
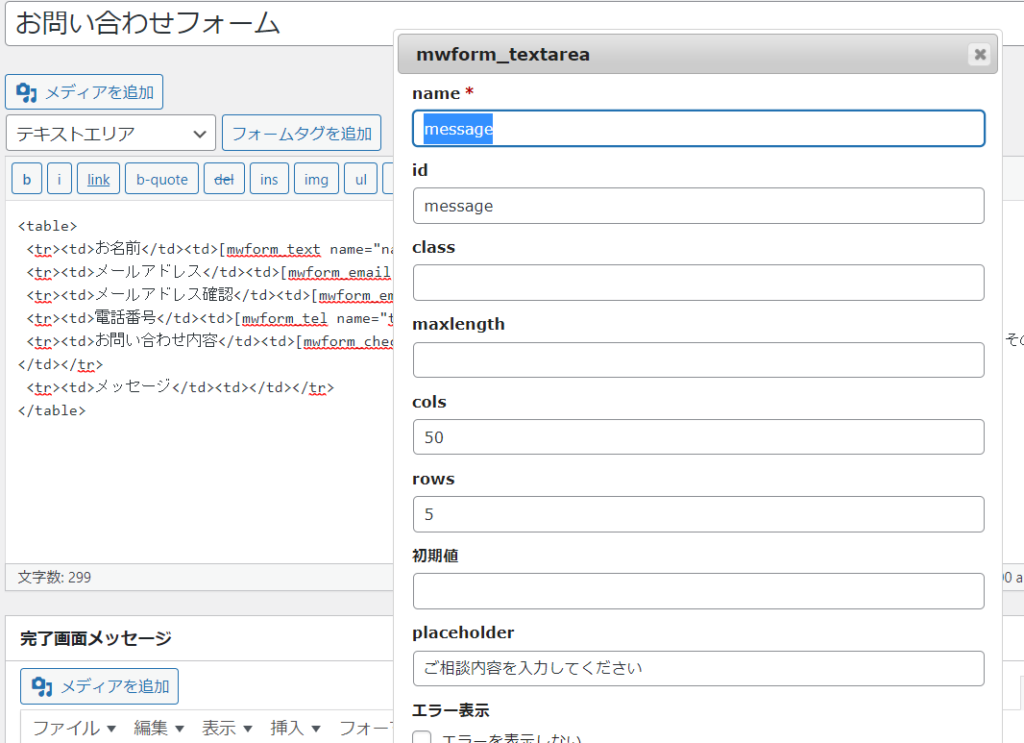
It was entered in this format.
Confirm/Submit button
Since we want to generate a confirmation page, we will use the Confirm/Submit button.
Until now, the table had two items per row: the name and name input field, but since the button is just one item, you can link them by adding the code [colspan="2"].
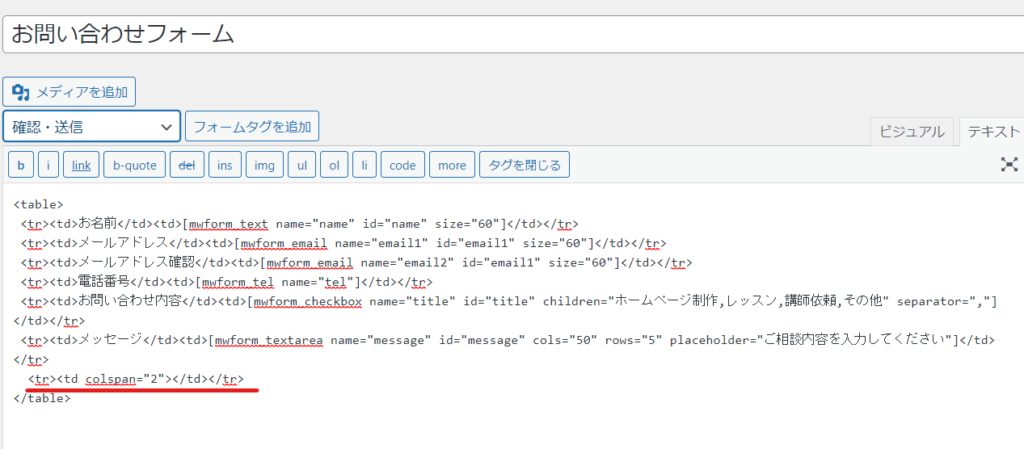
Set the Confirm/Submit button.
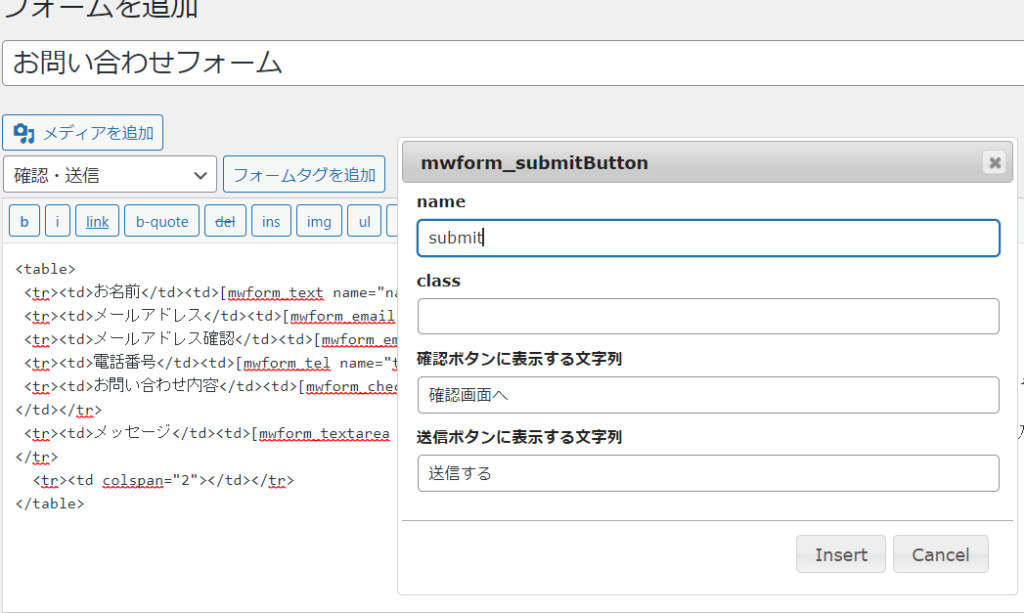
This is how it was set up.
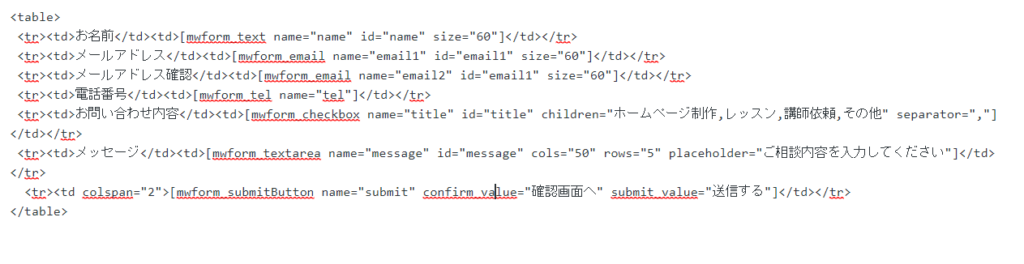
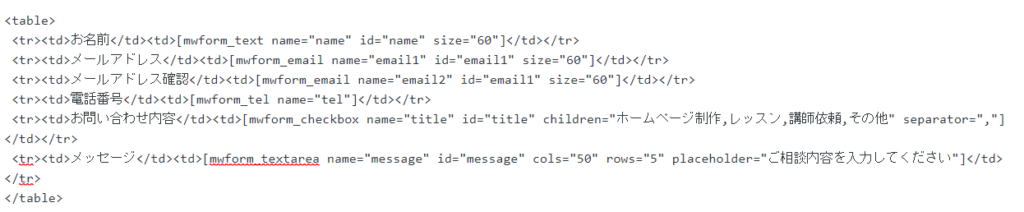
Contact form code
It's a simple contact form
- name
- email address
- Verify your email address
- telephone number
- Inquiry details (check box)
- message
- Confirm/Submit button
The inquiry form for the item has been created. The code is as follows.
<table>
<tr><td>name</td><td>[mwform_text name="name" id="name" size="60"]</td></tr>
<tr><td>email address</td><td>[mwform_email name="email1" id="email1" size="60"]</td></tr>
<tr><td>Verify your email address</td><td>[mwform_email name="email2" id="email1" size="60"]</td></tr>
<tr><td>telephone number</td><td>[mwform_tel name="tel"]</td></tr>
<tr><td>Content of inquiry</td><td>[mwform_checkbox name="title" id="title" children="Website creation, lessons, instructor requests, etc." separator=","]</td></tr>
<tr><td>message</td><td>[mwform_textarea name="message" id="message" cols="50" rows="5" placeholder="Please enter your inquiry"]</td></tr>
<tr><td colspan="2">[mwform_submitButton name="submit" confirm_value="Go to confirmation screen" submit_value="Submit"]</td></tr>
</table>Successful sending message
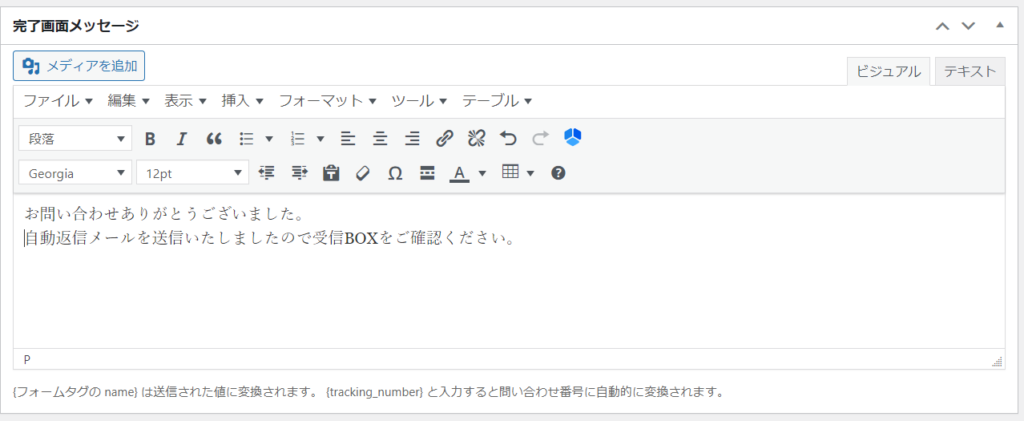
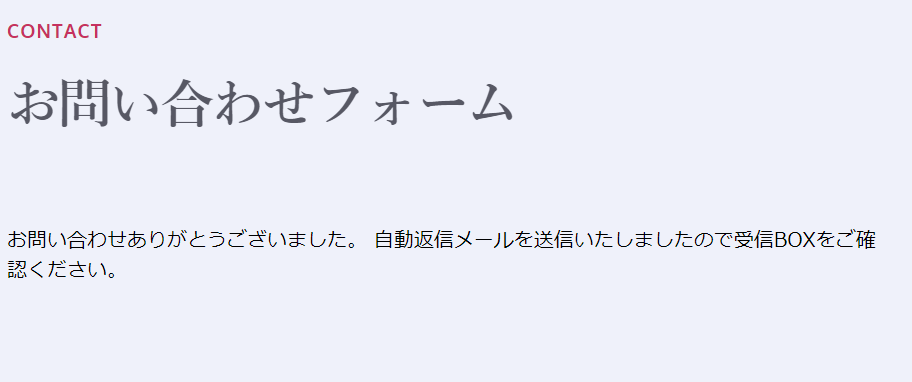
Once you have completed your contact form, the next step is to create a completion message.
The information you enter here will be displayed after submission is complete.
URL configuration
Set the URL.
Enter the URL of the page where the inquiry form will be placed in the [Input Screen URL] field.

Adding Validation Rules
Add settings to make the field required, allow only numerical input, and check that the email address is correct the second time it is entered.
Make it required
Click Add Validation Rule.
To set
- Item to apply validation: Enter the name value set in the input field
- Check the required items
Only this.
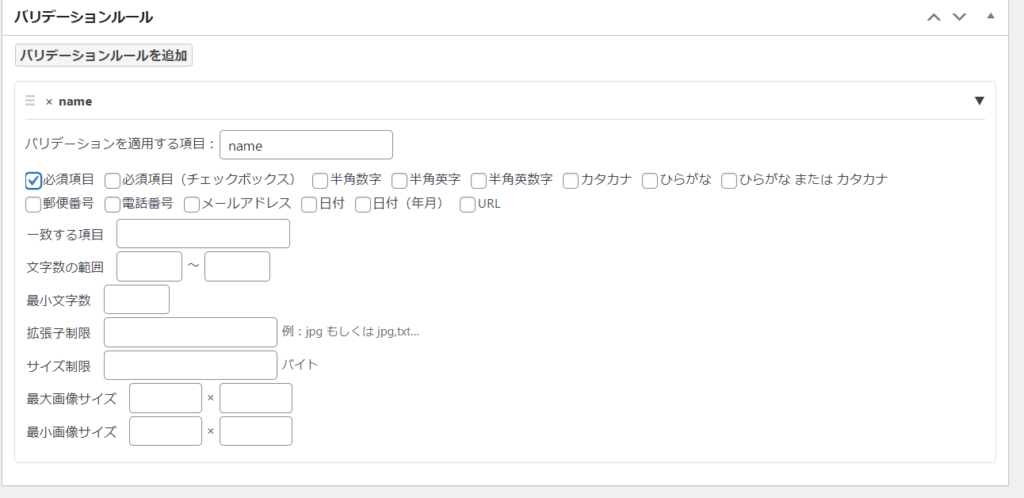
In the case of email addresses, check the email address as well.
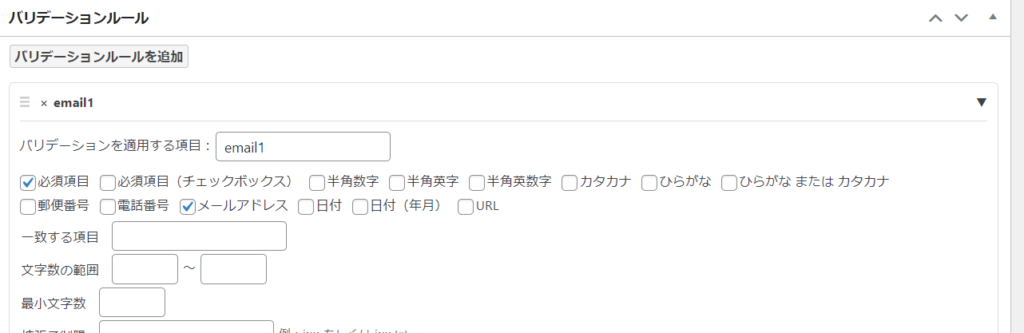
Check that the email address matches
This setting asks you to enter your email address twice to check that it is correct.
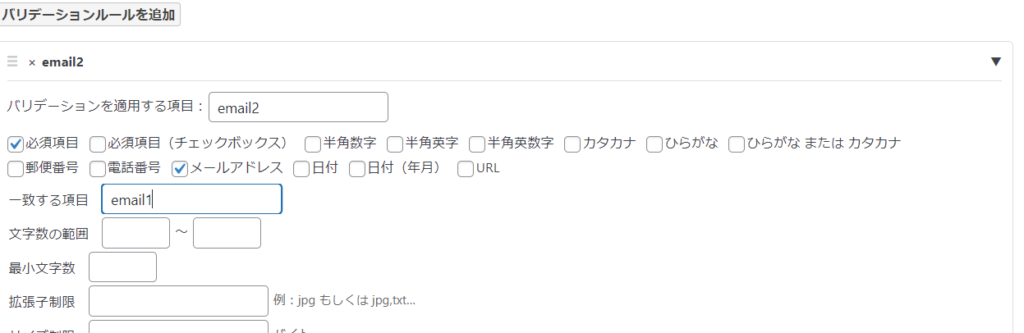
Add a new validation rule.
- Item to which validation rules are applied: email2 (the name given to the second email address input)
- Check the required items
- Check the email address
- Matching items - emal1 (the name you entered when you first entered your email address)
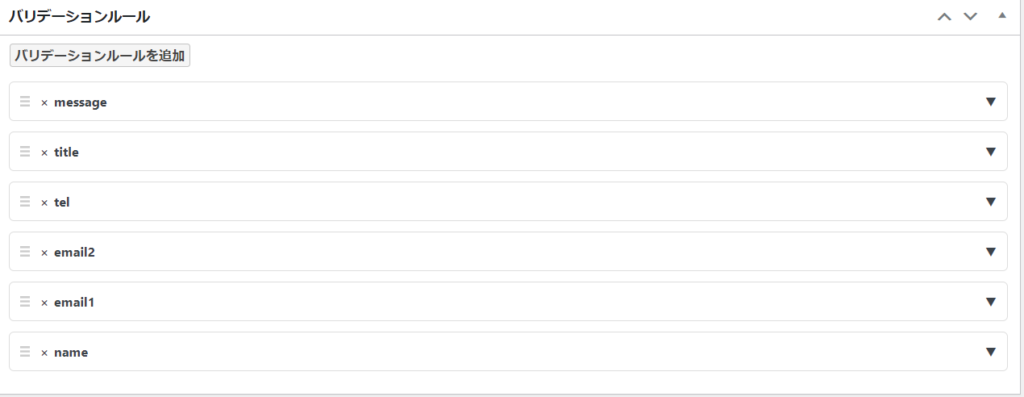
This time, I wanted to make all fields mandatory, so I set validation rules for all names.
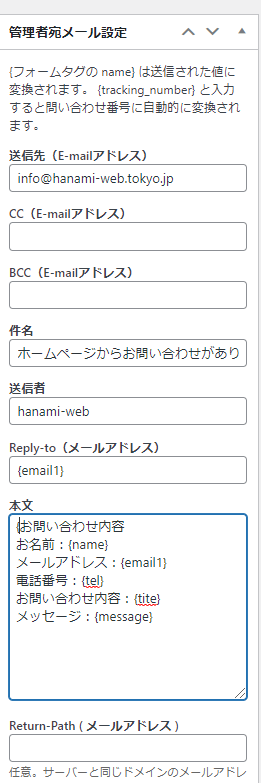
Setting up automatic reply emails to customers
There are settings options on the right sidebar.
- Subject - what will appear in the subject line of the email
- Sender - what will appear as the sender name in the email
- Replay-to - the email address to which you reply to the email you received
- Main text - Main text
- Auto-reply email – This needs to be addressed to the customer, so enter {email1} and the name you gave the customer in the email address they entered.
- Sender - You do not need to enter a sender email address.
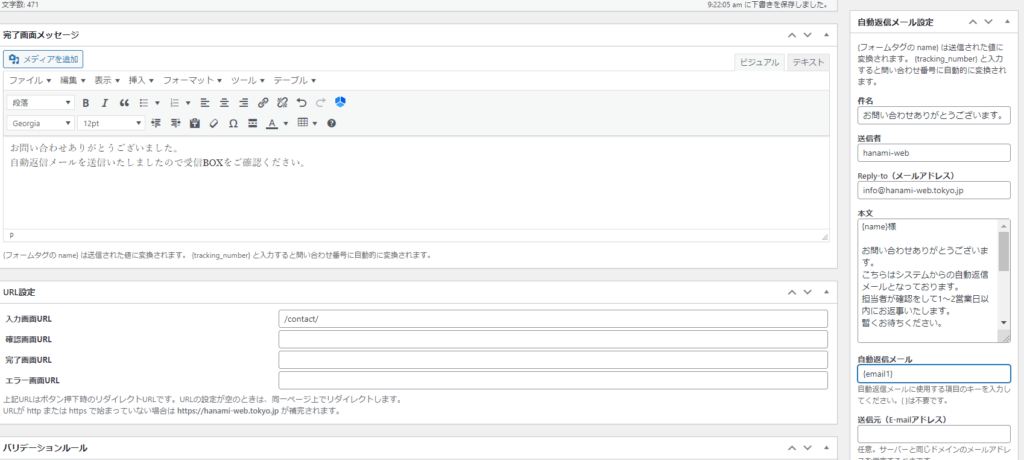
In the main text, you can display the input content by surrounding the name you entered with {}, like so: {name}.
A sample of the text is attached.
Thank you for your inquiry, {name}. This is an automatic reply email from the system. A person in charge will check your message and get back to you within 1-2 business days. Please wait a moment. Inquiry details Name: {name} Email address: {email1} Phone number: {tel} Inquiry details: {tite} Message: {message} ================= HanamiWEB HP: https://hanami-web.tokyo.jp/ Email: info@gmail.com TEL:Automatic reply email settings for administrators
Below the auto-reply email settings for customers are the settings for administrators.
Here are the differences between this and the one for customers.
- You can send emails to multiple administrators using CC etc.
- If you want to set your email address to Replay-to, use the name you gave in the email address input field. Example: {name1}
View contact form
Once the settings are complete, click [Save].
The contact form will be displayed by entering the shortcode on the page you want to display it on.

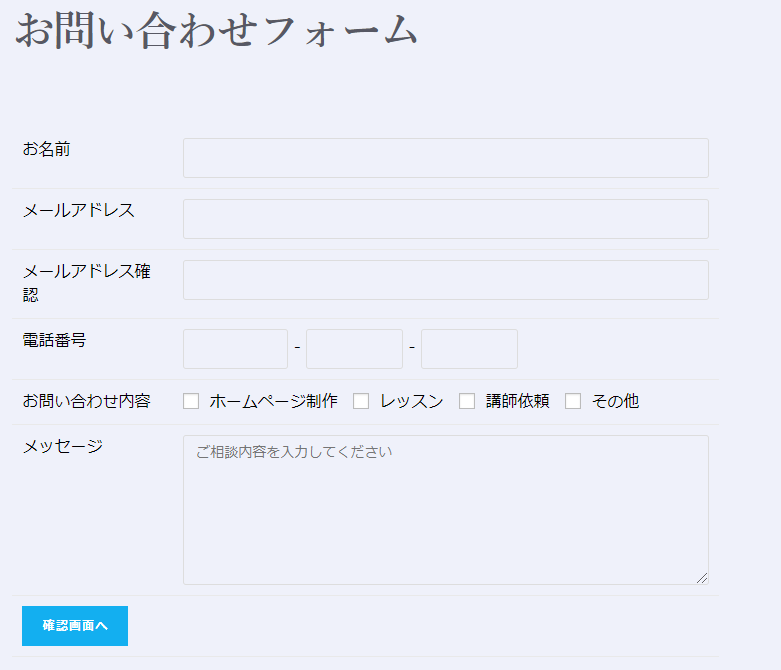
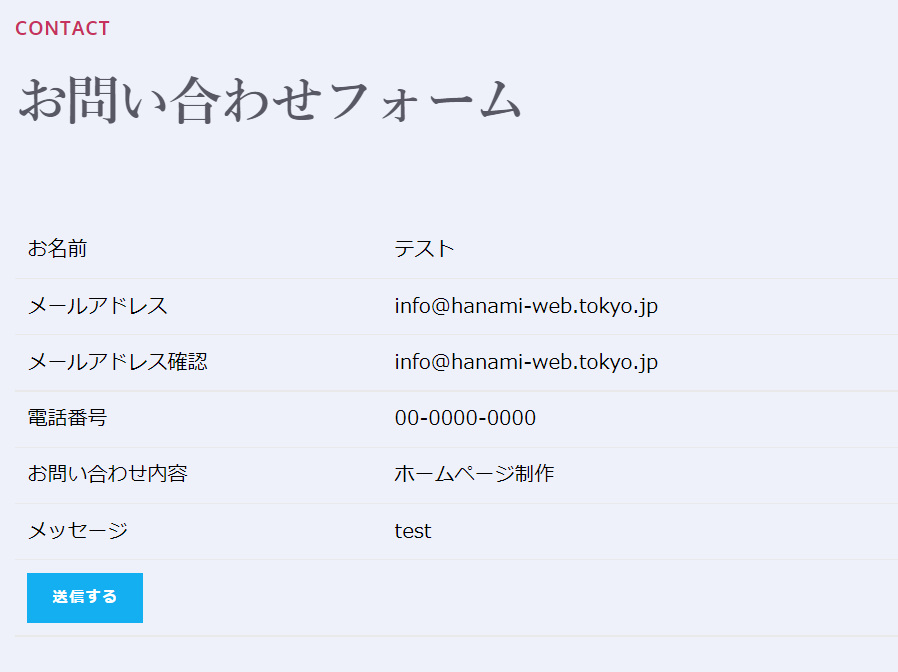
Inquiry form display example
The screen that is output after entering the shortcode looks like this.
Since it was created using a table, it is divided into items on the left and input fields on the right.
Also, suddenly instead of a submit button, I see a confirm button.
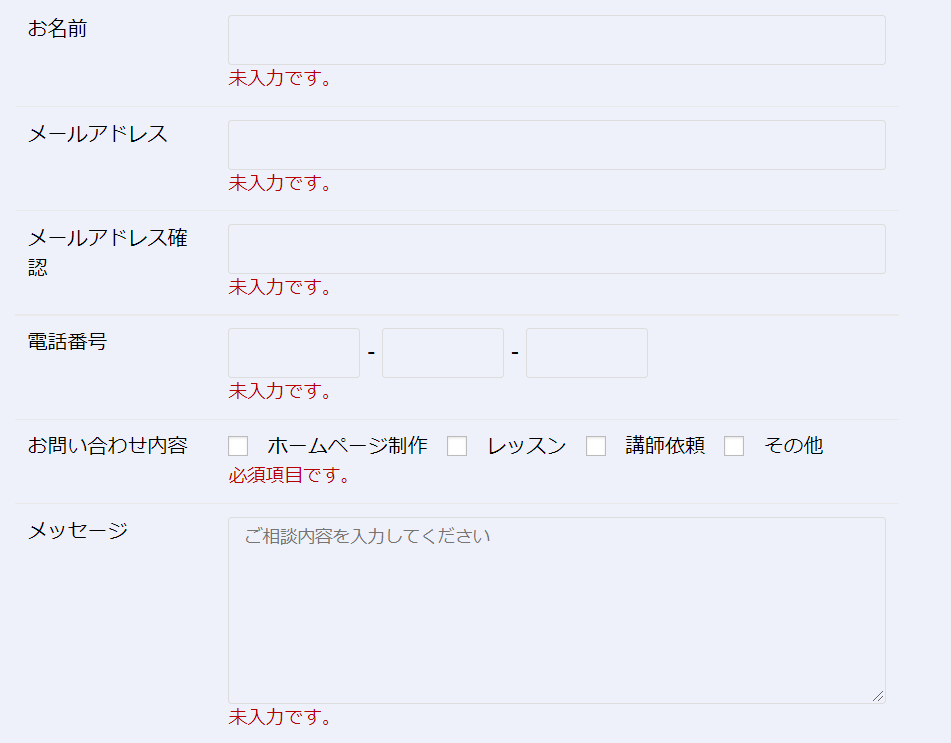
Since validation is set for required input, if you click the Confirm button with the field left blank, an error will be displayed.
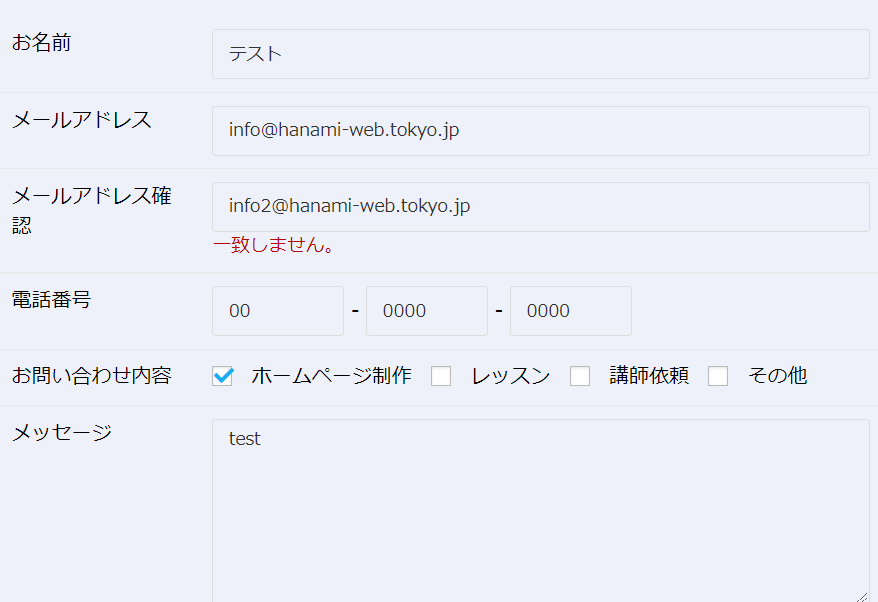
The email address verification setup is also successful.
Since the confirmation page URL is set to blank, the inquiry form will be switched to the confirmation page.
When you click Send, a completion message will appear on the screen to let you know what you have done.
summary
I think MW WP Form is the only free plugin that can implement the typical contact form flow in Japan.
- Email address verification input field
- Display confirmation page of inquiry form
I recommend it to anyone who wants to!
Released as soon as the next morning! Weekends and holidays are also available!
Super rush website creation plan
We offer a rush website creation plan for those who need a website in a hurry!
We can publish your content as soon as the next morning, even on weekends and holidays! If you have any questions, please check the details below!

Latest Articles


Error message: Allowed memory size of 268435456 bytes exhausted (tried to allocate 14684160 bytes) Error: On Lollipop


Explaining the Meta Pixel feature of the paid version of the WordPress booking system plugin Amelia (9.x and later)