How to create a website using WordPress/How to use plugins/No-code construction blog

How to set up the certificate for the LMS plugin LearnDash
At HanamiWEB Online School,
●Ask questions in real-time in the virtual study room!
●Ask as many questions as you want via chat!
●E-learning materials that you can learn as much as you want, 24 hours a day!
All included for just 2,500 yen/month!
We explain LearnDash, a paid LMS (Learning management system) plugin that allows you to build an e-learning system using WordPress.
This time, we will explain how to set up certificates.
Certificate Settings
Upon completing the course and passing the quiz, you can receive a certificate.
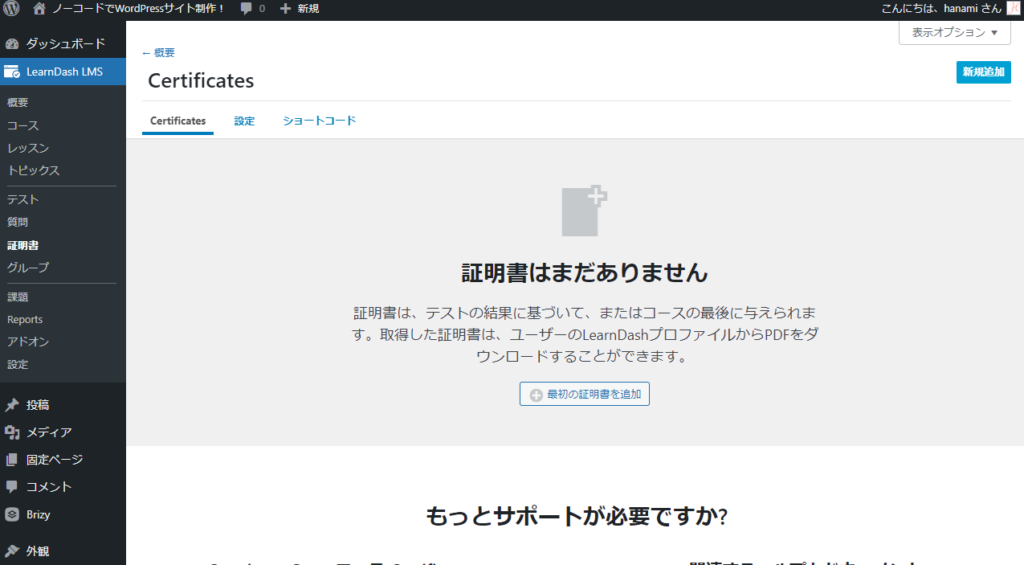
- LearnDash LMS
- certificate
This will be done.

Certificate Creation
Click [New] to launch the text editor.
- Title - This will not be displayed to students, so it is a good idea to give it a title that makes it clear which certificate it is.
- Body - You can also use shortcodes to add dynamic text, such as the student's name.
Enter the.
Dynamic Text Shortcodes
user
[usermeta field="first_name"]–Displays the user's first name[usermeta field="last_name"]– Shows the name of the user[usermeta field="display_name"]– Shows the user's full display name, which is often a combination of {first_name} and {last_name}.[usermeta field="user_login"]– Shows the user's username[usermeta field="nickname"]– Shows the user's nickname(May not be captured when user signs up)[usermeta field="user_email"]– Shows the user's email address[usermeta field="user_url"]– Shows the user's website address (May not be captured when user signs up)[usermeta field="description"]– View user bios (May not be captured when user signs up)[usermeta field="id"]– Displays the user’s unique WordPress assigned user ID(Assigned chronologically by WordPress when users register)
For courses
[courseinfo show="course_title"]–Displays the course title[courseinfo show="course_price"]– Show course prices(In the case of lump sum payment courseonly)[courseinfo show="course_price_type"]– of the specified courseAccess ModeDisplayMasu[courseinfo show="course_url"]– Shows the course URL[courseinfo show="course_points"]– Shows the total points available for the course[courseinfo show="user_course_points"]– Shows the amount of points a user has earned in a course[courseinfo show="enrolled_on"]– Shows the enrolment date of the course(This does not apply to OPEN courses)[courseinfo show="completed_on"]– Shows the date the course was completed[courseinfo show="user_course_time"]– Shows the total time spent on the course[courseinfo show="cumulative_score"]– Shows the average score for all graded parts of the course[courseinfo show="cumulative_points"]– Shows the average points earned[courseinfo show="cumulative_total_points"]– Shows the average points earned[courseinfo show="cumulative_percentage"]– Shows the average percentage of all quizzes taken in a course[courseinfo show="cumulative_timespent"]– Shows the average time spent on each part of the course[courseinfo show="aggregate_score"]– Shows the final score received in the course[courseinfo show="aggregate_points"]– Shows the total points earned on the course[courseinfo show="aggregate_total_points"]– Shows the total points earned on the course[courseinfo show="aggregate_percentage"]– Shows the total percentage score of all quizzes taken as part of the course[courseinfo show="aggregate_timespent"]– Shows the total time spent on quizzes across the course
for test
[quizinfo show="score"]– Shows the score you received for that quiz[quizinfo show="count"]– Shows the number of questions in a quiz[quizinfo show="pass"]– Shows you the score you need to pass the quiz[quizinfo show="timestamp"]– Shows the date and time the quiz was completed[quizinfo show="points"]– Shows the points received by the user in the quiz[quizinfo show="total_points"]– Shows the total points you can receive in a particular attempt[quizinfo show="percentage"]– Shows the percentage of the grade a user received in a quiz[quizinfo show="quiz_title"]– Shows the name of the quiz[quizinfo show="course_title"]– displays the name of the course the quiz is associated with[quizinfo show="timespent"]– Shows the time spent taking the quiz
group
[groupinfo show="group_title"]– Shows the group title[groupinfo show="group_url"]– Show the group URL[groupinfo show="group_price_type"]– Shows the access mode of the group[groupinfo show="group_price"]– Show group prices[groupinfo show="group_users_count"]– Shows the number of group subscribers[groupinfo show="group_courses_count"]– Shows the number of courses in a group[groupinfo show="user_group_status"]– Shows group progress status for users[groupinfo show="enrolled_on"]– Shows the date the user joined the group[groupinfo show="completed_on"]– Shows the date when a user completed all courses assigned to a group[groupinfo show="percent_completed"]– Shows the scores achieved in the group's courses
background image
It is also possible to set an image as the eye-catching image.

Certificate File Format
You can set the PDF file size and orientation.

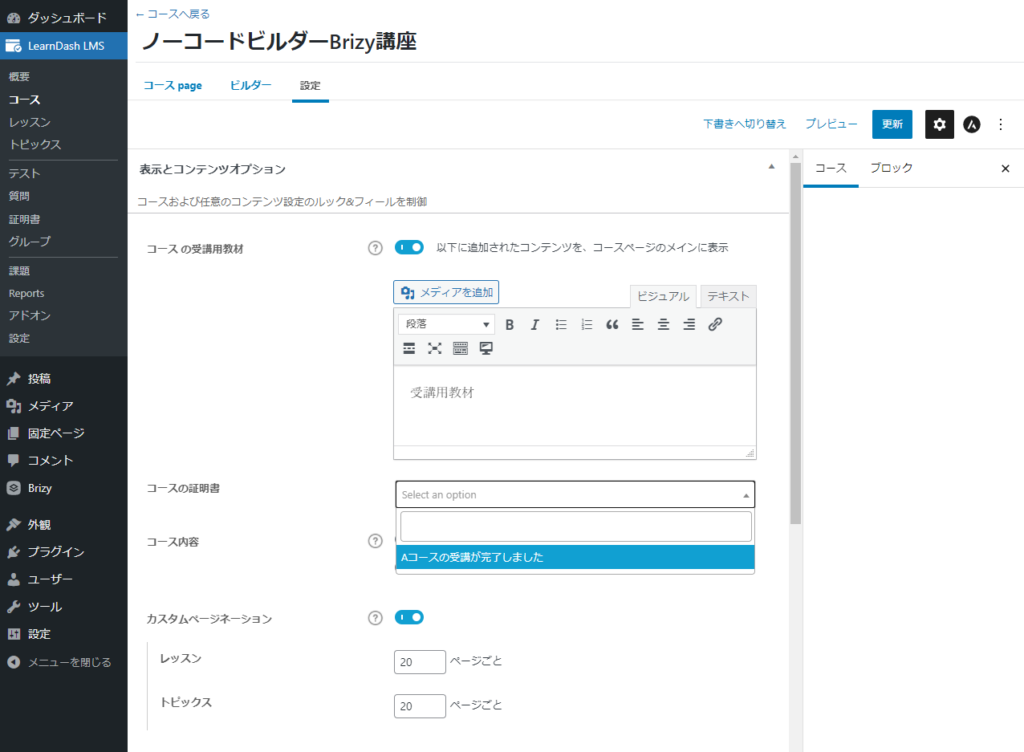
How to link a certificate to a course
- LearnDash LMS
- course
- Click the title or edit text of the course you want to set
- setting
- Course Certificates
Select the certificate you created.

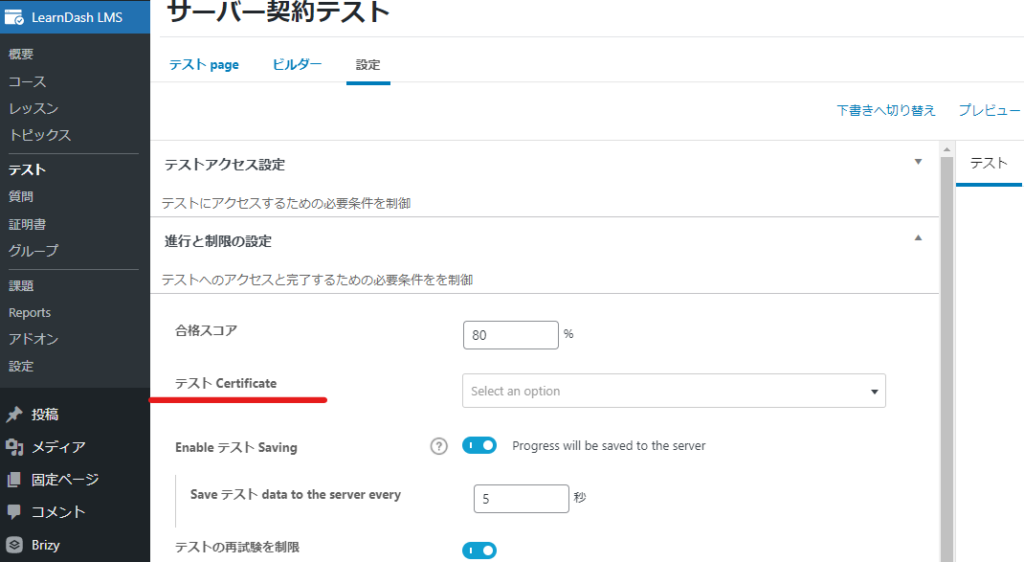
How to link certificates to tests
- LearnDash LMS
- test
- Click the title or edit text of the test you want to configure.
- setting
- Test Cirtificate
and set it up.

How to check the certificate you have set
It looks like the way to do this is to set up a certificate for a simple test and then check that it passes.
I created this test!

Select the correct answer to complete the test.
Click [Print certificate] to print a PDF file.

Released as soon as the next morning! Weekends and holidays are also available!
Super rush website creation plan
We offer a rush website creation plan for those who need a website in a hurry!
We can publish your content as soon as the next morning, even on weekends and holidays! If you have any questions, please check the details below!
Latest Articles


