How to create a website using WordPress/How to use plugins/No-code construction blog


[Diagrams & Video Explanation] Simple Memberships Online Membership Site/Online Salon Creation Plugin ~ Stripe SCA Compliant Subscription Purchase Button Setup ~
At HanamiWEB Online School,
●Ask questions in real-time in the virtual study room!
●Ask as many questions as you want via chat!
●E-learning materials that you can learn as much as you want, 24 hours a day!
All included for just 2,500 yen/month!
A WordPress teacher will carefully explain how to set up Simple Memberships, which allows you to easily create an online membership site or online salon using WordPress and create content exclusive to members!
This time, we will be looking at how to set up Stripe's SCA-compliant subscription purchase button.
The normal subscription purchase button settings are
[Diagrams & Video Explanation] Simple Memberships Online Membership Site/Online Salon Creation Plugin ~ Stripe Subscription Purchase Button Settings ~
What is SCA Compliance?
It seems to be a payment method that follows the latest online rules and regulations regarding the collection of information. It seems to be in compliance with the European payment service standards, and it is a more secure payment method than regular payments.
Also known as Strong Customer Authentication, this is a requirement of the EU Revised Directive for payment service providers (such as Stripe) in the European Economic Area.
https://simple-membership-plugin.com/sca-compliant-stripe-subscription-button/
Obtaining a Stripe API key
Get an API key from Sttipe. How to get it
[Diagrams & Video Explanation] Simple Memberships Online Membership Site/Online Salon Creation Plugin ~ Stripe Payment API Creation ~
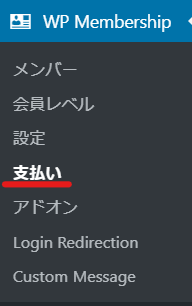
Go to your payment settings
Click [WP Membership] > [Payment].
Stripe SCA Subscription
Select [Stripe SCA Subscription] and click [Create].

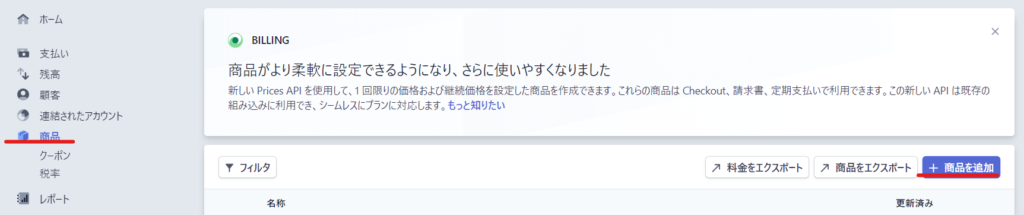
Register a subscription product with Stripe
You need to register a recurring payment product in the Stripe dashboard.
[Products] > [Add product]
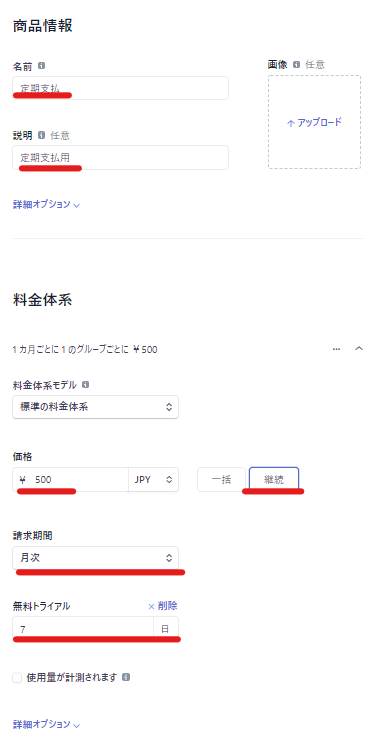
- name
- Description (optional)
- price
- continuation
- Billing Period
- Free trial (optional)
Enter the details and click on the Add Product button.
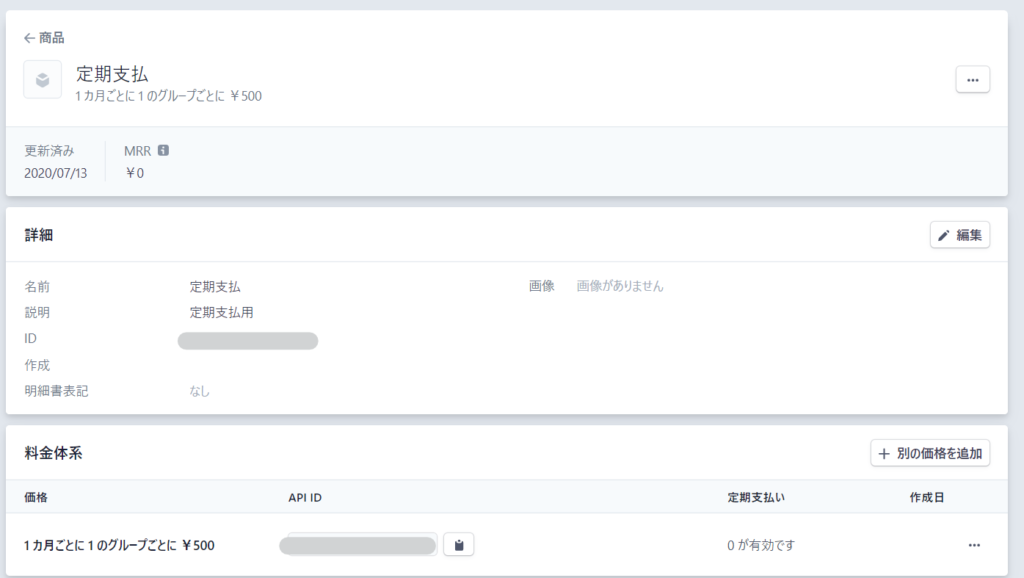
Get ID
An ID was issued to enter into the Simple Membership settings. Enter it in the [Stripe Plan ID] field.
Two types of IDs will be issued: [prod_xxxxxx] in the ID section of the details, and [price_xxxxxx] in the API ID section of the pricing structure.
The ID to be used is the one that starts with [price_xxxxxx] in the APP ID details.
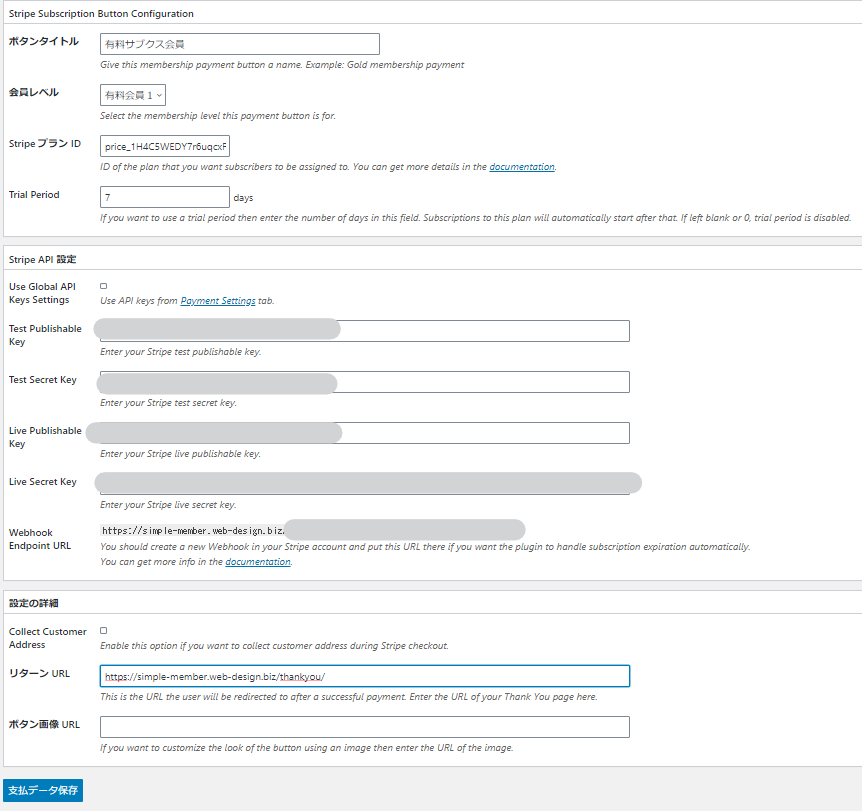
Enter required information
- Button Title
- Membership Levels
- Stripe Plan ID
- Trial Period
- Use Global API Keys Settings
- Test Publishable Key
- Test Secret Key
- Live Publishable Key
- Live Secret Key
- Webhook Endpoint URL
- Collect Customer Address
- Return URL
- Button Image URL
We will set up the following.
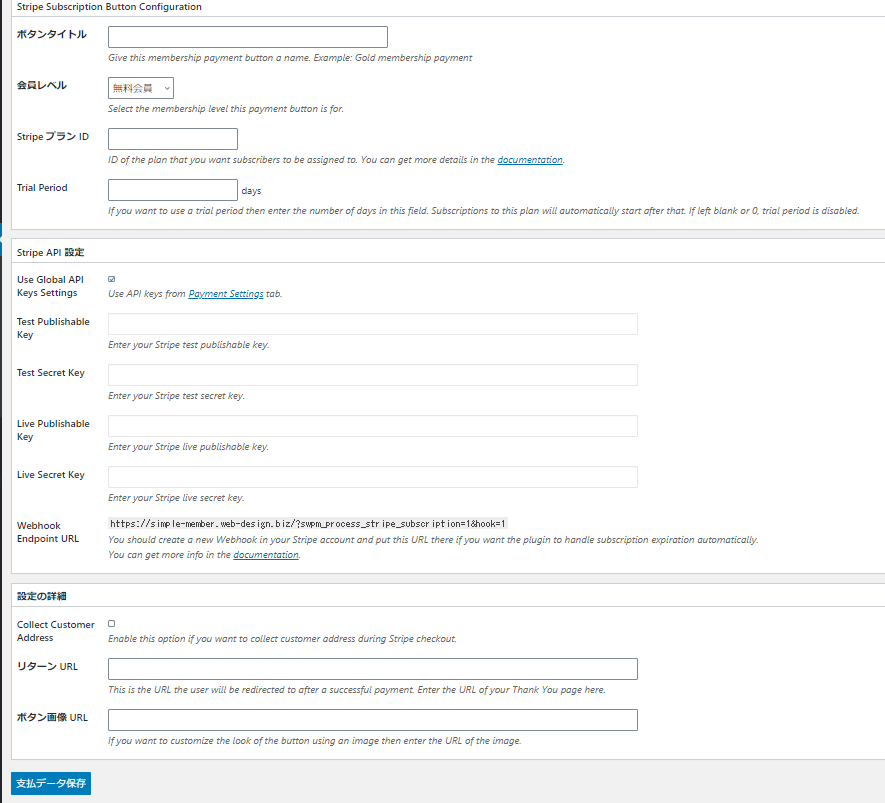
Button Title
Give the button a title so that you can tell what it is for. For example, Paid Member 1.
Membership Levels
Select a membership level from the list of membership levels you have created.
Stripe Plan ID
Enter the ID obtained during the registration process for your subscription product in Stripe.
Enter an ID that starts with [price_xxxxxx].
Trial Period
If you want to set a trial period, enter the number of days.
Use Global API Keys Settings
Uncheck the box to use the API key you created. If you haven't obtained an API key yet, please refer to the following!
[Diagrams & Video Explanation] Simple Memberships Online Membership Site/Online Salon Creation Plugin ~ Stripe Payment API Creation ~
Test Publishable Key
Enter your test releasable key.
Test Secret Key
Enter the test secret key.
Live Publishable Key
Enter your production publishable key.
Live Secret Key
Enter the production secret key.
Webhook Endpoint URL
Configure the Webhook Endpoint URL in Stripe.
Adding an endpoint with WebHook
Stripe dashboard [Developer] > [WebHool] > [Add Enpoint]
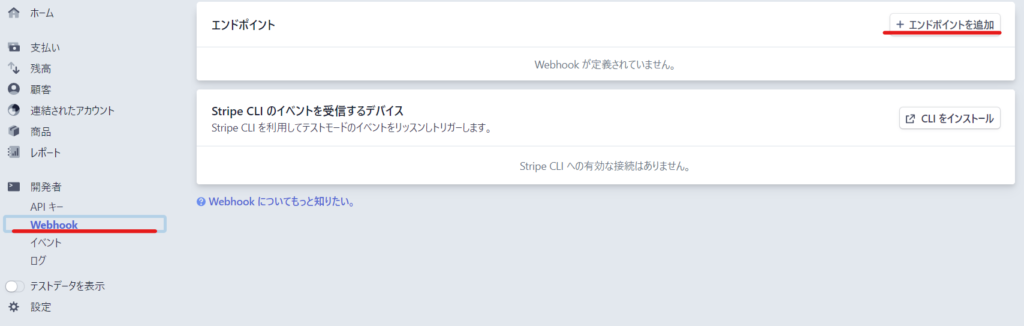
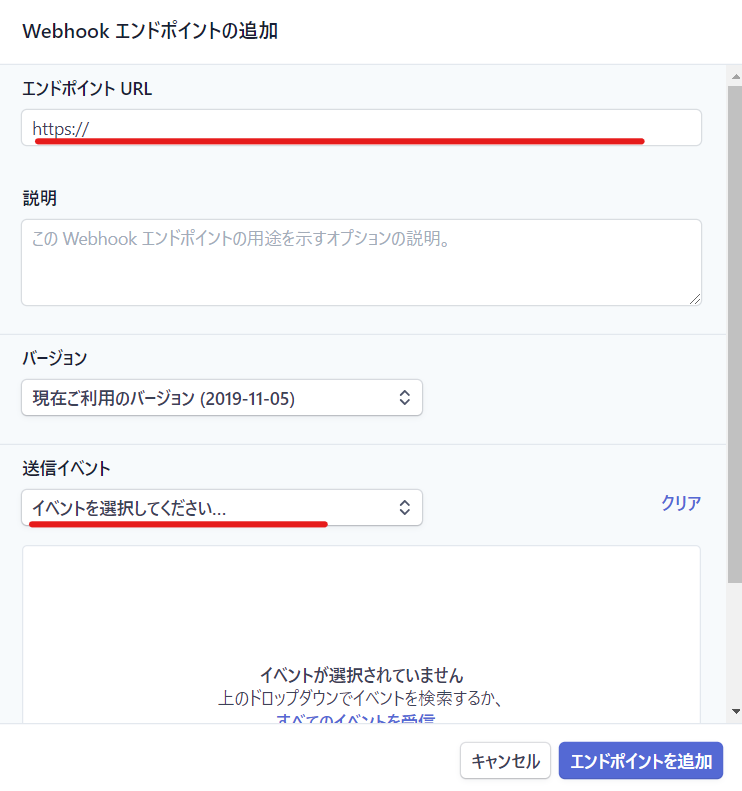
Enter the Simple Membership Webhook Endpoint URL
The URL listed below

Enter it in [Endpoint URL].
Select [invoice.payment_succeeded] for [Send Event] and click [Send Endpoint].
In the webhook settings
If you set [charge] or [customer], you can automatically cancel your Stripe subscription using the cancel membership button.
The unsubscribe button shortcode is
[swpm_stripe_subscription_cancel_link]
Collect Customer Address
Check this box if you want customers to enter their address when making a payment via Stripe.
Return URL
If you want to display a thank you page after payment is completed, set this. If you don't want to display one, leave it blank. For details,
[Illustrated & Video Explanation] Simple Memberships Online Membership Registration Plugin ~ How to Create a PayPal Button [One-Time Payment] ~
Button Image URL
You can set an image for the purchase button. For details,
Introducing a setting example
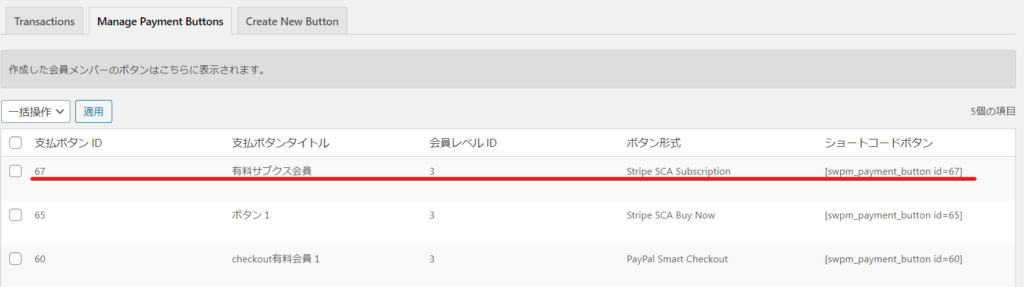
Your Stripe SCA Buy Now button has been created
The Stripe button you just created is listed in [Manage Payment Button]. Use [Shortcode] to place the Stripe button on the paid membership registration page.
In my case, [swpm_payment_button id=67] is the shortcode to display the button I created.
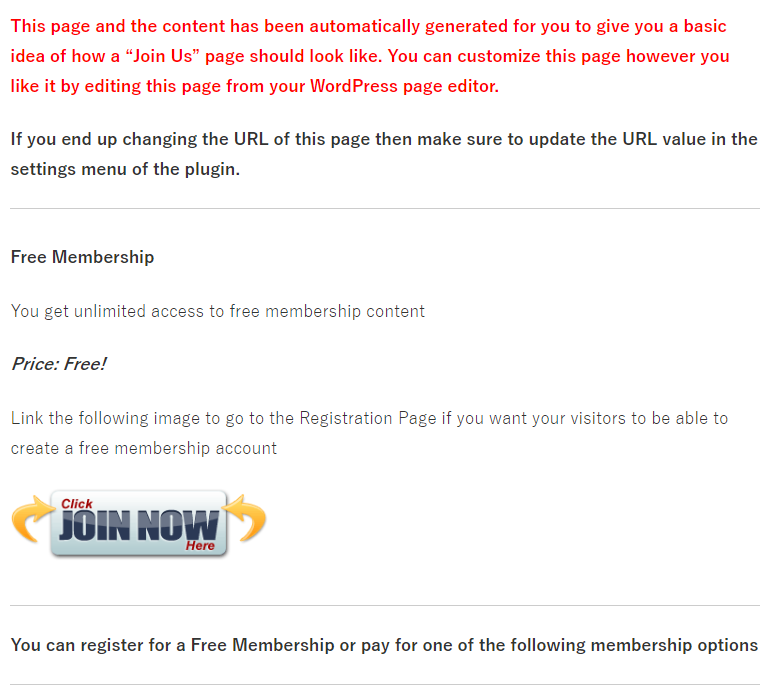
Automatically created page [Join Us]
Activate the Simple member ship plugin and paste the shortcode into the [Join Us] page, one of the pages that is automatically generated.

Delete all default sales text and change it to sales text that suits your service.
Insert the shortcode in the text like this:
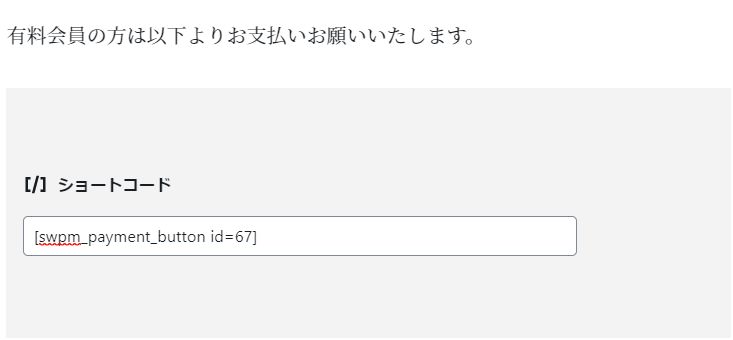
This makes it easy to set up a purchase button.
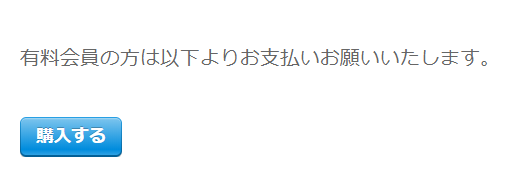
Click to buy
I was taken to the Stripe payment page. In Stripe, the color setting is pink, so in my case it is pink.
- email address
- Card Information
- Cardholder Name
- Country
The system is set up so that payment cannot be made unless you enter the above information.
Once payment is complete, you will be redirected to the site or to a page that has been set as a redirect.
There was also a button called GPay. It is linked to your Google account, so if you have credit card information saved in your email address or Google account, you can make payments without entering any information.
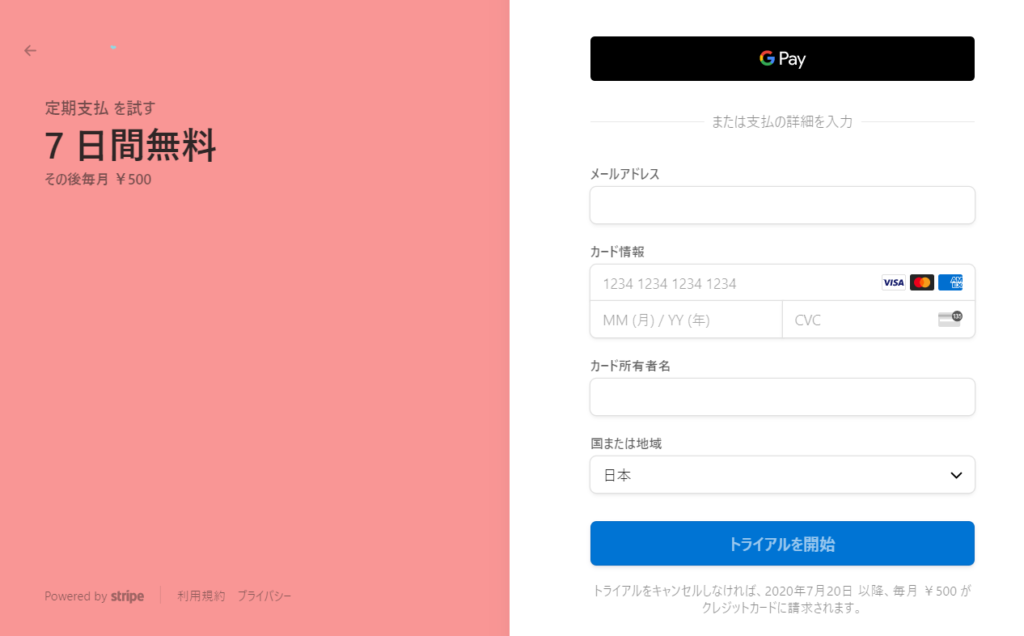
Since I had set up a 7-day trial when setting up my recurring payment product in Stripe, it says "7 days free."
This concludes our introduction to how to create a Stripe SCA Buy Now button.
- Stripe SCA Buy Now - SCA Compliant Buy Buttons
- Stripe Legacy Buy Now (deprecated) - Purchase button
- Stripe Legacy Subscription (deprecated) -Subscription button
can be set.
Released as soon as the next morning! Weekends and holidays are also available!
Super rush website creation plan
We offer a rush website creation plan for those who need a website in a hurry!
We can publish your content as soon as the next morning, even on weekends and holidays! If you have any questions, please check the details below!

Latest Articles

How to Enhance EEAT with WordPress | Settings and Design Improvements Necessary for AI-Driven Traffic


[2026 Latest] How to check the number of visits from generated AI using GA4's exploration function

Error message: Allowed memory size of 268435456 bytes exhausted (tried to allocate 14684160 bytes) Error: On Lollipop